·2204 words·11 mins

This is the story about how I built MacThrottle.
I’ve been very happy with my M2 MacBook Air for the past few years. However, when using an external display, especially a very demanding one like a 4K 120Hz display, I’ve noticed it started struggling more. Since it lacks fans, you can’t hear it struggling, but you can feel it as everything becomes very slow or unresponsive: that’s when thermal throttling kicks in.
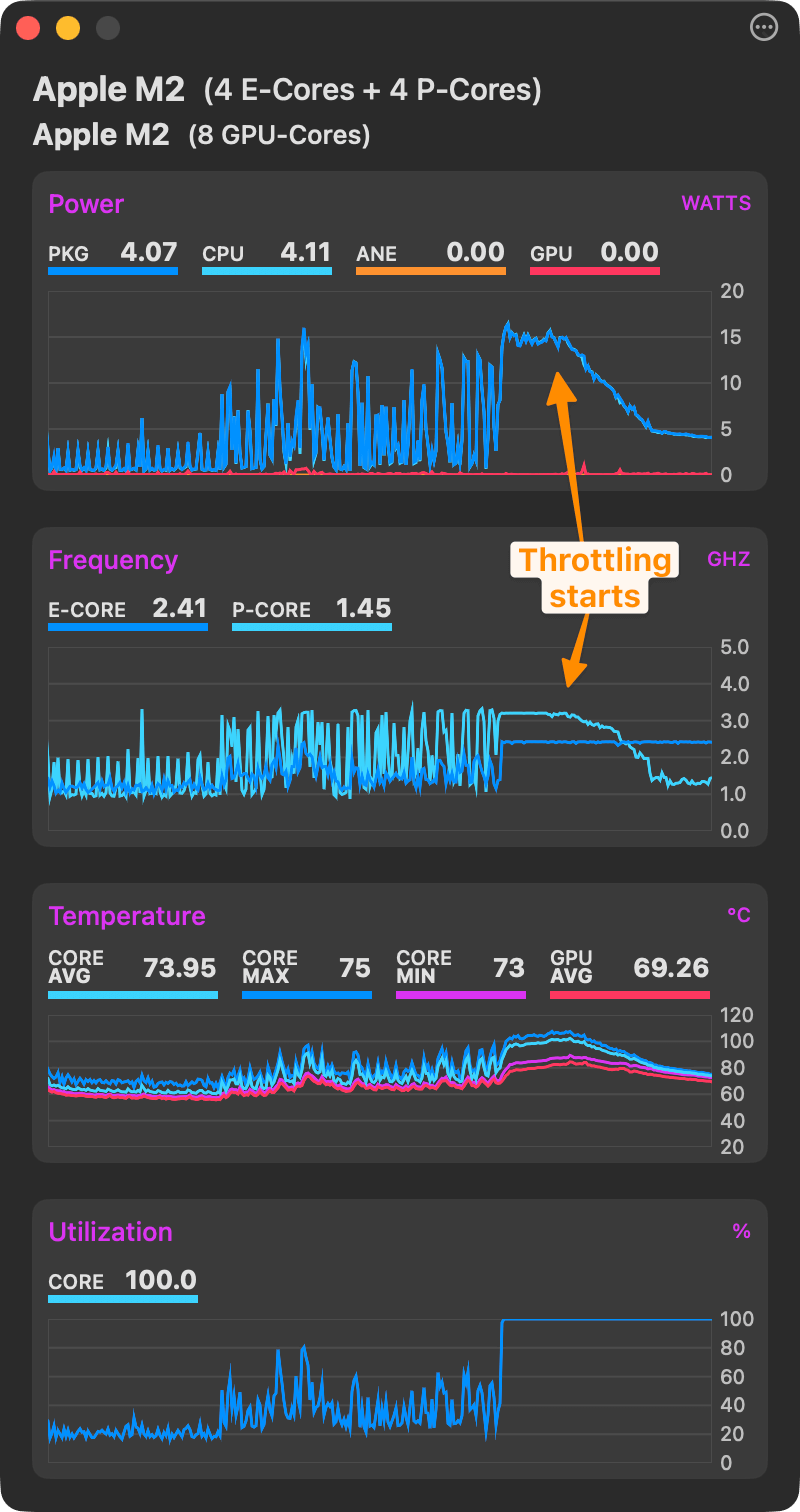
I know it’s thermal throttling because I can see in iStat Menus that my CPU usage is 100% while the power usage in watts goes down.
It’s even more obvious with MX Power Gadget: You can see the power usage and frequency of the performance core dropping, as usage keeps being 100%:
I’ve also hit thermal throttling with my work MacBook Pro. It’s the 14" M4 Max variant, which is the worst variant because the thermal envelope of the 14" is too small for the max output for the M4 Max. On my previous 14" M1 Pro MacBook Pro, I’ve never even heard the fans in 3 years…
That being said, I still love Apple Silicon for the performance and power usage, it’s still a dramatic improvement over the Intel days. 🫶
Anyway, I wanted to know: is there a way to tell if the Apple Silicon SoC is thermal throttling, that is not based on heuristics like in my screenshot?
Getting the thermal state programmatically #
This was a wilder ride than I expected. It’s possible to know programmatically if the Mac is throttled, because macOS exposes this in various but inconsistent ways.
The approach that Apple recommends is to use ProcessInfo.thermalState from Foundation:
➜  ~ swift -e 'import Foundation; print(["nominal", "fair", "serious", "critical"][ProcessInfo.processInfo.thermalState.rawValue])'
nominal
Sounds good, right? However, I knew that another tool could provide this information, though it needed root: powermetrics.
➜  ~ sudo powermetrics -s thermal

Password:
Machine model: Mac14,2
OS version: 25B78
Boot arguments:
Boot time: Sun Nov 23 10:19:29 2025


*** Sampled system activity (Wed Dec 17 09:48:34 2025 +0100) (5001.07ms elapsed) ***


**** Thermal pressure ****

Current pressure level: Nominal


*** Sampled system activity (Wed Dec 17 09:48:39 2025 +0100) (5001.25ms elapsed) ***


**** Thermal pressure ****

Current pressure level: Nominal
(yes the output has that many newlines)
Both report the pressure level to be “nominal”, they must be the same…right?
After running a few stress tests stress-ng --cpu 0 -t 600, I started to see the two values diverge!
For some reason, the granularity is different between ProcessInfo.thermalState and powermetrics. They have a different amount of possible states and they don’t line up.
Here is my empirical experience:
ProcessInfo.thermalState | powermetrics |
|---|---|
| nominal | nominal |
| fair | moderate |
| fair | heavy |
I never managed to hit these states, so I don’t know if they match, but they’re technically defined:
ProcessInfo.thermalState | powermetrics |
|---|---|
| serious | trapping |
| critical | sleeping |
In practice, when my Mac starts getting hot, from the powermetrics perspective it goes into moderate, and when it starts throttling, it goes into heavy. The problem is that with ProcessInfo, both are covered by the fair state, so it’s not really useful to know when the Mac is actually throttling. ☹️
I thought maybe this was an iOS vs macOS thing? But Apple references it in the macOS docs as well. Maybe it was more consistent on Intel Macs?
I stumbled upon this article from Dave MacLachlan, a Googler working on Apple stuff, from 2020. I learned that there are other CLI tools to get thermal data, but they don’t seem to work on my Apple Silicon MacBook:
➜ sudo thermal levels
Thermal levels are unsupported on this machine.
➜ sudo pmset -g thermlog
Note: No thermal warning level has been recorded
Note: No performance warning level has been recorded
Note: No CPU power status has been recorded
^C
But the most interesting thing I learned is that the data powermetrics shows is actually coming from thermald. And thermald writes the current thermal pressure to the Darwin notification system (notifyd)!
➜ notifyutil -g com.apple.system.thermalpressurelevel

com.apple.system.thermalpressurelevel 0
The various levels are defined in OSThermalNotification.h according to the article. Indeed:
➜  ~ xcrun --sdk macosx --show-sdk-path
/Applications/Xcode.app/Contents/Developer/Platforms/MacOSX.platform/Developer/SDKs/MacOSX26.2.sdk
➜  ~ SDK="$(xcrun --sdk macosx --show-sdk-path)"
➜  ~ find "$SDK/usr/include" -name 'OSThermalNotification.h'
/Applications/Xcode.app/Contents/Developer/Platforms/MacOSX.platform/Developer/SDKs/MacOSX26.2.sdk/usr/include/libkern/OSThermalNotification.h
➜  ~ head -n 52 "/Applications/Xcode.app/Contents/Developer/Platforms/MacOSX.platform/Developer/SDKs/MacOSX26.2.sdk/usr/include/libkern/OSThermalNotification.h"
/*
 * Copyright (c) 2007 Apple Inc. All rights reserved.
 *
 * @APPLE_LICENSE_HEADER_START@
 *
 * This file contains Original Code and/or Modifications of Original Code
 * as defined in and that are subject to the Apple Public Source License
 * Version 2.0 (the 'License'). You may not use this file except in
 * compliance with the License. Please obtain a copy of the License at
 * http://www.opensource.apple.com/apsl/ and read it before using this
 * file.
 *
 * The Original Code and all software distributed under the License are
 * distributed on an 'AS IS' basis, WITHOUT WARRANTY OF ANY KIND, EITHER
 * EXPRESS OR IMPLIED, AND APPLE HEREBY DISCLAIMS ALL SUCH WARRANTIES,
 * INCLUDING WITHOUT LIMITATION, ANY WARRANTIES OF MERCHANTABILITY,
 * FITNESS FOR A PARTICULAR PURPOSE, QUIET ENJOYMENT OR NON-INFRINGEMENT.
 * Please see the License for the specific language governing rights and
 * limitations under the License.
 *
 * @APPLE_LICENSE_HEADER_END@
 */

#ifndef _OSTHERMALNOTIFICATION_H_
#define _OSTHERMALNOTIFICATION_H_

#include <_bounds.h>
#include <sys/cdefs.h>
#include <Availability.h>
#include <TargetConditionals.h>

_LIBC_SINGLE_BY_DEFAULT()

/*
**  OSThermalNotification.h
**
**  Notification mechanism to alert registered tasks when device thermal conditions
**  reach certain thresholds. Notifications are triggered in both directions
**  so clients can manage their memory usage more and less aggressively.
**
*/

__BEGIN_DECLS

/* Define pressure levels usable by OSThermalPressureLevel */
typedef enum {
#if TARGET_OS_OSX || TARGET_OS_MACCATALYST
        kOSThermalPressureLevelNominal = 0,
        kOSThermalPressureLevelModerate,
        kOSThermalPressureLevelHeavy,
        kOSThermalPressureLevelTrapping,
        kOSThermalPressureLevelSleeping
The funny thing is that OSThermalNotification.h is barely referenced anywhere, there are only three pages of Google results. It seems to be used in Bazel for example. That post was a big help.
What’s great about this approach is that it doesn’t require root! I can subscribe to the notification system for the com.apple.system.thermalpressurelevel event to get the (good) thermal state!
Here is a snippet to get it in Swift:
import Foundation

@_silgen_name("notify_register_check")
private func notify_register_check(
  _ name: UnsafePointer<CChar>, _ token: UnsafeMutablePointer<Int32>
) -> UInt32
@_silgen_name("notify_get_state")
private func notify_get_state(_ token: Int32, _ state: UnsafeMutablePointer<UInt64>) -> UInt32
@_silgen_name("notify_cancel")
private func notify_cancel(_ token: Int32) -> UInt32

let notifyOK: UInt32 = 0
let name = "com.apple.system.thermalpressurelevel"

var token: Int32 = 0
let reg = name.withCString { notify_register_check($0, &token) }
guard reg == notifyOK else { fatalError("notify_register_check failed: \(reg)") }
defer { _ = notify_cancel(token) }

var state: UInt64 = 0
let got = notify_get_state(token, &state)
guard got == notifyOK else { fatalError("notify_get_state failed: \(got)") }

let label =
  switch state {
  case 0: "nominal"
  case 1: "moderate"
  case 2: "heavy"
  case 3: "trapping"
  case 4: "sleeping"
  default: "unknown(\(state))"
  }

print("\(state) \(label)")
Prints:
➜  ~ swift thermal.swift
0 nominal
Now that I had a useful value to work with, it was time to build the app.
Building MacThrottle #
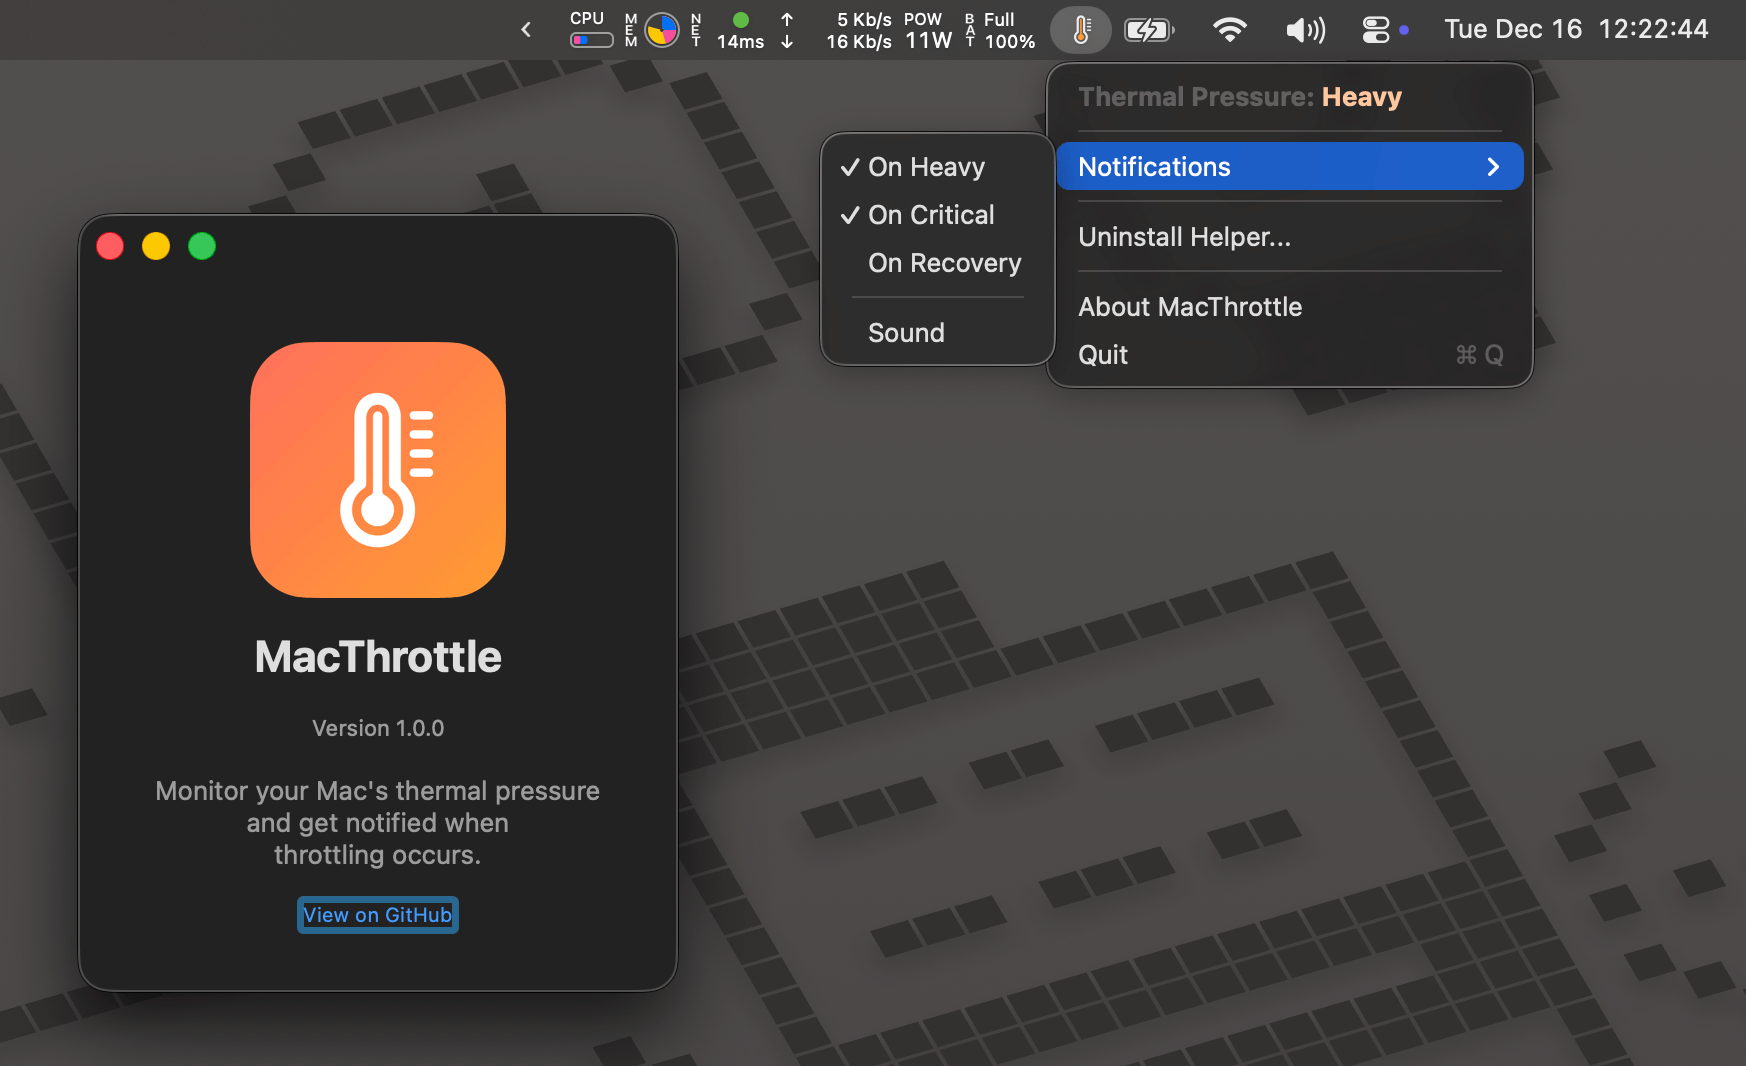
Armed with Opus 4.5, I set out to build a little menu bar app where I could see, at a glance, if my Apple Silicon die was trying to save itself from crossing 110°C. I called it MacThrottle.
I built a simple SwiftUI app for the menu bar that shows me the status in a superbly original thermometer icon. The thermometer is filled depending on the thermal state, and its color changes from green to red. I have like 20 menu bar icons and they’re all monochromatic, so the color in the thermometer is very subtle to keep things consistent.
The app is a simple SwiftUI app. Apple provides a scene called MenuBarExtra to render a menu bar control. It was simpler than I expected! To make it a pure menu bar app with no dock icon, you just need to set LSUIElement to true in Info.plist.
First approach: root helper for powermetrics #
I explained the various approaches to get the thermal pressure level in the previous section. But when I was building the app, I discovered later on that thermald was publishing the thermal state to notifyd. So at first, I thought I had to use powermetrics to get useful thermal state changes. Since that unfortunately requires root access, the app needed root access too.
To reduce the scope of what runs as root, I did not run the app itself as root. Instead, the app does not work by default, but it gives you the option to install a helper. It does this through an AppleScript with administrator privileges to prompt for access.
The helper is just a bash script run as a launchd daemon:
➜  ~ cat /Library/LaunchDaemons/com.macthrottle.thermal-monitor.plist
<?xml version="1.0" encoding="UTF-8"?>
<!DOCTYPE plist PUBLIC "-//Apple//DTD PLIST 1.0//EN" "http://www.apple.com/DTDs/PropertyList-1.0.dtd">
<plist version="1.0">
<dict>
    <key>Label</key>
    <string>com.macthrottle.thermal-monitor</string>
    <key>ProgramArguments</key>
    <array>
        <string>/usr/local/bin/mac-throttle-thermal-monitor</string>
    </array>
    <key>RunAtLoad</key>
    <true/>
    <key>KeepAlive</key>
    <true/>
</dict>
</plist>
➜  ~ cat /usr/local/bin/mac-throttle-thermal-monitor
#!/bin/bash
OUTPUT_FILE="/tmp/mac-throttle-thermal-state"

while true; do
    THERMAL_OUTPUT=$(powermetrics -s thermal -n 1 -i 1 2>/dev/null | grep -i "Current pressure level")

    if echo "$THERMAL_OUTPUT" | grep -qi "sleeping"; then
        PRESSURE="sleeping"
    elif echo "$THERMAL_OUTPUT" | grep -qi "trapping"; then
        PRESSURE="trapping"
    elif echo "$THERMAL_OUTPUT" | grep -qi "heavy"; then
        PRESSURE="heavy"
    elif echo "$THERMAL_OUTPUT" | grep -qi "moderate"; then
        PRESSURE="moderate"
    elif echo "$THERMAL_OUTPUT" | grep -qi "nominal"; then
        PRESSURE="nominal"
    else
        PRESSURE="unknown"
    fi

    echo "{\"pressure\":\"$PRESSURE\",\"timestamp\":$(date +%s)}" > "$OUTPUT_FILE"
    chmod 644 "$OUTPUT_FILE"
    sleep 10
done
The bash script writes the thermal state to a file every few seconds and the app reads it every few seconds!
Using the thermald IPC notifications #
Once I discovered I could use the notification system without elevated privileges, I replaced the helper by code in the app to read the value from the notification system directly. Much simpler 🎉
Temperature and fans #
I wanted to show the temperature and fan speed (when supported) in a little graph in the menu bar app. This would allow me to correlate the thermal state with increased temperature, for example.
Again, there are multiple APIs to read the temperature. First, I started using an undocumented API from IOKit, but I realised I was getting ~80ºC max, while iStat Menus or MX Power Gadget would show >100ºC.
Stats, the open source alternative to iStat Menus, helped me use the SMC instead and get the correct values. But the SMC is a much more unstable API because each SoC has different keys to access the temperature data:
private let m1Keys = ["Tp01", "Tp05", "Tp09", "Tp0D", "Tp0H", "Tp0L", "Tp0P", "Tp0X", "Tp0b"]
private let m2Keys = ["Tp01", "Tp05", "Tp09", "Tp0D", "Tp0X", "Tp0b", "Tp0f", "Tp0j"]
private let m3Keys = ["Tf04", "Tf09", "Tf0A", "Tf0B", "Tf0D", "Tf0E", "Tf44", "Tf49", "Tf4A", "Tf4B"]
Though the M3 keys seem to work on my M4 Max work MacBook Pro…
I ended up using SMC first to get the accurate temperature and fall back to IOKit if SMC doesn’t work.
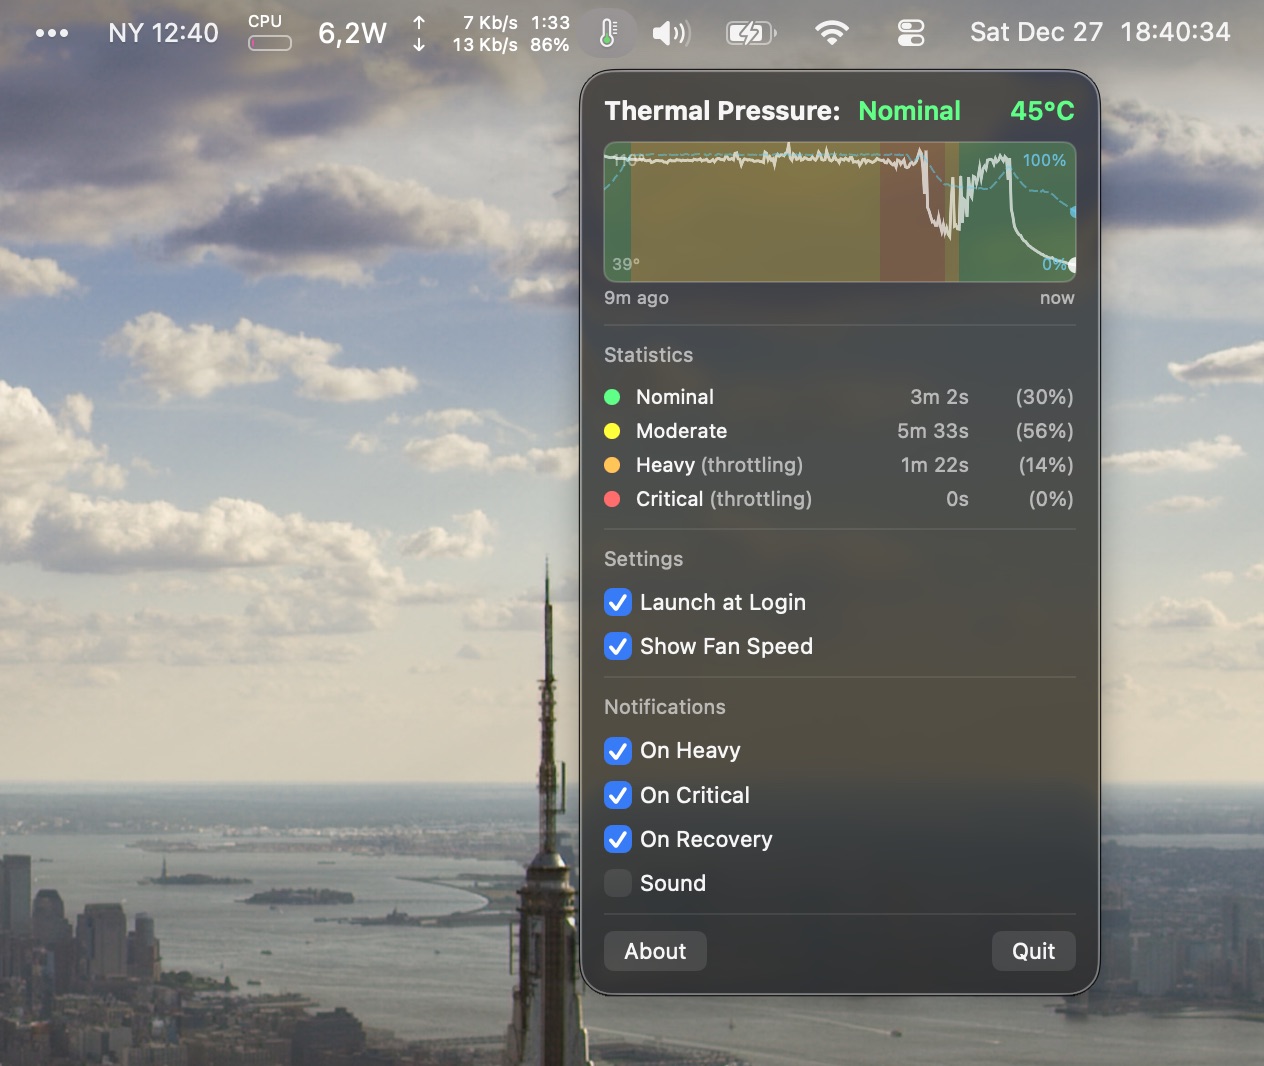
For the graph, I wanted a compact visualization that would show me the thermal history at a glance.
The graph packs three layers of information:
- Colored background segments for each thermal state (green for nominal, yellow for moderate, orange for heavy, red for critical)
- A solid line for CPU temperature with a dynamic Y-axis that adjusts to actual values
- A dashed cyan line for fan speed percentage (on Macs that have fans)
I didn’t want to spend too much time making a super fancy graph system. Since it polls every two seconds, the graph gets very busy after a while. So I decided to keep it down to 10 minutes, since the thermal state history is mostly interesting short-term.
I also added hover tooltips using onContinuousHover.
When the system was under load, I noticed the graph hovering was not very smooth on my 120Hz display. I found out I can add .drawingGroup to my SwiftUI canvas to use GPU rendering!. Indeed, I added it, and it was smooth again.
Adding macOS notifications #
I also added notifications so I get alerted when the state changes, in case I miss the menu bar icon. It can alert on specific state transitions, and optionally on recovery. This is useful to know when it’s time to kill a VS Code instance or a Docker container!

It’s true that I usually already notice when the Mac is getting slow, but sometimes the Mac gets slow when it’s swapping heavily. At least now I know when it’s just too hot.
Launching the app at Login #
Of course, I want the app to start automatically now, since it works so well!
I expected that I would need to write .plist again, but no, it’s extremely easy to prompt the user to add a “login item” as macOS calls it, using SMAppService.
SMAppService.mainApp.register()    // enable auto-start
SMAppService.mainApp.unregister()  // disable auto-start
SMAppService.mainApp.status == .enabled  // check current state
How to use it #
Since I don’t have an Apple Developer account, I can’t notarize the app, so installing it from the releases is going to require a few extra clicks in Privacy and Security.
And for Macs that disallow it entirely, building from source with Xcode is the only way. I added instructions in the README.
Hope this is useful to someone else!