Threat models
These are two threat models for which disk encryption is the answer:
-
The device is stolen or lost and its contents must remain secret.
-
The device is tampered with, and all attempts at tampering must render it unusable.
Right now, we will focus on the first threat model. It is very difficult to build a tamper-proof system, and you need to worry about tamper-proofing your hardware, depending on what kind of actor is a realistic threat.
If we want to keep data on the system secret, we must first consider which data is worth protecting. On a NetBSD system, our data can be grouped into two broad categories:
-
System files (open source software)
-
User-modified files
Does the /bin/sh executable downloaded from the NetBSD FTP server contain any sensitive information?
On a BSD system, due to the separation of the base system and packages, many root file system directories are mostly unmodified outside of upgrades. In a properly configured system, nearly all system daemons and user applications are not going to be running as root, so won’t have permission to modify or create files in /bin.
We can reasonably assume that /bin/sh is the same binary that every other NetBSD user is running. A user may even opt to make directories containing such system files read-only.
Problems with disk encryption
The operating system needs to be able to load files to boot.[citation needed] This makes "true" full disk encryption difficult to achieve without specialized hardware, since the user needs some way to enter a password or an encryption key, and can’t do so without some form of software running on their computer. NetBSD also needs to store some amount of metadata about the encrypted partition on the disk, such as information on how to generate a secure 256-bit key from a 24 character password.
It is common for Unix systems to use shared libraries, which are loaded by programs to access system functionality. If these become unavailable, for example, by /usr/lib going missing, it becomes much harder to use the system. Familiarize yourself with the standard utilities in /rescue which don’t need working shared libraries to be useful.
The cryptographic algorithms that get standardized by the US government tend to be slow when implemented in software. This carries a performance penalty. As a result, many modern CPUs include implementations of ciphers like AES in hardware. For those that don’t, there’s alternative ciphers like Adiantum.
Which directories are sensitive?
And which are necessary for the OS to load?
On a normal NetBSD system, several directories have a high chance of being modified during system operation:
-
/home- user-specific files -
/var- log files, system-wide databases (e.g. mail notifications), crash dumps… -
/root- configuration files relevant to the root user account -
/usr/pkgand/usr/local- where third-party software is installed -
/etc- init scripts, system-wide configuration for the base system
A simple approach might be to encrypt /home. However, this might not be enough for some users. Although the crash directory can be easily changed with
sysctl,
a crash dump contains a snapshot of system memory which might be sensitive. If any servers have been run on the system, the log files might be sensitive. Mail sent to users (e.g. about their interrupted vi sessions and associated backups) might reveal sensitive file names.
Some users opt for the
cgdroot
approach, which uses only a small unencrypted ramdisk to pivot to an encrypted file system. However, this modifies the system startup routines significantly and may make certain rescue options harder. So, it’s worth asking whether there’s an approach that is somewhere in the middle, and still uses the standard NetBSD installation and boot process. Many BSD systems use separate file system partitions for /usr and /var, and this is a standard configuration supported by the NetBSD installer.
/etc is a harder problem to solve, since it contains files necessary to boot the system. However, on a typical desktop system, many files in /etc remain untouched. Passwords in /etc are generally stored only in hash form, except for Wi-Fi access points and certain VPN configurations (although it’s easy to reconfigure wpa_supplicant_flags to use a different configuration file from the default one in /etc). Many configuration files are only loaded much later in the boot process, after /usr is already mounted, and can easily be replaced with symbolic links to files on another file system.
The installation process
The NetBSD installer has basic functionality, but gets the job done quickly. In this configuration, we’re going to install NetBSD to a small unencrypted root file system. When you start to ignore the growth that can occur in /usr and /var and /home, even a complete NetBSD installation with development tools included is tiny. 4 GB should be more than enough.
For example purposes, I am going to use a sparc64 virtual machine, but the process is basically the same for more mainstream CPU architectures like amd64.
The installer detects that we already have a partitioned disk. We’re going to pick the "e: Delete everything" option so we have a fresh disk to start with:
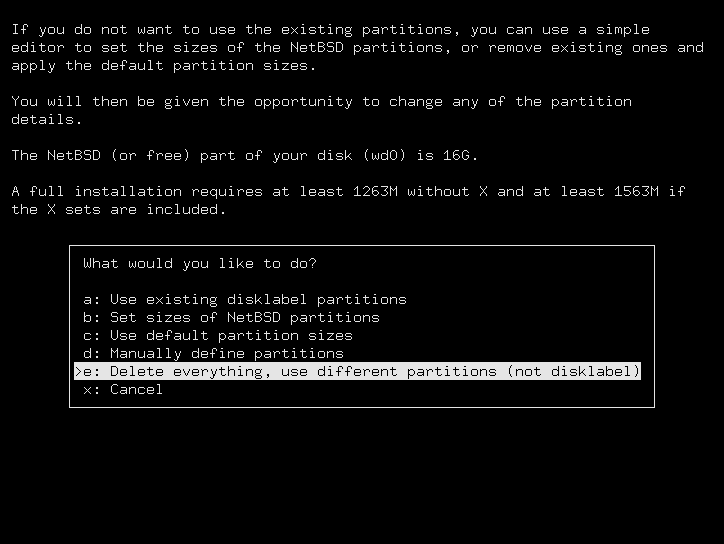
Next, we’re going to choose "Set sizes of NetBSD partitions". This will allow us to have a small root, and reserve a large encrypted partition:
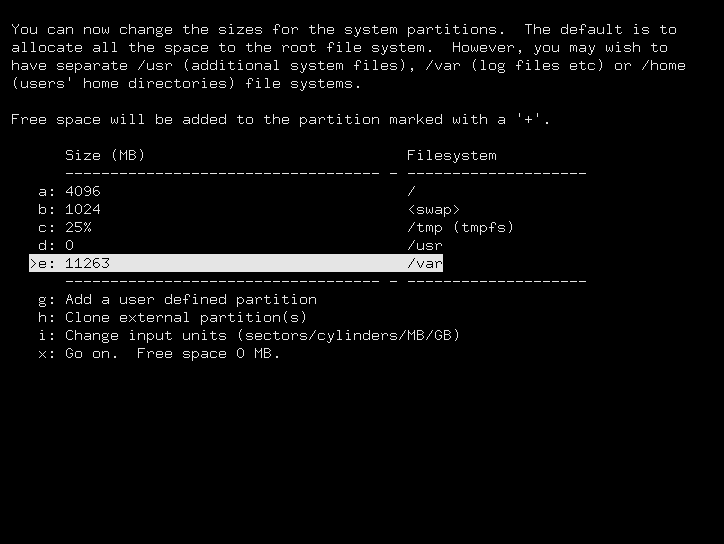
Here, I’ve decided I want a 4096 MB (4 GB) root file system, and a 11263 MB (11 GB) partition allocated for /var. Later, we’ll make /usr and /var share a disk partition, so don’t worry about this too much. Select "Go on".
On the next screen, I’ve changed the type of the secondary partition to "cgd" (listed under "Other type"), NetBSD’s encrypted device driver. I’ve also set its mount point to "-" so we can reconfigure it later:
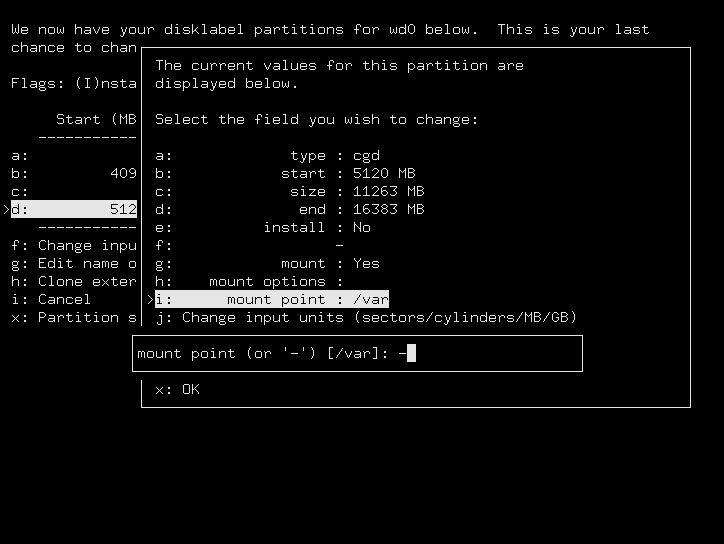
I tell the installer I want to do a Full Installation and it completes as normal, installing everything into the small root partition.
When we reboot and log in as root, we enter a new world… our 4 GB unencrypted root partition.
Post-installation setup (disklabel)
|
Note |
Disklabel partitions are supported by every NetBSD port, and are required by some ports, such as sparc64 in our example. However, if your system uses UEFI, or you opted to use GPT partitions in the installer, your system has disk wedges instead. Ignore this section and read the section below for information about wedges. |
Since I’m on sparc64, the disk is partitioned into disklabels. wd0 is the primary drive, and the disklabel command shows that /dev/wd0d is the partition reserved for our encrypted file system:
# disklabel wd0
#        size    offset     fstype [fsize bsize cpg/sgs]
 a:   8389584         0     4.2BSD      0     0     0  # (Cyl.      0 -   8322)
 b:   2097152   8389584       swap                     # (Cyl.   8323 -  10403*)
 c:  33554432         0     unused      0     0        # (Cyl.      0 -  33288*)
 d:  23067072  10487232        cgd                     # (Cyl.  10404 -  33287)
We can go directly ahead with creating a parameters file for the cgd:
# cgdconfig -g -k argon2id -o /etc/cgd/wd0d adiantum 256And then load the configuration and set our password:
# cgdconfig -V re-enter cgd0 /dev/wd0dNow cgd0 appears to the system as yet another disk, but all attempts to access that disk will be automatically encrypted/decrypted by the kernel.
The next time we enter our password, we want to be able to verify that the password was correct, to avoid reading or writing invalid data.
This is done by choosing a verification method based on the contents of the encrypted partition. For flexibility’s sake, we’re going to put another disklabel inside the encrypted partition. This will allow the system to easily verify the password is correct by looking for a valid disklabel, but also gives us flexibility in our choice of file system.
This opens the interactive editor. We’re going to enter N to set a name for our disklabel (enter something like "cgdlabel"), then enter a to modify the first sub-partition.
First, it asks for a file system type. Enter ? to display a list of types:
partition>a
Filesystem type [unused]: ?
Supported file system types:
Since I’m running -current and want to test the Log File System, I’m going to enter "4.4LFS". A more common and well-tested configuration would be "4.2BSD".
Next is the start offset and partition size:
Start offset ('x' to start after partition 'x') [0c, 0s, 0M]: 0
Partition size ('$' for all remaining) [0c, 0s, 0M]: $
Since "a" is the only sub-partition at the moment, the default start of 0 is fine. "$" will use all available space on the cgd.
Finally, we’ll save our new label and quit the disklabel editor:
partition>W
Label disk [n]?y
Label written
partition>Q
Now change the verify_method in /etc/cgd/wd0d to disklabel,
and add a line in /etc/cgd/cgd.conf to create the cgd at boot time:
cgd0 /dev/wd0d /etc/cgd/wd0dWe can now access this hidden partition as /dev/cgd0a. But for it to be useful, we’ll need to create a file system on it. Once again, here I’m using the Log File System:
A more normal and well-tested configuration would be FFSv2ea:
# newfs -O2ea /dev/rcgd0aWe can now mount and access the encrypted file system:
# mkdir -p /encfs
# mount /dev/cgd0a /encfs
Add a new line in /etc/fstab for our encrypted mount point:
/dev/cgd0a /encfs lfs rw,noatime 1 2Use "ffs" instead of "lfs" if you aren’t using the Log File System. If using FFS, you may want to use the options rw,log,noatime to enable journaling.
Post-installation setup (disk wedges)
On a recent amd64 machine, your system probably uses GPT and disk wedges instead of disklabels. Assuming our primary disk is ld0, we can see a list of wedges with dkctl:
# dkctl ld0 listwedges
/dev/rld0: 3 wedges:
dk0: 20e57277-ad70-408e-9c68-225270ed1500, 9267072 blocks at 64, type: ffs
dk1: abad5a2d-8411-4d36-980e-a5f2b03a1047, 4194304 blocks at 9267136, type: swap
dk2: 2c4d136a-f7ed-48f8-aae8-38afdd50c661, 53647360 blocks at 13461440, type: cgd|
Note |
If your disk is SATA rather than NVMe, it’s probably called wd0 instead of ld0. |
In this case, our partition reserved for our encrypted file system is /dev/dk2, also accessible via the UUID alias NAME=2c4d136a-f7ed-48f8-aae8-38afdd50c661.
We can go directly ahead with creating a parameters file for the cgd:
# cgdconfig -g -k argon2id -o /etc/cgd/maincgd aes-cbc 256And then load the configuration and set our password:
# cgdconfig -V re-enter cgd0 NAME=2c4d136a-f7ed-48f8-aae8-38afdd50c661 /etc/cgd/maincgdNow cgd0 appears to the system as yet another disk, but all attempts to access that disk will be automatically encrypted/decrypted by the kernel.
The next time we enter our password, we want to be able to verify that the password was correct, to avoid reading or writing invalid data.
This is done by choosing a verification method based on the contents of the encrypted partition. For flexibility’s sake, we’re going to put another GPT partition table inside the encrypted partition. This will allow the system to easily verify the password is correct by looking for a valid GPT table, but also gives us flexibility in our choice of file system.
Now change the verify_method in /etc/cgd/maincgd to gpt,
and add a line in /etc/cgd/cgd.conf to create the cgd at boot time:
cgd0 NAME=2c4d136a-f7ed-48f8-aae8-38afdd50c661 /etc/cgd/maincgdFor now, we’ll only create one partition inside the new sub-table. I’m running -current and want to test the Log File System, so I’ll use the "lfs" partition type. A more common and well-tested configuration would be "ffs".
# gpt add -l encfs -t lfs cgd0You should receive a kernel message, readable with the dmesg command, which notes that a new wedge is available, including its number. In this case, it’s dk3.
For it to be useful, we’ll need to create a file system on it. Once again, here I’m using the Log File System:
A more normal and well-tested configuration would use FFSv2ea:
We can now mount and access the encrypted file system:
# mkdir -p /encfs
# mount NAME=encfs /encfs
Add a new line in /etc/fstab for our encrypted mount point:
NAME=encfs /encfs lfs rw,noatime 1 2Use "ffs" instead of "lfs" if you aren’t using the Log File System. If using FFS, you may want to use the options rw,log,noatime to enable journaling.
Final steps (moving over the data)
These are required regardless of whether using disklabel or wedges.
We’re going to copy our important directories to the new encrypted file system:
# umount /var/shm
# cp -a /home /var /usr /encfs/
We need to create a symbolic link with ln because the /usr/lib directory contains some relative links to ../../, and it expects the lib directory to be there at the root. This is a hack:
Then, we move our important directories out of the way and replace them with links to the encrypted ones:
# /rescue/mv /home /home2
# /rescue/ln -s /encfs/home /home
# /rescue/mv /var /var2
# /rescue/ln -s /encfs/var /var
# /rescue/mv /usr /usr2
# /rescue/ln -s /encfs/usr /usr
Finally, we need to add a line to /etc/rc.conf to tell it to mount the encrypted partition early, so that /usr and /var are available during the init process:
# echo 'critical_filesystems_local="/encfs"' >> /etc/rc.confDisclaimer
After this process, the NetBSD installer is not aware of the encrypted partition existing during upgrades. Online upgrades must be used, rather than offline upgrades where the installer is booted from removable media. This may be done with a tool like sysupgrade.
This guide was 100% written by one human and might contain human errors.