19 January 2025 · jupyter · airflow · notebook
This post is based on my JupyterCon 2020 talk. I decided to write it 5 years later, because I think that notebook-based data platforms are relevant, now more than ever as AI helps us do more things, to enable citizen data science and seamless collaboration in large orgs. It's a story of how I helped build the notebook-based data platform at Grofers (now Blinkit) based on Netflix's pioneering work.
Around 2018, there was this growing trend of MLOps and enterprise notebook infra, where everyone was setting up JupyterHubs in their orgs to democratize access to data and make data science reproducible. It was a recurring theme at every JupyterCon 1 2 3 4. Every data engineer I talked to had worked on, or was working on setting up some kind of notebook infra at their org.
This quote from Brian Granger sums it up pretty nicely:
"We are entering an era where large, complex organizations need to scale interactive computing with data to their entire organization in a manner that is collaborative, secure, and human centered." — Brian Granger (source)
He further adds that there's an organizational shift from the historical usage patterns of Jupyter being used by individuals in an ad hoc manner to the new world of large scale Jupyter deployments.
At JupyterCon 2018, Paco Nathan also pointed out how large organizations are adopting Jupyter at scale.
"We've seen large organizations adopt Jupyter for their analytics infrastructure, in a "leap frog" effect over commercial offerings." — Paco Nathan (source)
He says that on the one hand, there are people in the organization who are well trained in a problem — the domain experts. They may not have the technical expertise at first, but they can use Jupyter to gain enough of the tooling to really amplify what they're doing in the domain.
This is also called citizen data science, where enterprise notebook infra makes it easy for anyone in an organization to get access to data and do wonderful things with it.
On the other hand, there's the fresh graduates that these organizations are hiring. And since they already know how to use Jupyter from their coursework, enterprise notebook infra can help them deliver results from the first day itself.
Notebook Infra at Netflix
There have been multiple talks and blog posts from large orgs like PayPal and Civis Analytics around this theme. But perhaps the most famous of all stories is of Netflix, where they set up a data platform by putting notebooks at the core.
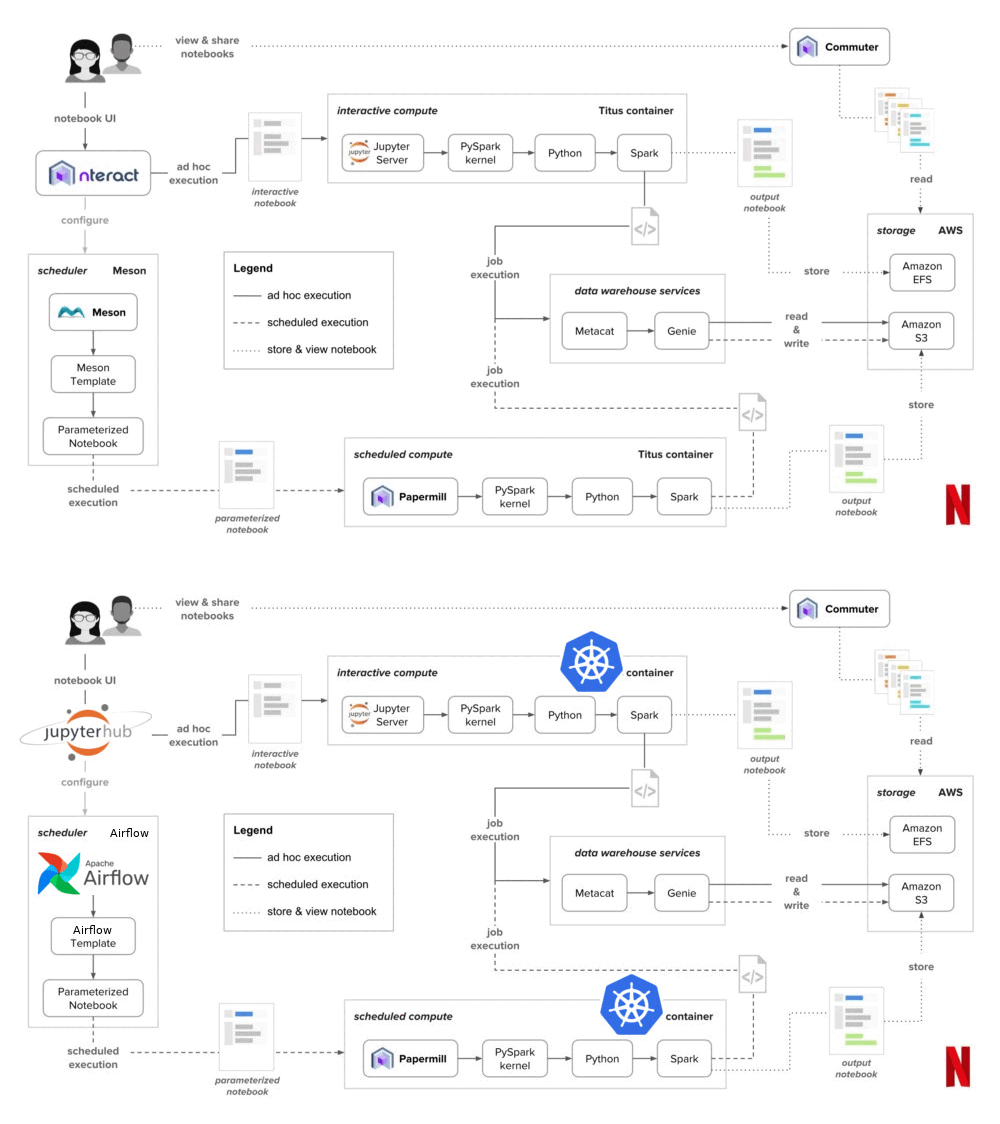
In their platform, anyone can launch a notebook server on-demand. Users can also choose resources like CPU and memory, after which their server gets launched in a container using Titus, which is their container management platform. If someone wants to schedule their notebook to run at specific times, they can do so using Meson, which is their internal workflow orchestration platform.
Note: The team that built the notebook infra at Netflix founded Noteable, which was acquired by Confluent.
In a notebook-based data platform, everything is a notebook. You want to write an ETL job? Notebook. You want to train a model? Notebook. You want to send out a daily report? Believe it or not. Notebook.
Grofers
In February 2019, I joined Grofers (now Blinkit) as a data engineer in the Bangalore team. We had around 15 data analysts and around 5 data scientists, supported by 3 data engineers: Deepu Philip, Sangarshanan Veera, and me.
Everyone in the data team was using JupyterLab. By that, I mean that we had one large EC2 instance which was running JupyterLab for everyone. When something didn't work on this big instance, they would move to using JupyterLab on their laptops.
Read credentials for various databases were often hardcoded inside notebooks, from where they would eventually end up in GitHub. I'm glad we didn't make one of our repos public by mistake!
  import pandas
  from sqlalchemy import create_engine

  engine = create_engine(
      'postgresql://read_user:83ffaf15@<hostname>:<port>/<dbname>'
  )
  df = pandas.read_sql('SELECT * FROM schema.table;', engine)
If someone in the data team wanted to schedule their notebook to run at a specific time, an engineer would use nbconvert to convert the notebook into a Python file and schedule it as a cronjob on the same EC2 instance. These notebooks would run ETL jobs or send out reports every morning.
  $ crontab -l
  0 2 * * * /home/ec2/notebooks/scripts/run_etl.py
  0 6 * * * /home/ec2/notebooks/scripts/send_report.py
We also had Airflow running on another EC2 instance for when someone in the data team wanted to run complex workflows where they wanted dependencies between tasks.
As you might expect, this setup had some flaws.
1. No session isolation
With one JupyterLab serving many users, there was no concept of a user session. One person's large workload could disrupt other users on the same system. This led to the other user moving to using JupyterLab on their own laptop, which would be a hassle because they would need to move all of their files and re-create all of their dataframes.
2. Dependency clashes
When one user upgraded a Python package on the server, the package would be upgraded for everyone, which would break another user's workflow. It was also a pain to keep the dependencies on the JupyterLab and Airflow instances in sync.
3. No reproducibility
Because of the dependency mismatches and a user constantly moving their work between their laptop and the JupyterLab server, it created a "works on my machine" problem. This also made it hard for another person to build on past work because even if they were able to somehow find an old notebook, they would need to create a requirements.txt by looking at the imports, and sometimes figure out the appropriate versions in case of breaking changes within libraries.
4. Not self-serve
When someone in the data team wanted to schedule complex workflows, they wouldn't be able to do that themselves unless they were familiar with Airflow's Python API. This added a dependency on a data engineer to translate their notebook's core logic into Airflow. Over time, this approach put a lot of maintenance burden on the data engineers.
A New Hope
Over time, Grofers had built a "DIY" DevOps culture where anyone could provision new infra resources and create Jenkins jobs very easily. There were dedicated infra and CI teams that set up awesome tooling for this.
Around the time when we were facing the problems I mentioned above, the infra team set up a Kubernetes cluster and there was an org wide move to migrate services to Kubernetes. Any engineer could install anything on the cluster once they had set up kubectl and helm.
We started to think about how we could solve all of our problems using these tools. We'd read about the notebook infra at Netflix and decided we needed something similar. The only problem was that some of the things they talked about weren't open-source, so we decided on these alternatives:
- Kubernetes, in place of Titus for container management
- JupyterHub, in place of Nteract as a multi-user notebook environment
- Airflow, in place of Meson for workflow management
- Some GitHub and Jenkins automation as glue to tie JupyterHub and Airflow together
JupyterHub
What is JupyterHub?
JupyterHub is a multi-user version of JupyterLab which is designed for large user groups. The Jupyter team has written great docs on how you can set up JupyterHub on Kubernetes, where each user can spin up their own JupyterLab environment in an isolated Kubernetes pod.
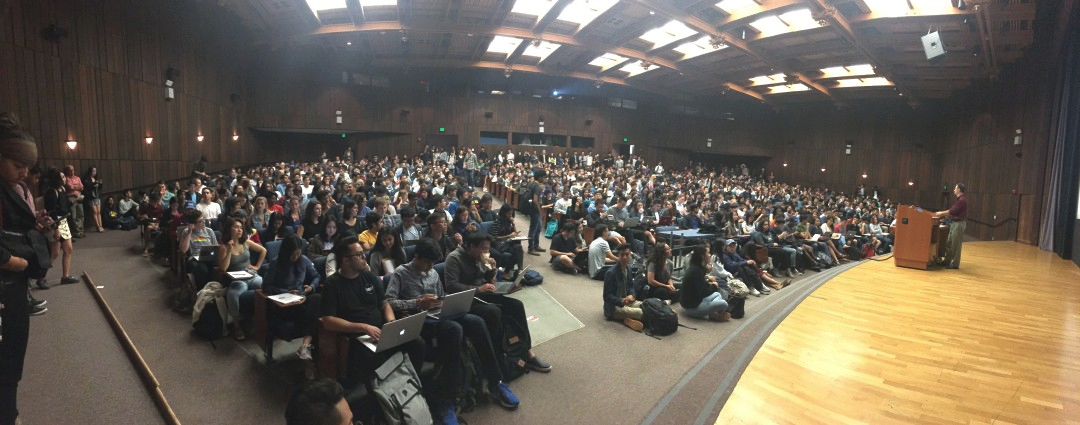
JupyterHub is famously used to serve more than a 1000 students in the Foundations of Data Science course at UC Berkeley.
Setting up
If you already have a Kubernetes cluster, it is pretty easy to set up JupyterHub using helm. You just need to create a config in which you declare with all of settings you need.
For example, you can configure how someone logs into JupyterHub with a bunch of different methods. We used Google OAuth which meant that everyone with a grofers.com Google id could log in to get access to org-wide data.
  auth:
    type: google
    google:
      clientId: <client_id>
      clientSecret: <client_secret>
      callbackUrl: <hub_url>/oauth_callback
      hostedDomain:
      - grofers.com
      loginService: Grofers
Persistent storage with EFS
We used EFS to store everyone's files. With EFS, every user would get a brand new filesystem which would be mounted on their JupyterLab server at /home/jovyan. Anything that they created would be persisted on EFS at home/username. Whenever they re-launched their server after shutting it down, they'd get their working directory back.
You must be wondering who's jovyan. It's just the name of the default user that shows up in Jupyter docker images. In science fiction, a Jovyan is an inhabitant of planet Jupyter. Here's a GitHub comment by Kyle Kelley where he talks about coining this term.
Custom environments
We reused a bunch of docker images that the Jupyter team maintains to create different environments for our users. For example, we used the datascience-notebook docker image which contains all of the commonly used data science libraries and created a new image. We just had to import it at the top of our Dockerfile and then add commands to install all of our own libraries.
  FROM jupyter/datascience-notebook:177037d09156
  # Get the latest image tag at:
  # https://hub.docker.com/r/jupyter/datascience-notebook/tags/
  # Inspect the Dockerfile at:
  # https://github.com/jupyter/docker-stacks/tree/master/datascience-notebook/Dockerfile

  # install additional package...
  RUN pip install --no-cache-dir astropy
After we published these images to our internal docker registry, we could list them as profiles in the JupyterHub config.
  singleuser:
    # defines the default image
    image:
      name: jupyter/minimal-notebook
      tag: 2343e33dec46
    profileList:
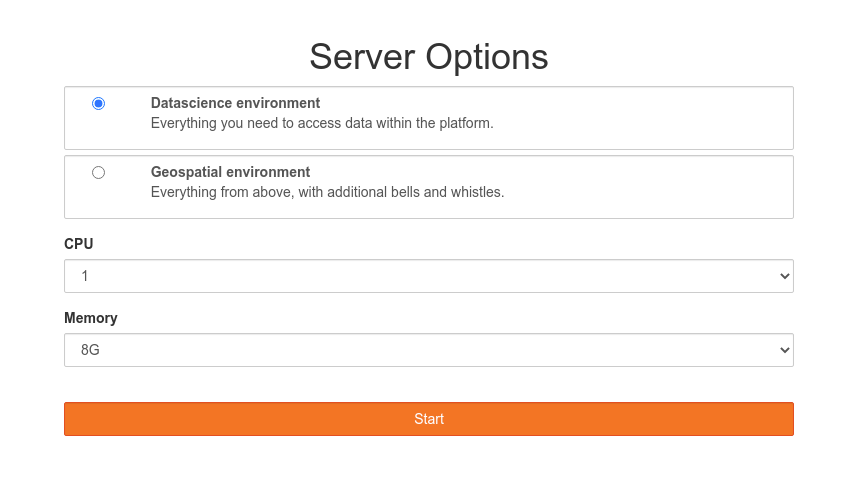
    - display_name: "Datascience environment"
      description: |
        Everything you need to access data within the
        platform
      kubespawner_override:
        image: {{ registry_url }}/datascience-notebook:2343e33dec46
This enabled users to pick the relevant environment when they were looking to launch a JupyterLab instance. We also modified the existing form template to let users select the CPU and memory for their environment. When the user clicked on start, they would get a personal JupyterLab instance running in an isolated Kubernetes pod. These environments ensured reproducibility in the data team's work.
Onboarding and experience
For new users, we added a README notebook where they could give in some details like their name and email, execute cells one by one, and get SSH and GPG keys which they could add to their GitHub account. This ensured that they were able to clone and create repos inside the org account, and that all of their commits were verified.
  fullname = "Your full name"
  email = "Your email on GitHub"
We also built an internal Python library which automated some common tasks that everyone would do, and added it to all of those environments. One of these tasks was getting connections to databases within the org. So we added a function called get_connection where any user could just pass in the connection id for a database, and get a connection to query that database. All ids were listed in the README notebook. This solved the problem of hardcoded credentials inside notebooks being pushed to GitHub.
  import pandas
  import toolbox

  con = toolbox.get_connection("redshift")
  df = pandas.read_sql("SELECT * FROM schema.table;", con=con)
The library also had functions for some other common tasks like:
- Sending emails
- Storing and retrieving files from S3
- Loading data into our data warehouse
  import toolbox

  toolbox.send_email(from_email, to_email, subject, body)

  toolbox.to_s3(file_path, s3_path)
  toolbox.from_s3(s3_path, file_path)

  toolbox.to_redshift(df, **kwargs)
Whenever we released a new version of the toolbox library, we built all the docker images again, pushed them to our registry, and upgraded the JupyterHub deployment on Kubernetes. That made sure that everyone got the latest goodies when they launched a new server. This did not affect users with running servers, because they would get the new environment only when they re-launched their servers.
JupyterHub was adopted very quickly as it undid a lot of knots from the setup we had earlier. Now that we'd ensured a consistent and reproducible experience with JupyterHub, the next question was "How do we replicate the same experience for scheduling notebooks" while also making the scheduling process very easy.
Airflow
At this point, the data team had grown and there were more users on the platform who wanted to schedule notebooks. This amplified some of the scheduling problems I mentioned earlier, and it started to become difficult to scale and maintain Airflow on that old EC2 instance.
What is Airflow?
If you're not familiar with Airflow, it's a platform where you can create and monitor workflows. You can think of it as a powerful cron. It has a Python API that lets you define workflows as DAGs, or directed acyclic graphs. It also comes with a lot of operators that let you connect to external systems and define individual tasks within your DAG workflow.
Each DAG is a Python file where you import the DAG class, and instantiate a DAG object with some metadata, like the dag_id, owner, the date from which it should start running, and how often it should run using cron-like syntax.
You can then create tasks using a bazillion operators, for example, the PythonOperator lets you create a task to run any Python function. Each task needs to have an id, the Python function it should run, and the DAG to which it belongs. At the end, you can define the dependency between tasks using the << and >> syntax.
  from airflow.models import DAG
  from airflow.operators import PythonOperator

  dag = DAG(
      dag_id='python_v1',
      owner='vinayak',
      start_date='2020-09-01',
      schedule_interval='0 0 * * *',
  )

  task1 = PythonOperator(
      task_id='task_1',
      python_callable=func1,
      dag=dag,
  )

  task2 = PythonOperator(
      task_id='task_2',
      python_callable=func2,
      dag=dag,
  )

  task1 >> task2
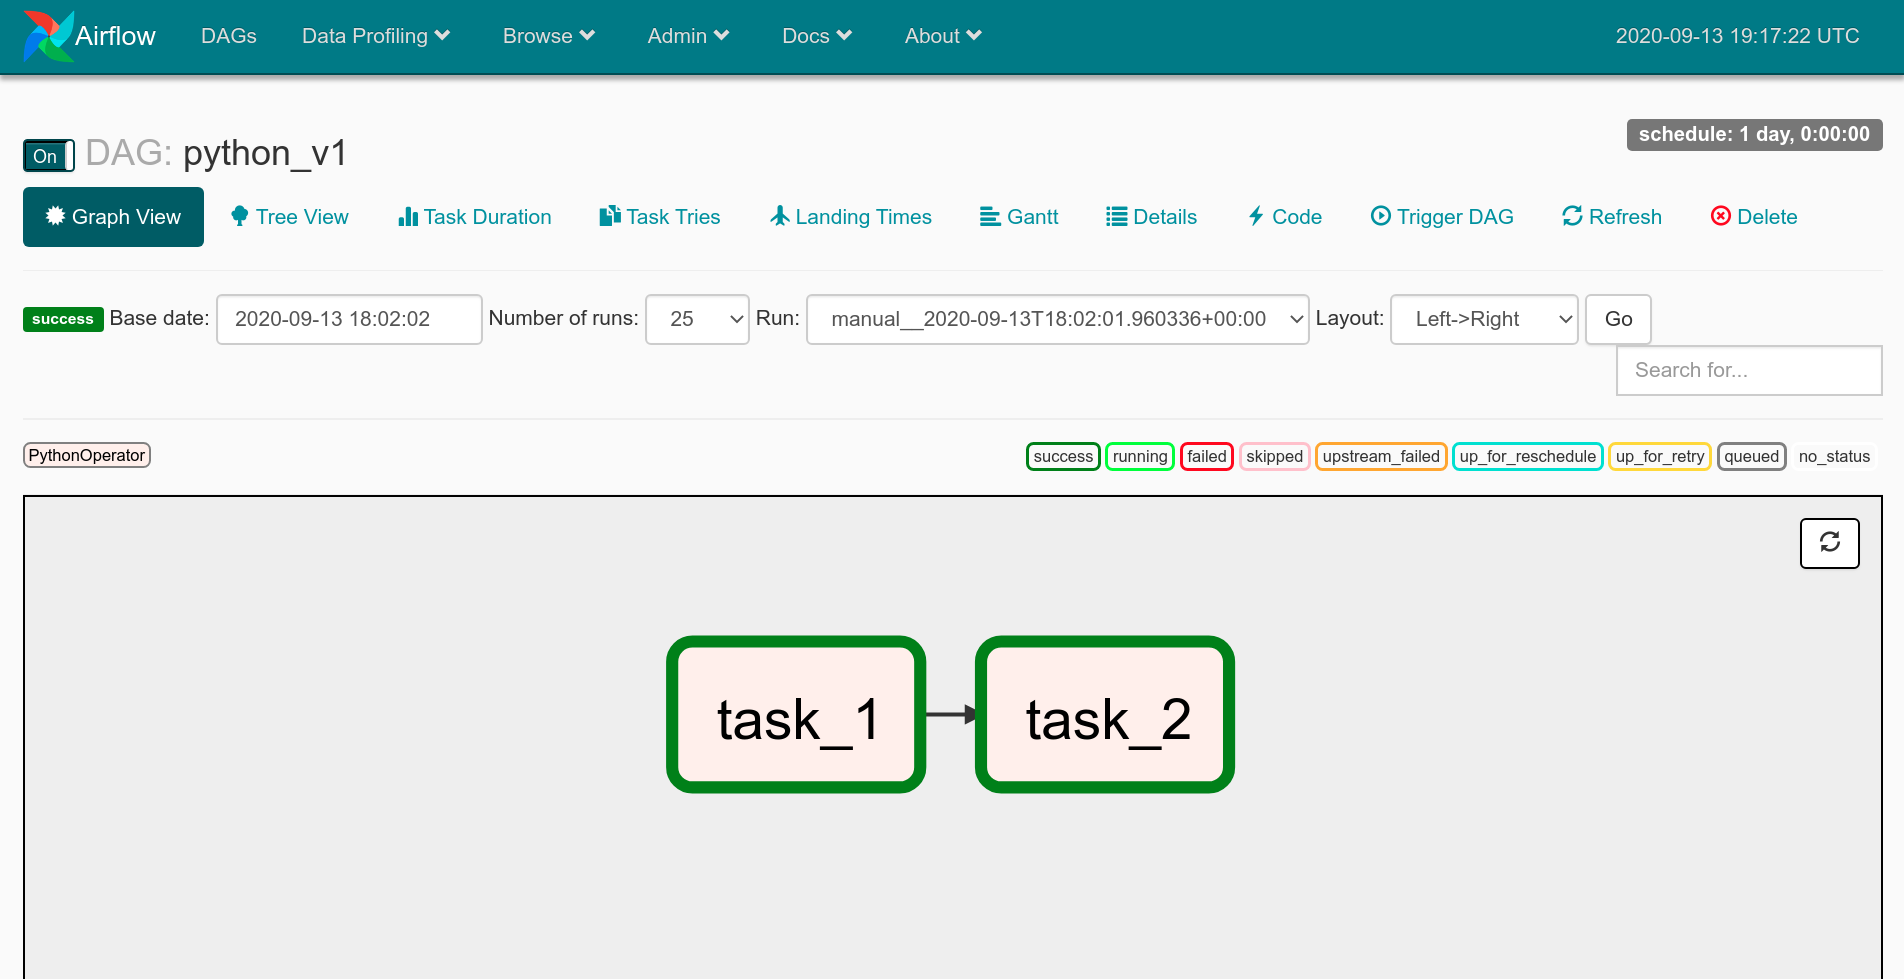
Airflow has a web interface where you can see what the DAG looks like. This interface also shows you all the times the DAG has run, the status of each run, and the status of each task in that run. You can also click on individual tasks to view all of their logs.
It has a concept of executors which define how and where you task will be executed, for example celery or dask. You can also configure the executors to run on a single server, or in a distributed setup.
KubernetesExecutor
When we were working on solving our scheduling problems, we found the KubernetesExecutor, which was shiny and brand new at that point. It lets you run your DAG's tasks in their own Kubernetes pods.
We just had to define an executor config inside our Python DAG files with the docker images we wanted the tasks to run with. We also defined CPU and memory resources for the task pod, and added that executor config to our tasks.
  executor_config = {
      "KubernetesExecutor": {
          "image": "<registry_url>/airflow:latest",
          "request_memory": "500M",
          "limit_memory": "4G",
          "request_cpu": 0.5,
          "limit_cpu": 1,
      }
  }
Running notebooks with Papermill
We used Papermill to execute these notebooks, because it lets you define a parameters cell to inject inputs at runtime. Airflow also supports a PapermillOperator which meant that we could run our notebooks in their own Kubernetes pod using Papermill, use Airflow macros as notebook inputs, and store the output notebook on S3 for debugging in case things went south.
We used these Airflow macros:
{{ dag }}: the DAG object,dag.dag_id{{ run_id }}: therun_idof the current run{{ ds }}: the current execution date{{ prev_ds }}: the previous execution date
Which helped us:
- Create a nice file hierarchy for output notebooks on S3 by specifying the dag and run ids in the Papermill output path
- Easily perform incremental loads to backfill data into a sink table, by aligning the start date and end date for the code and queries in the notebook with Airflow's scheduling as the source of truth
  from airflow.operators import PapermillOperator

  notebook_task = PapermillOperator(
      ...
      output_nb="s3://airflow/{{ dag.dag_id }}/{{ run_id }}/notebook.ipynb",
      parameters={
          "start_date": "{{ prev_ds }}",
          "end_date": "{{ ds }}"
      },
      ...
  )
We configured Airflow to send alerts on Slack whenever a notebook failed. The alert would tag the DAG owner and also have a URL for the output notebook that they could open in their browser. Once a day in the morning, we would also send an automated email to every DAG owner with a short summary of notebook scheduling stats for the past day.
Writing DAGs
The next question was "How do we make authoring DAGs easy for anyone". We didn't want to stop anyone from scheduling their notebooks just because they weren't familiar with Airflow's Python API.
We came up with YAML DAG definitions where any user could declare some DAG metadata using YAML instead of Python. Since most of the DAGs looked similar, we create Jinja templates for each type. Single notebook DAGs were the simplest as they just needed one PapermillOperator. Based on the DAG metadata a user provided, we would generate the final Python DAG file by rendering the Jinja template with the YAML values.
This still required a user to first write YAML, build a DAG file, and then also learn git in order to push all the files to the Airflow DAGs GitHub repo we maintainted. Learning git was painful for new users, and it shouldn't have been a requirement in the first place. You shouldn't be required to learn git to access and work with data.
To get around this, we cloned and automatically updated the DAGs GitHub repo using pod hooks every time sometime launched their JupyterLab server. When a user wanted to schedule their notebook, they could go into the cloned directory and create a new notebook project using a CLI tool we baked into the environment.
  $ cd airflow-dags/dags
  $ dag create notebook
  $ ls
  dag.yml notebook.ipynb
They could then write some DAG metadata like their name and the scheduling information, copy their notebook into the project.
  dag_id: notebook_v1
  owner: vinayak
  start_date: '2020-09-01'
  schedule_interval: '0 0 * * *'
  notebook_name: notebook.ipynb
  parameters:
    msgs: 'Ran from Airflow at {{ execution_date }}!'
And push it to GitHub with a simple command. This would open a pull request on the Airflow DAGs GitHub repo.
  $ dag push
  All done! ✨ 🍰 ✨
  You can see your pull request here: <link>
We would then trigger a build job which would render the Python DAG file, and push it to the pull request's branch. The job also did some other things like:
- Checking for missing fields
- Validating existing fields
- Checking for syntax errors in code
- Formatting the code
- And finally, adding a comment on the pull request with the build status
After the pull request was merged, the new DAG would be deployed to the EFS volume that was mounted on all Airflow pods. Voila !
Deploying DAGs
We also had to figure out how we'd deliver new DAGs to the Airflow DAGs folder for the KubernetesExecutor. On one server, all Airflow components can see the DAGs folder, because they share the same filesystem. But in a distributed setup like Kubernetes, there are three ways we could go about it:
- Have a sidecar container in all the Airflow pods that would regularly pull new DAGs from a GitHub repo
- Build the DAGs into the Airflow docker image itself which can then be reused across all Airflow pods
- Have a way to push new DAGs to a network file system which can be mounted on all Airflow pods
We had a GitHub repo where we maintained all our DAGs but we went with the third way because we already had a network file system, EFS, that we were using for JupyterHub. We didn't go the second way as we didn't want to build a new Airflow docker image every time someone added a dag, since that was happening quite often.
This Airflow setup fit nicely with our JupyterHub setup, because we could now schedule notebooks to run in the same environment that they were written in.
This notebook-based data platform was adopted by every data analyst and scientist, and a lot people in non-data roles across both our offices in Delhi and Bangalore.
These are some types of workflows that everyone built:
- Notebook ETLs that would load data into tables in Redshift, our data warehouse, which powered our Tableau dashboards
- Notebooks that would send send reports to various people inside the org if some condition on some table wasn't met
- Notebooks what would train machine learning models on new data every day and load predictions in a table that was used by a consumer facing system
- Very complex notebook workflows where multiple notebooks would run in parallel to calculate the stock of items in different warehouses, with one final notebook calling the API for a downstream system that would send relevant orders to replenish the warehouse stock for the next day/week
- And many more!
Learnings
JupyterHub culling or: How I learned to live long and prosper
JupyterHub has this nice feature where it can terminate (or cull) inactive user pods. This helps to scale everything down when resources aren't in use. You can set an inactivity time period after which a pod should be terminated.
We found that this feature would cull user pods even if they had JupyterLab open in their browser and context switched to do something else. This would usually happen when they were running a big task like training a model. It was painful for them when they came back and saw that their long running task didn't complete because their server was no longer there.
To overcome this, we used another JupyterHub feature called named servers where you can launch a server and also give it a nickname. We modified the culling behavior to ignore pods that were launched with the -llap suffix in the nickname, where llap stands for Live long and prosper 🖖.
Pinning dependencies
Initially we were using the latest tag on the datascience notebook docker image, but this one time after building all the images and upgrading the JupyterHub deployment, every user would see an error when they tried to launch a new pod.
It took a long time for us to figure out that the new version of JupyterLab broke some old KubeSpawner behavior that we were depending on.
Pinning dependencies also helped us move quickly when we had to migrate from our old kubernetes cluster to a new one. We just installed the helm chart with the same config values, pointed the domain name to the new IP, and no user even felt that a migration had taken place.
Monitoring
Monitoring this whole system using Prometheus and Grafana helped us get relevant metrics to improve user experience and also help in resource planning.
After we started monitoring the resource usage for our JupyterHub deployment, we found that we could fit the same number of users on half the nodes which helped us reduce cost by 50%.
Backups
This one time, a user accidentally deleted their notebook which contained all the work they'd been doing for the past one week. Yes, they should have pushed it to GitHub, and no, we couldn’t find it in the notebook checkpoints. However, we managed to recover it from the latest EFS backup.
Another time an engineer accidentally reset the Airflow metadata database on which the Airflow scheduler has a hard dependency, but we were able to quickly restore it from the latest RDS snapshot.
Improvements
Remove accidental complexity
For new users, a graphical interface is often more intuitive than a CLI. New users shouldn't have to pay the command-line tax and learn git just to work with data on the platform.
Notebook pipeline editors
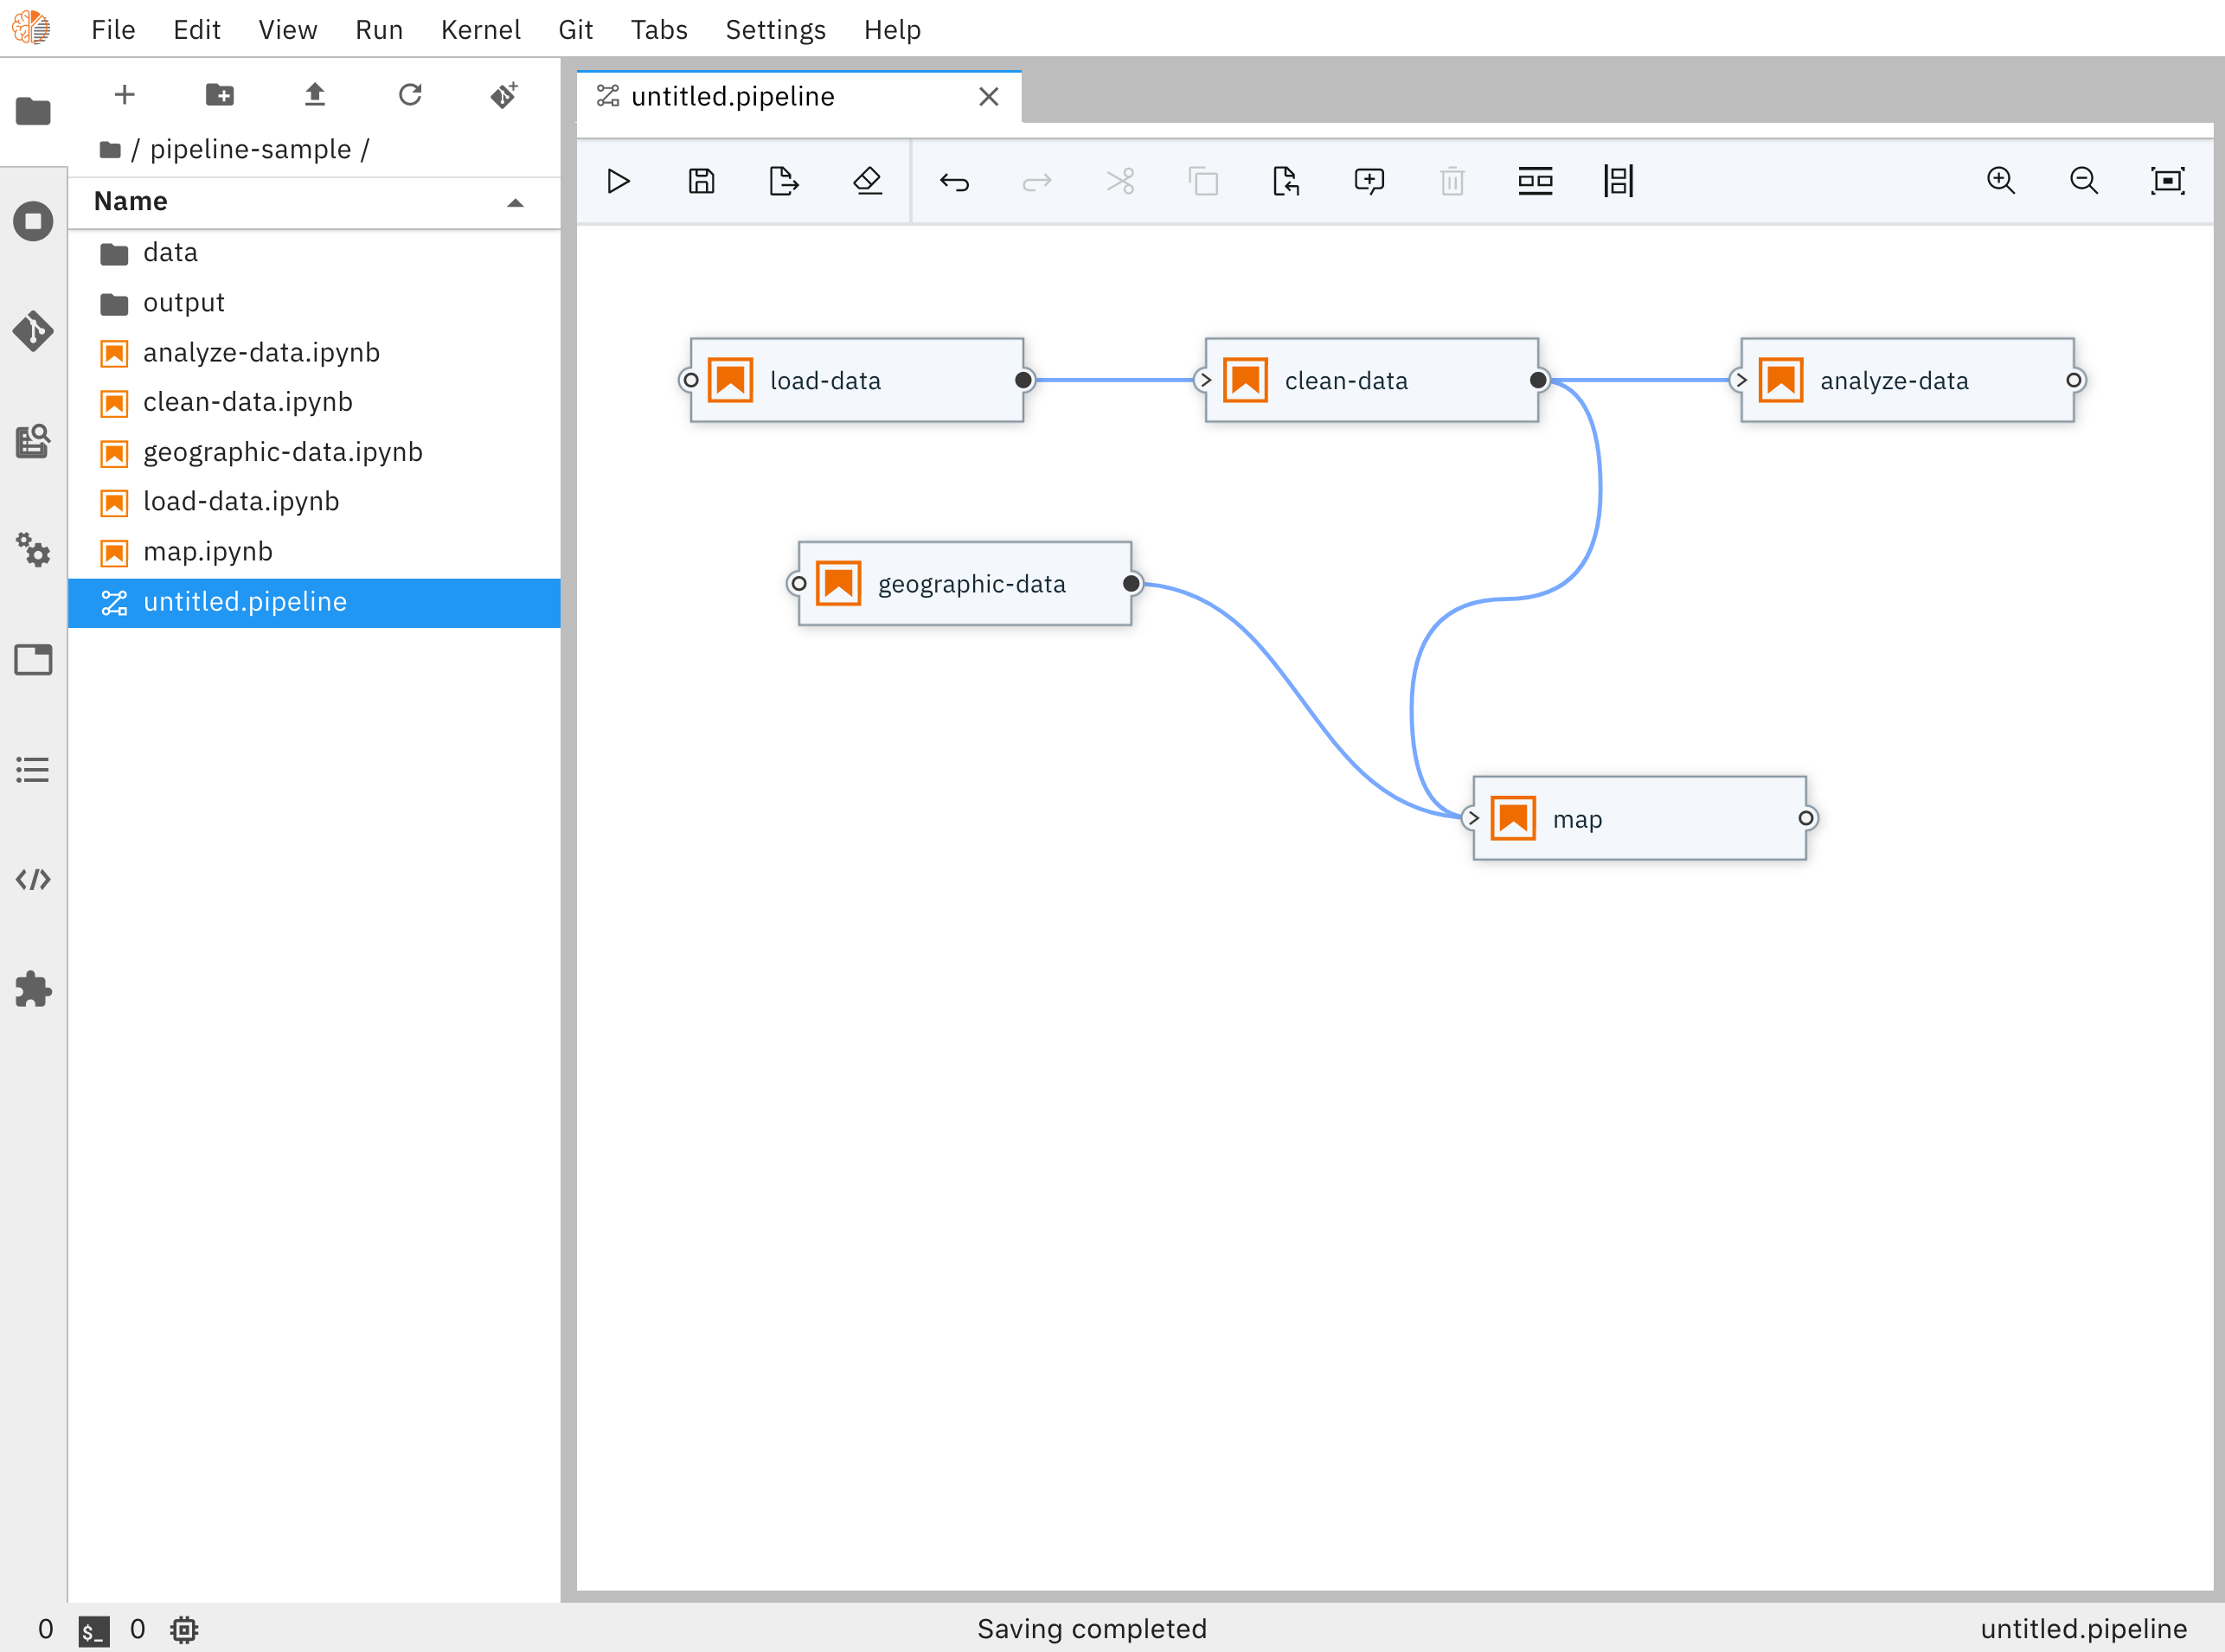
Elyra is a cool project that provides a nice visual editor in which you can drag and drop notebooks and build complex notebook pipelines.
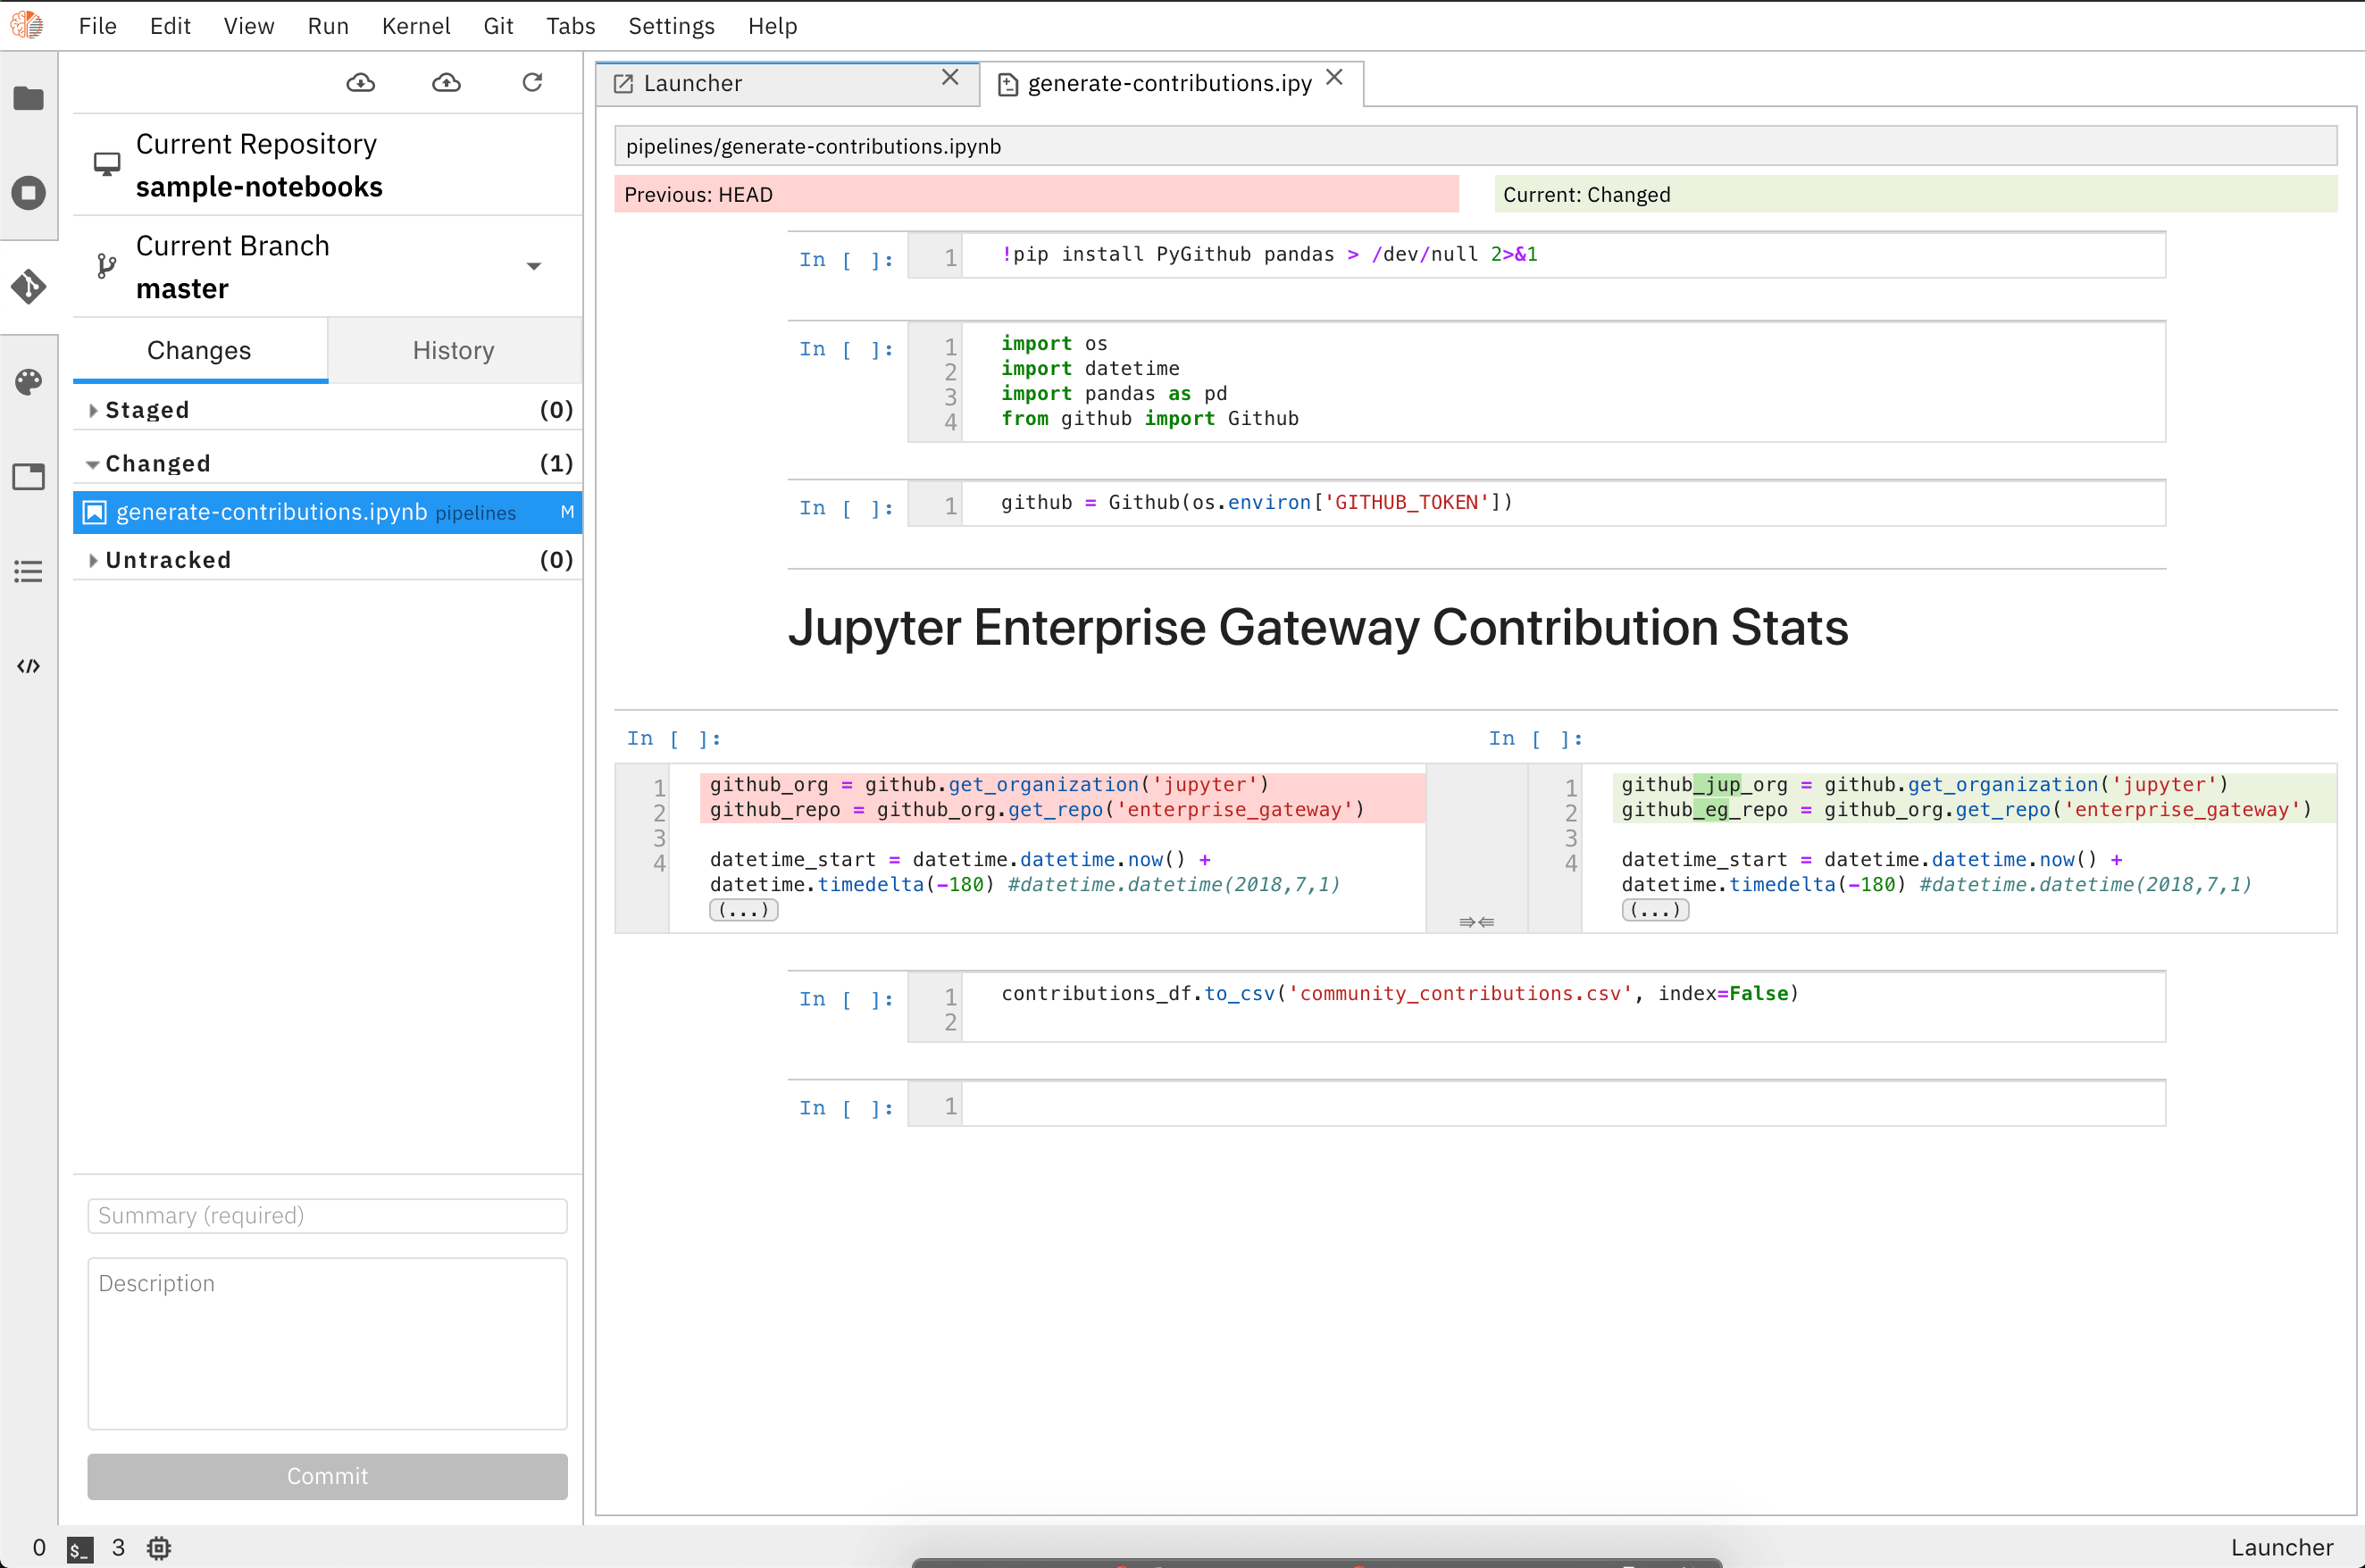
It also has a nice interface to review changes made to notebooks.
Make notebooks discoverable
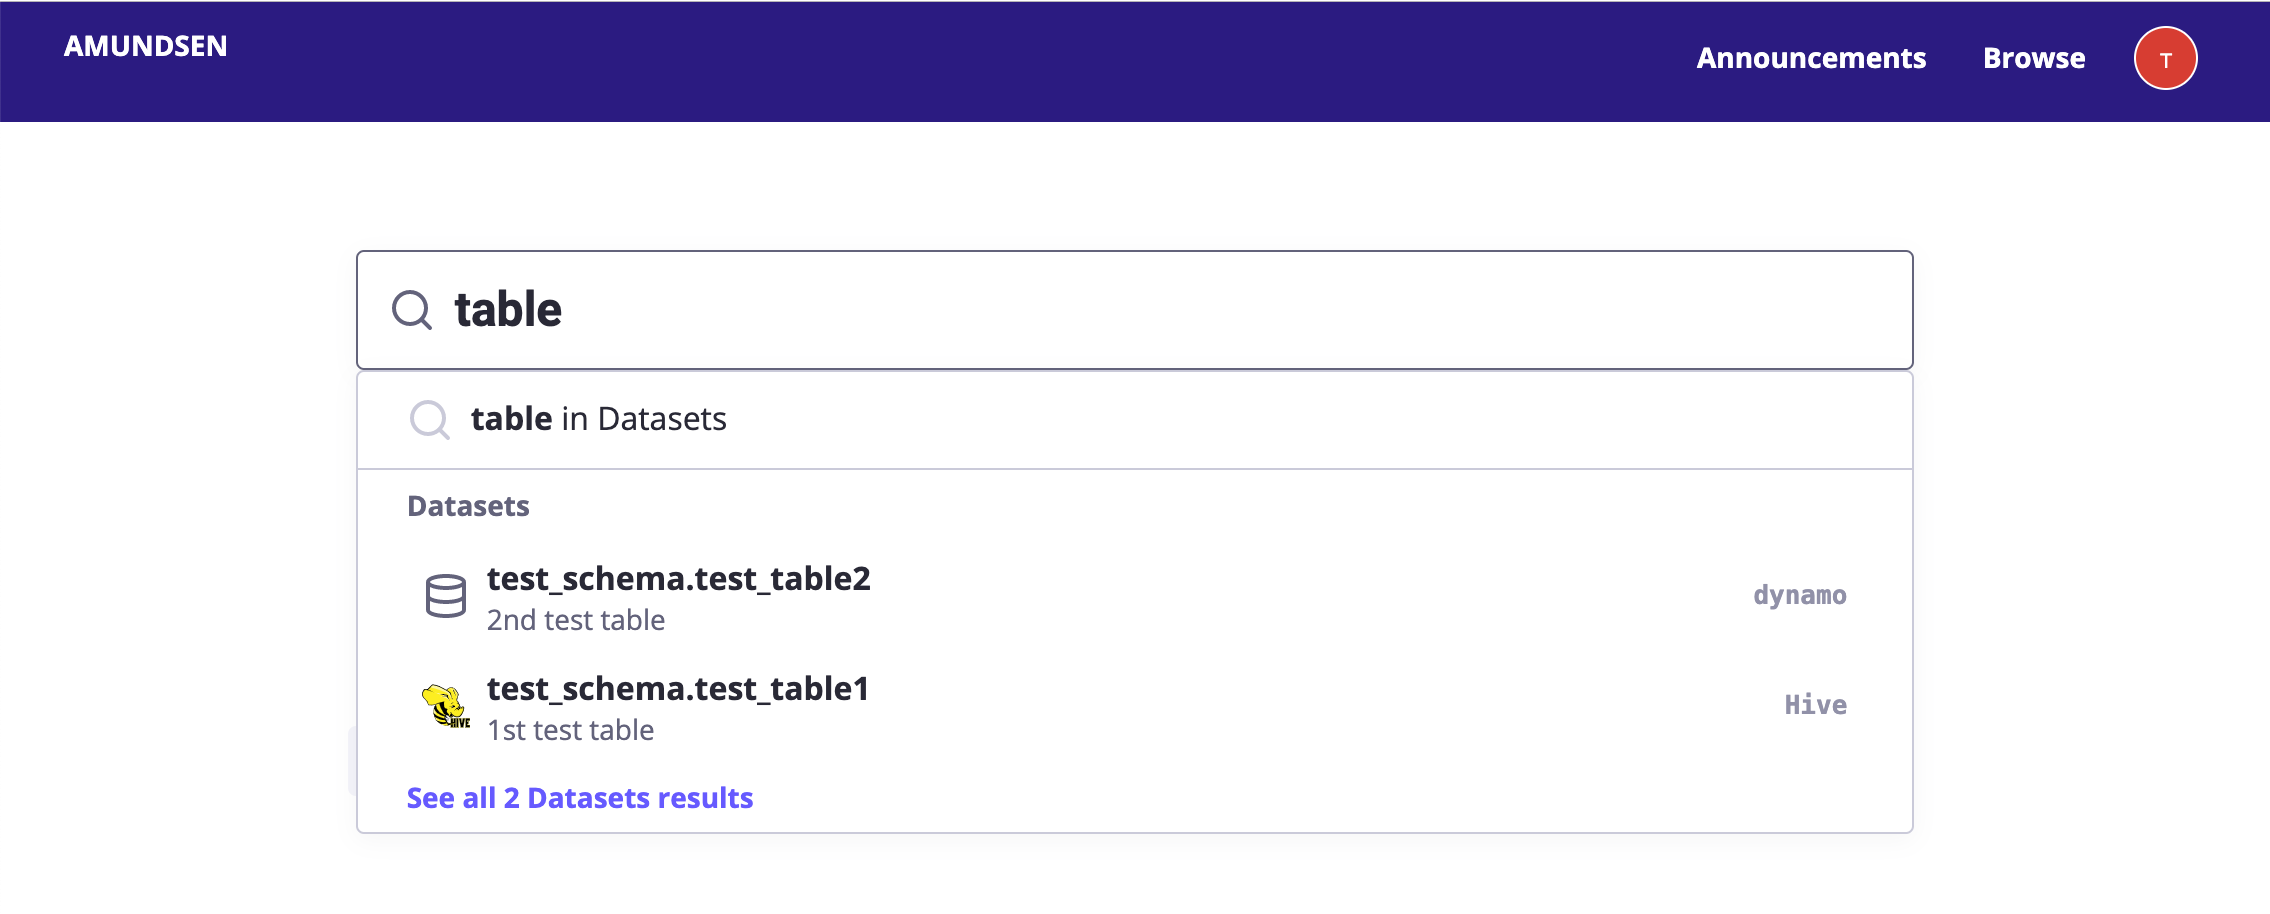
In a notebook-based data platform, notebooks should become first-class citizens just like tables so that it's easy to discover them and build on past work. Amundsen (and a bunch of other tools) can help you build a searchable catalog for your notebooks.
I hope this post provided useful insights into our experience setting up a notebook-based data platform. I also hope that it will guide you in selecting the right open-source tools and avoiding common pitfalls when setting up something similar. Reach out to me if you're working on something along these lines, I would love to hear what you're up to.