TL;DR: I build terminal applications (TUIs) like kl for k8s logs and wander for Nomad. Core functionality of TUIs includes interacting with large blocks of text, like application manifests and logs. I created a reusable
viewportcomponent in Go for text navigation in my projects.Terminal pagers are programs that allow you to interactively navigate multi-page text. I used my
viewportcomponent to make lore, which I’m now daily driving as my terminal pager.In this post, I detail the features I wanted to support in my
viewportas well as some learnings and design decisions on the way to making them a reality.
Introduction to Terminal Paging#
Along with running commands, the terminal is often a place for viewing and navigating text.
❯ cat file.txt
I love terminals!
Terminals have a grid-like nature with a monospace font. Their size is defined in rows and columns, with text filling this grid accordingly.
❯ cat ~/chessboard.txt
    a  b  c  d  e  f  g  h
 8  R  N  B  Q  K  B  N  R
 7  P  P  P  P  P  P  P  P
 6
 5
 4
 3
 2  P  P  P  P  P  P  P  P
 1  R  N  B  Q  K  B  N  R
    a  b  c  d  e  f  g  h
Aside: styling text in terminals
You can style text in terminals with ANSI escape codes.
❯ echo "default, \x1b[31mred text\x1b[0m, default"
default, red text, default
\x1b[31m: begin red foreground text stylingred text: content to be styled\x1b[0m: reset styling
This type of styling is how we get the grey checkerboard pattern in the terminal out of chessboard.txt above:
chessboard.txt contains text with ANSI escape codes styling it for the terminal.
Developers often scan through high volumes of text in their terminal:
- verbose output from scripts and CLIs
gitdiffs- application logs
manpagesREADMEs- database query results, e.g.,
psql/sqliteresult rows - output of agentic AI tools
When the text output is less than one terminal view’s height, output is usually printed directly to your terminal
without a special pager. You can then scroll with the mouse and search using your terminal emulator’s built in
functionality (e.g. cmd+f in iTerm2). Or maybe you use a terminal multiplexer like tmux within your terminal
emulator that has its own set of keyboard bindings for search and scrollback.
But most often for text spanning multiple terminal pages, programs use a pager for interactive text navigation. Programs
check the PAGER environment variable and, if set, use that program to display the text instead of dumping it to stdout.
The PAGER environment variable points to a program that expects either piped input <command> | mypager or a file
argument mypager myfile.txt.
Aside: how programs use $PAGER
Programs like git, man, etc. have some internal logic to check if PAGER is set and conditionally use it. They’ll
usually pipe content directly into the PAGER, skipping it if stdout isn’t a TTY (an interactive terminal session). So
the PAGER isn’t relevant in a non-TTY stdout like git diff | grep ...
If stdout is a TTY, programs may opt to use the PAGER. They’ll spawn the program set as PAGER as a child process,
then use a pipe to connect the pager process’s stdin with the program’s stdout.
I enjoyed Andrew Healey’s recent write-up on Building a Shell for more on pipes and the syscalls that shells use to make this all work nicely.
Most programs on developer machines use less as a fallback pager if PAGER isn’t set. If you want everything
to be dumped to your terminal directly, set your PAGER environment variable to cat. Other options include bat,
most, and delta. There are special paging environment variables as well, for example, setting
GIT_PAGER specifically for git output, or BAT_PAGER for paging within bat after it
performs syntax highlighting.
The most common PAGER, less, is quite powerful with effective use of the options and configuration. For example,
text by default is lost once you quit less, which is generally reasonable, but you can use --no-init/-X to have the
text you’ve paged through up to the point of quitting persist in your terminal output. And use --ignore-case/-i to
make searching case-insensitive. I recommend these articles on less options and less
configuration to learn more.
Terminal Applications/TUIs#
Terminal applications, or TUIs, are a bit like native desktop applications or websites, except that you run them within your terminal.
TUIs usually use the alt screen to temporarily take over the full terminal screen, displaying application components like titles, side bars, help text, and text viewports within them. Text viewport components are similar to terminal pagers, but only take up part of the screen. Other common user workflows in TUIs are:
- moving focus between components on the screen
- selecting from a list of items on the screen
- taking in user input
In a TUI, the smallest editable unit is the terminal grid cell rather than the pixel. This provides a nice constraint, pushing terminal applications to remove all but essential information and provide a hierarchy of keyboard-driven views into the data, rather than one large scrollable screen of components and button-laden toolbars like a website or desktop app might provide.
Take kl, a TUI I built for interacting with Kubernetes logs across many clusters and namespaces, for example. On startup, you’re presented with 2 text viewports: a Kubernetes entity hierarchy on the left showing your configured clusters, namespaces, pods, and containers, and an initially-empty view of logs on the right.
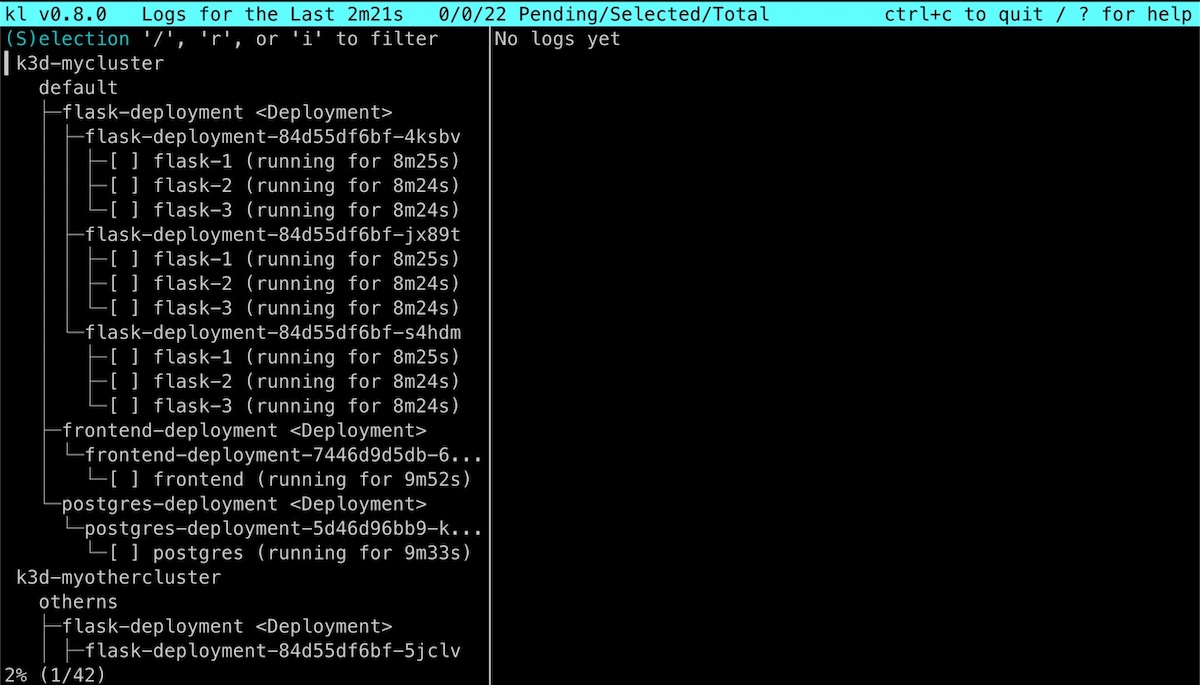
You start focused in the selection viewport, where you select one or more containers to tail the logs for.
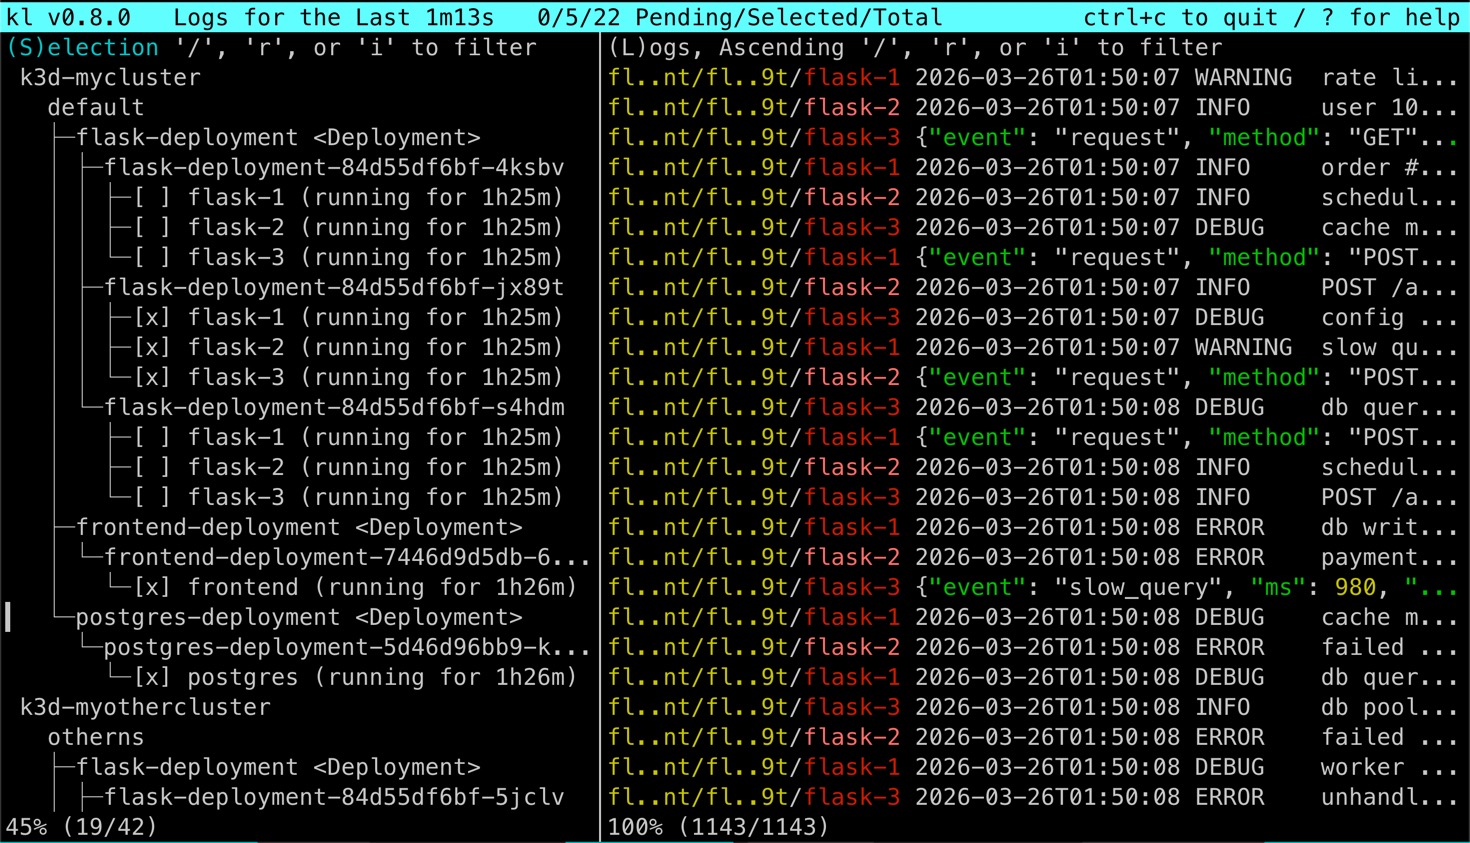
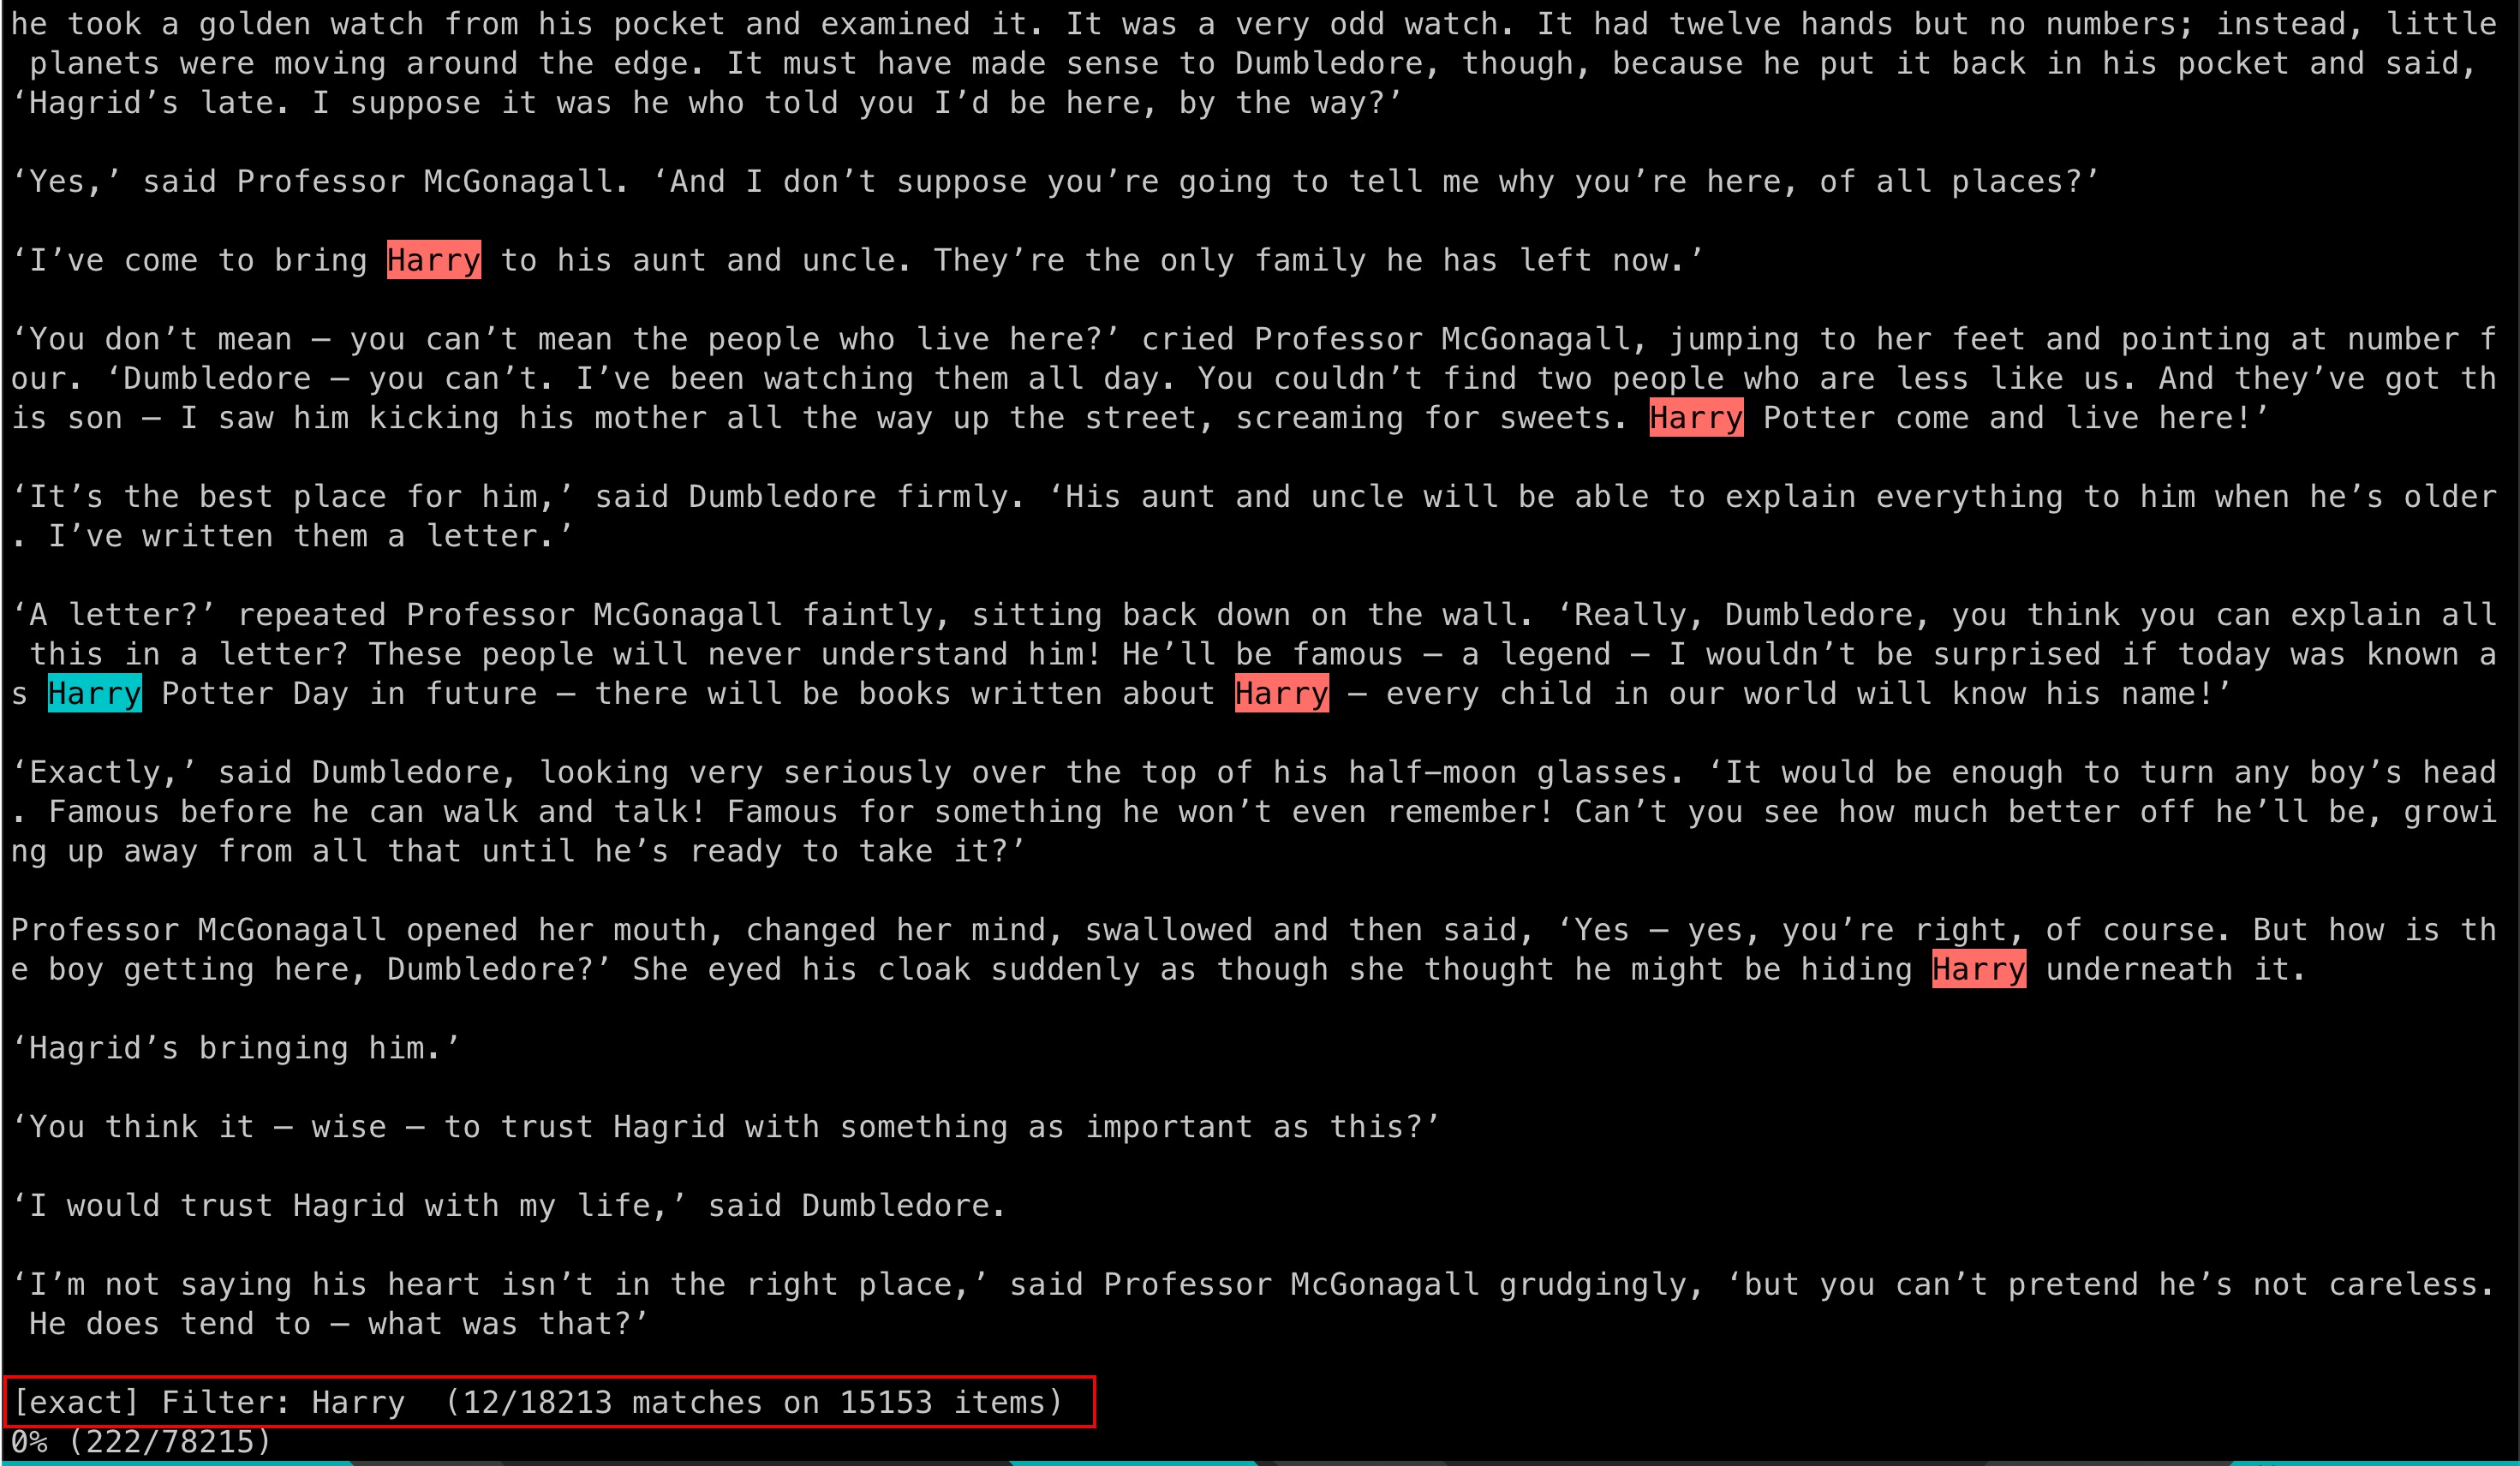
Pressing L shows you those logs in full screen, hiding the selection tree. From there, you can search for exact
matches with /.
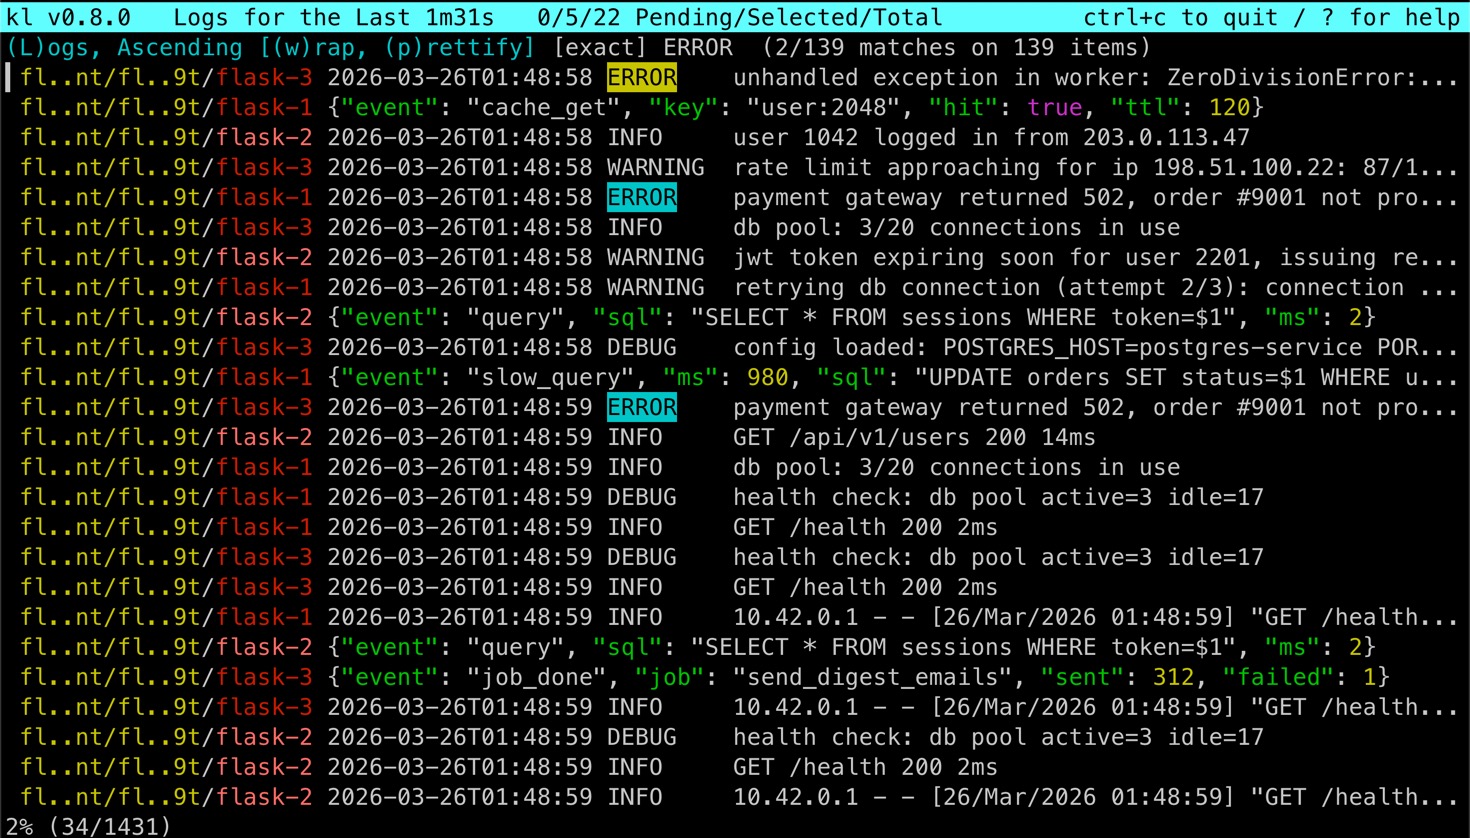
You can see matches with surrounding (non-matching) context, or only the matching items by pressing x. Pressing p
prettifies the JSON logs with spacing and indentation. Press enter to zoom into the single log view. ? to show all
the potential commands, and ctrl+c to quit.
This gives you an idea how a TUI is a keyboard-driven application consisting of components, and the most important
components of TUIs are often just mini terminal pagers. In kl, both the selection tree and the logs view are mini
terminal pagers. I extracted out this shared functionality into a viewport component.
The Viewport Component#
The viewport is a flexibly-sized box with an arbitrary amount of text. This box of text is resizable, scrollable, provides a percentage indicator for your current position in the text, makes text (un)wrappable with horizontal panning when unwrapped, enables search with match navigation, allows for item selection, supports ANSI escape codes for styling text, handles Unicode, and is generally performant even with lots of text.
This viewport is written in Go and can be easily integrated into applications using the Bubble Tea TUI framework.
To facilitate this feature set, there are three modules that make up the implementation:
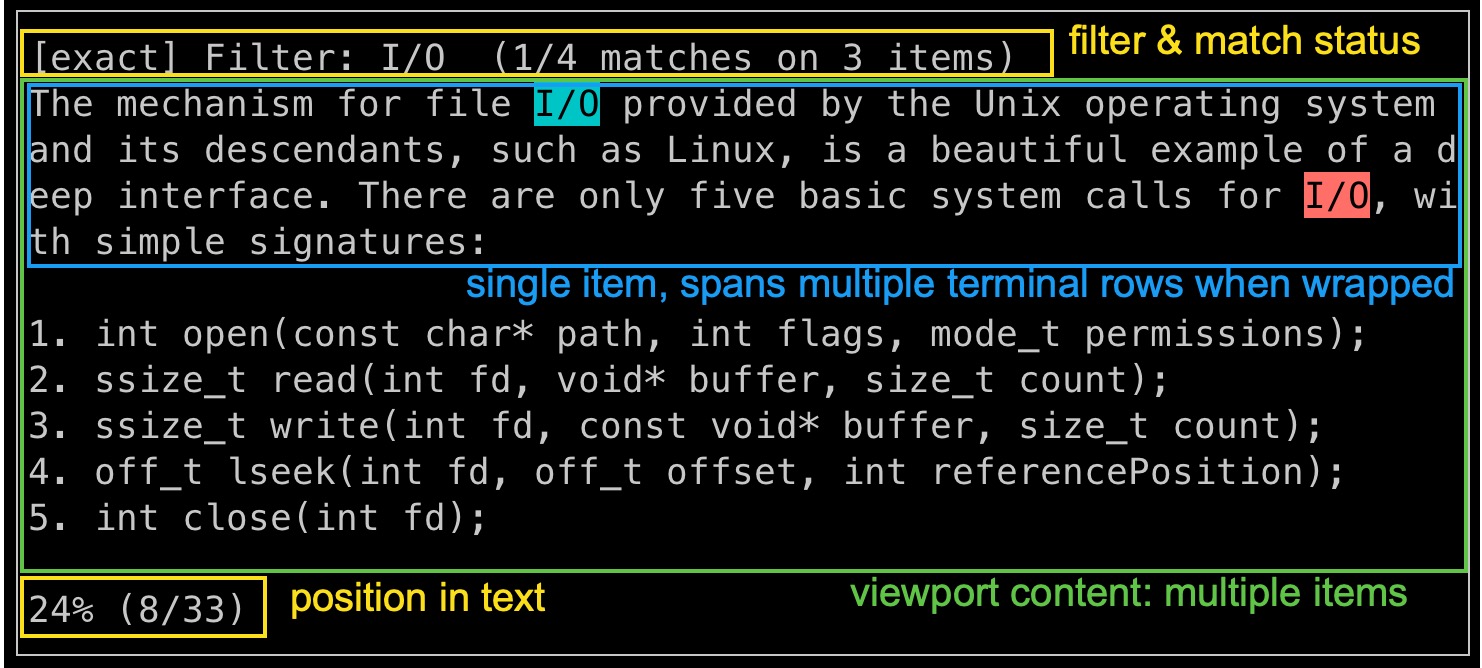
- item: wraps a string and takes up one or more rows in the terminal depending on the string width, terminal width, and wrap state
- viewport: displays items and allows navigation
- filterableviewport: adds search to viewport functionality
If you have Go installed, the fastest way to try out the filterableviewport, the composition of these elements,
yourself is to run:
go run github.com/robinovitch61/viewport/examples/filterableviewport@latest
Or if you don’t have Go, in Docker:
docker run -ti golang:1.26-alpine \
  go run github.com/robinovitch61/viewport/examples/filterableviewport@latest
Unicode handling#
Most Unicode characters take up 1 cell width in the terminal, but special ones don’t.
Here’s a shell function that uses the wcwidth library for checking the width in terminal columns of a string:
termwidth() {
  uv run --with wcwidth python -c \
  "import wcwidth; print(wcwidth.wcswidth('$1'))"
}
Simple strings are the cell width that you’d expect:
❯ termwidth 'a'
1

❯ termwidth '123'
3
But what’s with these ones?
❯ echo '\u2728'
✨

❯ termwidth '✨'
2
The sparkles emoji, represented by its Unicode code point ✨ U+2728 SPARKLES, takes up two terminal cells in width.
In Unicode text in the context of terminals, there are:
- code points: a number assigned to a character in the Unicode standard e.g.
U+2728 - grapheme: a human’s perception of a single character (one or more code points), e.g. ✨
- byte encoding: byte representation of code points, dependent on UTF-8/16/32, e.g. ✨ is 3 bytes,
0xE2 0x9C 0xA8, in UTF-8 - code point width: the number of terminal cells a code point occupies (0, 1, or 2), e.g. 2 for ✨
- a grapheme’s terminal width is determined by its combined code points
It’s hard to guess how many terminal cells a given character will take up by only looking at it visually:
❯ termwidth '全'
2

❯ termwidth '■'
1

❯ termwidth '﷽'
1
You can represent single-width characters like é multiple different ways in Unicode: either as a single é code
point, or an e code point with a combining accent code point following it.
- é U+00E9 LATIN SMALL LETTER E WITH ACUTE
- e U+0065 LATIN SMALL LETTER E
- ́ U+0301 COMBINING ACUTE ACCENT
❯ echo '\u00E9'
é

❯ termwidth '\u00E9'
1

❯ echo '\u0065\u0301'
é

❯ termwidth '\u0065\u0301'
1

❯ termwidth '\u0301'
0
To support Unicode in my viewport, I had to consider the mapping of string bytes (usually UTF-8 in Go), to code
points, to graphemes and their corresponding terminal widths.
The Item interface handles the implementation of this, simplified below:
type Item interface {
    // Width returns the total width in terminal cells
    Width() int

    // Take retrieves a string from startWidth to startWidth + takeWidth,
    // width being in terminal cells
    Take(startWidth, takeWidth int) string
}

// NewItem builds a SingleItem, which implements Item, from a string
func NewItem(content string) SingleItem {
    // build maps of:
    //   code point -> byte offset
    //   code point -> cumulative terminal cell width
}
Immutable strings, like kubernetes logs, can have their Item object eagerly instantiated once as they arrive.
Instantiation builds a sparse internal map of code points to byte offsets and terminal cell widths.
A MultiItem implementation satisfies the same interface, but works across multiple individual Items, allowing for
efficient dynamic item prefixing (e.g. line numbers, timestamps, container names, etc.) without needing to rebuild an
entire SingleItem just to change the prefix.
For multi-line content like prettified JSON logs, a MultiLineItem implementation supports items that span multiple
line breaks.
The Item abstraction nicely supports wrapping – successive calls to Take until an item’s underlying content is used
up – as well as panning left and right efficiently when items are unwrapped.
Searching and filtering#
I find it valuable to have different keyboard shortcuts for exact match search (/), regex search (r), and
case-insensitive search (i), which I’ve implemented as just regex search with an automatic prefix of the case
insensitive flag (?i). Separate single-key shortcuts for these common search actions make the app feel agile.
Applied searches are saved to an in-memory buffer, navigable with up and down arrow keys.
The filterableviewport maintains a sequence of all Items from which it filters to the currently visible set dependent
on the filter. The x keyboard shortcut toggles between showing matches only or including the matches’ surrounding
context as well. There can be multiple matches per item, and n/N is used to navigate between matches, bringing the
focused match into view on screen.
Item selection#
For some text views, paging through the content screen by screen is all that’s needed. For other views, selection of an
item from the visible set is required. The viewport handles both cases by setting selection to enabled or disabled. In
kl, for example, pressing enter on a log will bring you to a full page view of that log, nicely formatted, from
which you can scroll, pan, search, or flip through surrounding logs one by one.

To support item selection, the viewport is generic to an object type:
// New creates a new viewport to display Objects of generic type T
func New[T Object](width, height int, opts ...Option[T]) (m *Model[T]) {
    ...
}

// GetSelectedItem returns a pointer to the currently selected item
func (m *Model[T]) GetSelectedItem() *T {
    if !m.selectionEnabled {
      return nil
    }
    return m.getSelectedItem()
}
Callers can then listen for keyboard events like enter, trigger GetSelectedItem() on the focused viewport, and
respond accordingly to the object returned.
Like less and more before it, lore is my simple terminal pager that is an alt-screen Bubble Tea TUI application
leaning on the viewport component to handle all functionality. As long as I’m building these mini terminal pagers in
apps like kl and wander that suit my preferences for viewing and navigating text, I may as well have that same
functionality for paging in my terminal!
lore supports only a subset of what less does, but in a more intuitive and useful manner for my daily activity. I
also find value in understanding it from the ground up, bytes to terminal views, and continuing to refine it as I learn
more about what I actually want and need in a terminal pager.
There are installation instructions for lore here. I regularly run lore <path-to-some-file>, or
<command> | lore. I’ve also set export PAGER=lore in my ~/.zshrc, and am delighted each time a new program uses
lore instead of less in my day-to-day terminal interactions.
This domain goes deep. I’m excited by the progress of packages like libghostty that cover much of the functionality
I’ve implemented in my Go viewport, but with Zig and C bindings. I’ll keep improving the core viewport functionality,
kl, and my terminal pager lore, and other TUIs to come.