Tips and a practical guide on how to plan a trip like this yourself.
Assumed audience: People who are curious about what it's like to do a solo multi-day cycling trip for the first time, with or without plans to do something similar themselves.
In my last post, I wrote about my experience riding from New York to Montréal last October.
Let’s take a moment to marvel at some snaps from the trip 😍:
So how did I, a triathlete with no prior bikepacking or bicycle touring experience, manage to complete such an adventure all by myself?
In this post, I go into detail on how I prepared for this trip. I hope it shows you that a trip like this is totally accessible even to newer cyclists and that it inspires you to go on one like it yourself.
Part 2: The Plan #
Plotting my route #
Most people who ride from NYC to Montréal follow all or part of the Empire State Trail. This is a connected network of several smaller trails, including the popular Manhattan Greenway Trail (colloquially known as the “Hudson River Greenway”, the “Hudson Bike Path”, or sometimes the “West Side Highway”) that runs along the west side of Manhattan from Battery Park City to Inwood Hill. The trail then continues via a combination of paved and unpaved wooded, rail and road cycling paths all the way to Albany, where it splits in two: one part heading north via the Champlain Valley Trail to the US border near Rouses Point and the other part going west along the Erie Canalway Trail to the US border near Buffalo and Niagara Falls.
The State of New York has done a truly incredible job documenting the EST in detail. You can request a free paper map of the trail, download route-planning files for your GPS-enabled device, view individual trail section info, track planned and current trail closures, and lots more. I’m yet to come across another cycling or multi-use trail system with such extensive documentation.
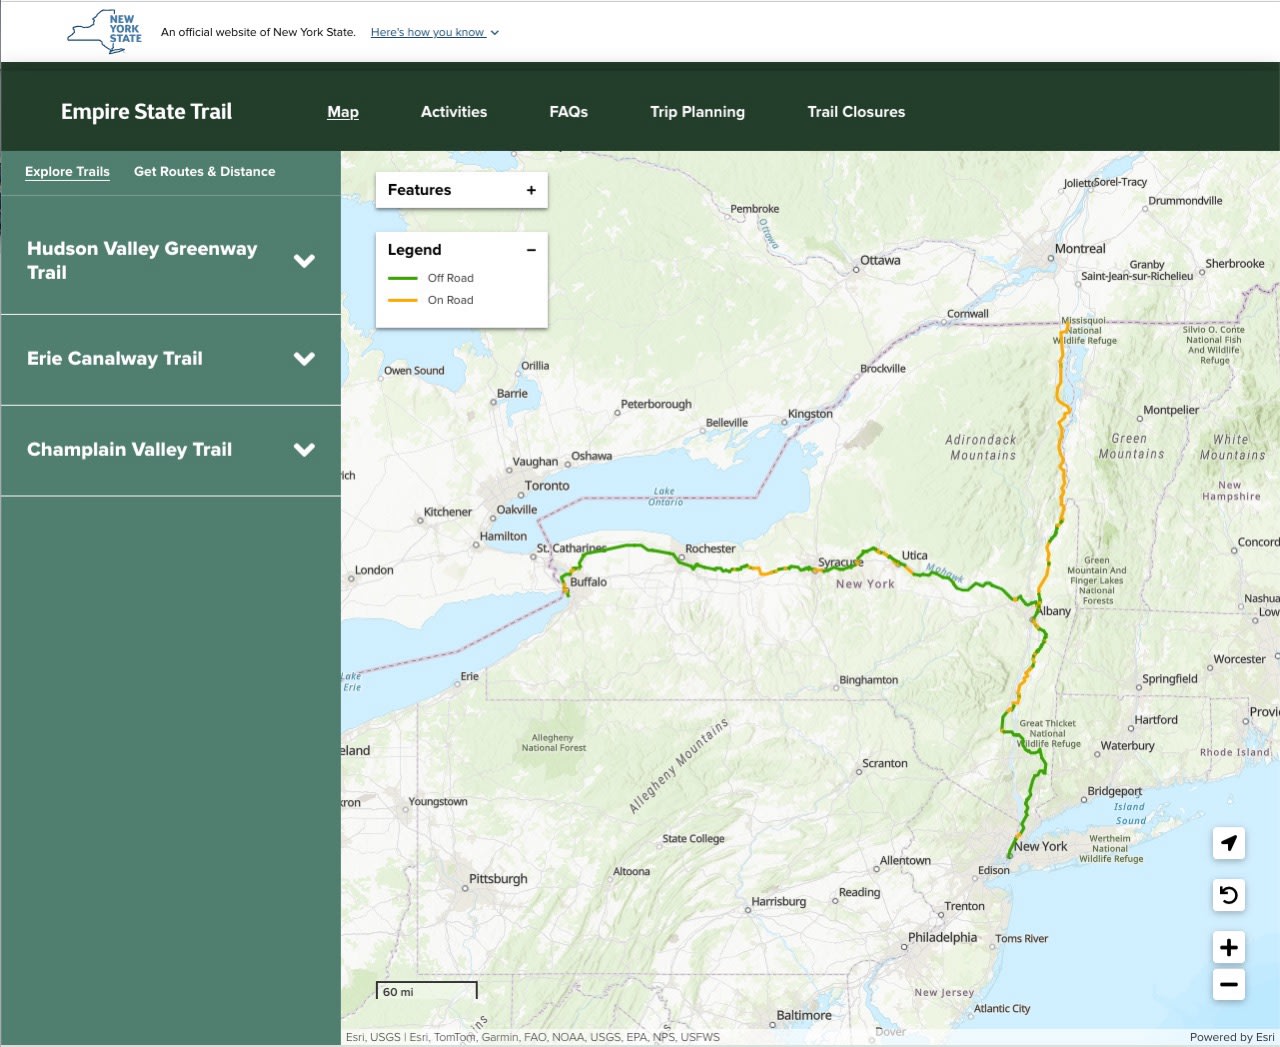
While studying the EST’s map, I discovered that more than half of the northbound trail is on narrow roadway shoulders next to fast-moving car traffic. The nearly 200 miles from Ticonderoga to the border via Westport, Keeseville, Plattsburgh, and Rouses Point looked especially gnarly. Even though I’m fairly experienced riding next to cars, I’d still rather avoid doing so, especially if I’m alone. Purely by chance, I ran into someone who’d completed this trip before who recommended I take a ferry from Ticonderoga to Shoreham and continue my journey to the border on the Vermont side of Lake Champlain. This sounded far more appealing and safer to navigate as a solo bikepacker.
After some extensive research, I settled on the following plan:
- Start my trip on the Empire State Trail at Van Cortlandt Park. Having ridden the Hudson bike path countless times before, I thought I’d save myself the 20 miles and an hour plus of cycling from my home to the park entrance. Instead, I’d take the 1 train to Van Cortlandt Park - 242 St subway station in the Bronx and ride on the EST through Poughkeepsie, Albany and Fort Edward to Ticonderoga.
- Depart the EST in Ticonderoga a few days later and take the Fort Ticonderoga ferry across Lake Champlain into Vermont.
- Ride the quieter farm roads of Vermont’s Champlain Bikeway through Vergennes, Charlotte and Shelburne to Burlington.
- From the Colchester Causeway near Burlington, take the popular Local Motion Island Line Bike Ferry to get onto the beautiful South Hero and North Hero islands.
- Enter Canada at the Alburgh-Noyan border, before continuing on to Saint-Jean-sur-Richelieu and finally Montréal via Canada’s Route Verte multi-use system.
Here’s what that ended up looking like across my 7 days of riding:
—
How did I keep track of all that on the road? #
Most of these trails are well marked and relatively easy to follow, but I’d still need to know when to stop for water, food, a bathroom, or for the night. And when I needed to leave the trail for any of these (which was most of the time), I’d need to know where to do so and how to re-join the trail afterward.
I had two choices for navigating my trip. The first and easiest choice was to download the GPX file of the entire route from the Empire State Trail’s website onto my bike computer and simply follow the map. The route file is not annotated with any landmarks, water fountains, public restrooms, cafés, or anything like that; it’s just a point-to-point map of the entire trail. When I wanted a break or as I got closer to my planned stop for the day, I could use my phone or bike computer to navigate to that location, typically a few miles off the trail. Relatively simple approach and appears to be the one many bikepackers take.
Personally, I like to see exactly where and when my next stop would be without having to constantly do the math in my head. To get the detail and precision I wanted for my daily riding, I could either add rest stops to my copy of the EST’s route file or simply make my own individual daily route files, using the original EST route file as the base. I chose to do the latter.
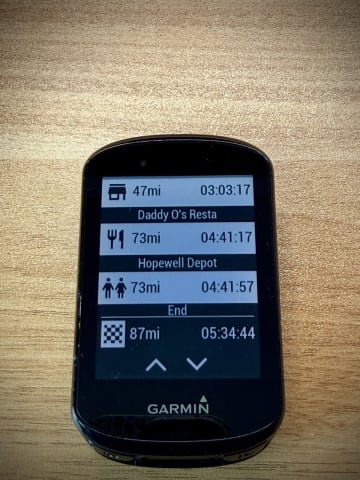
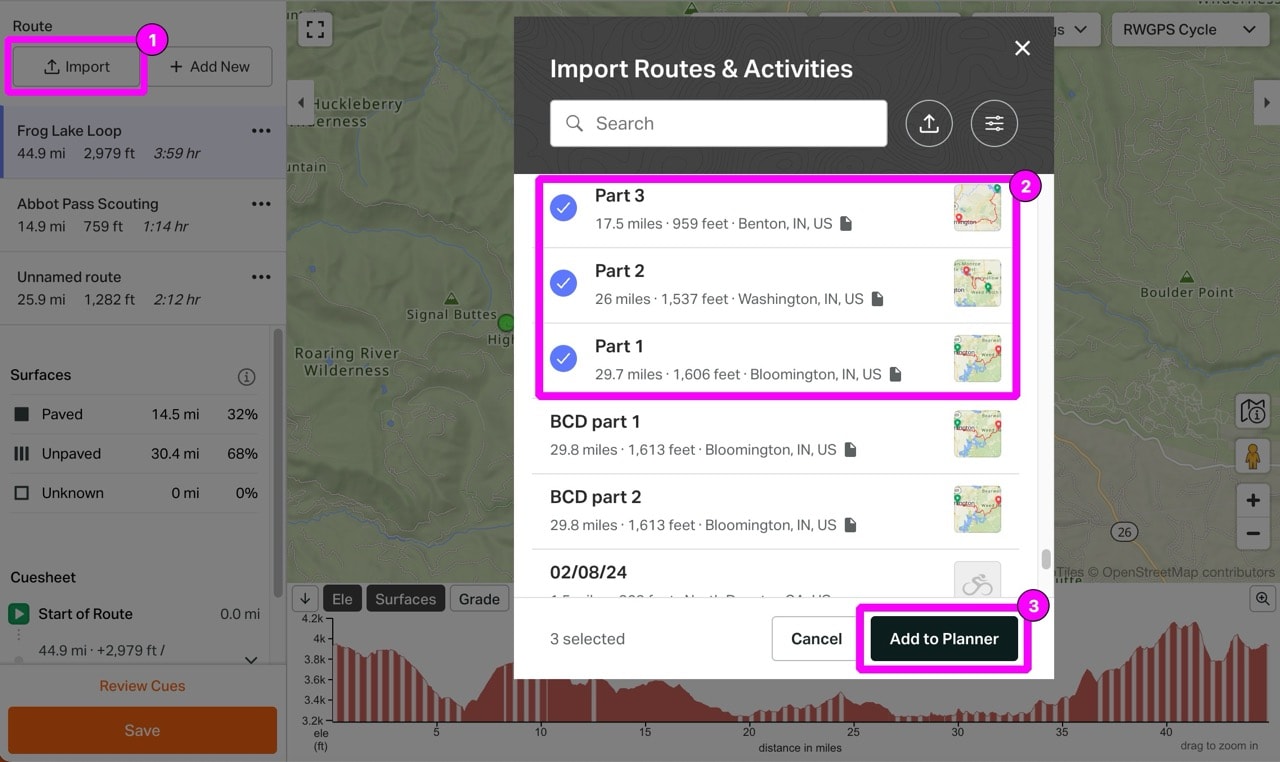
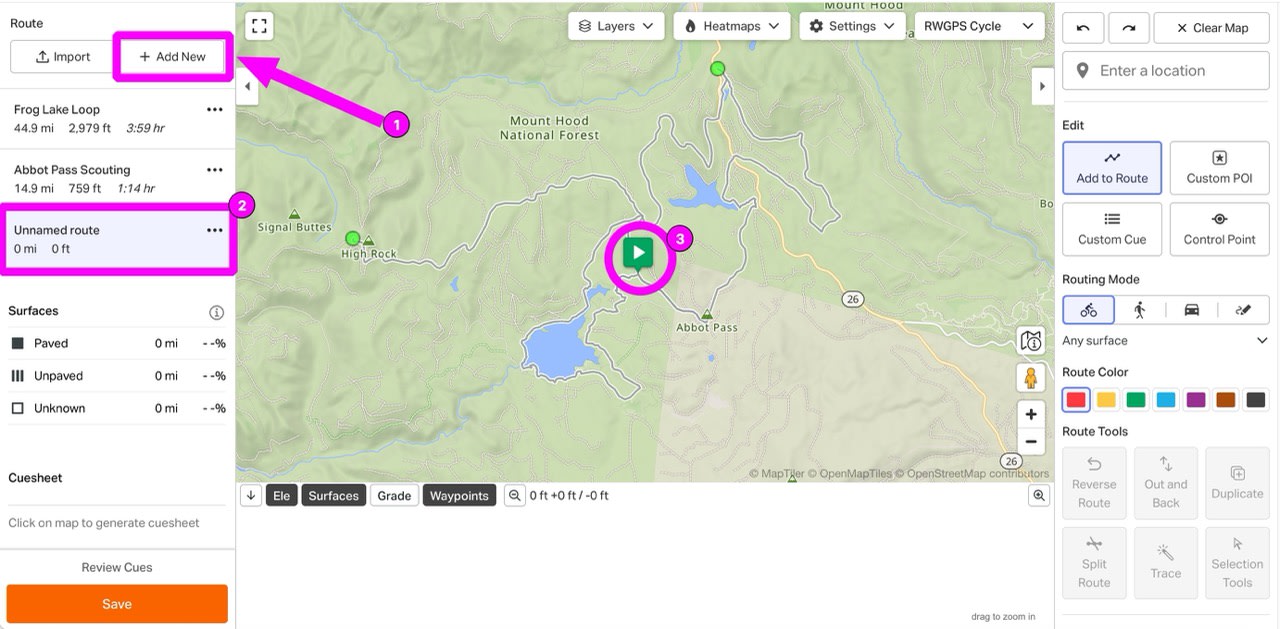
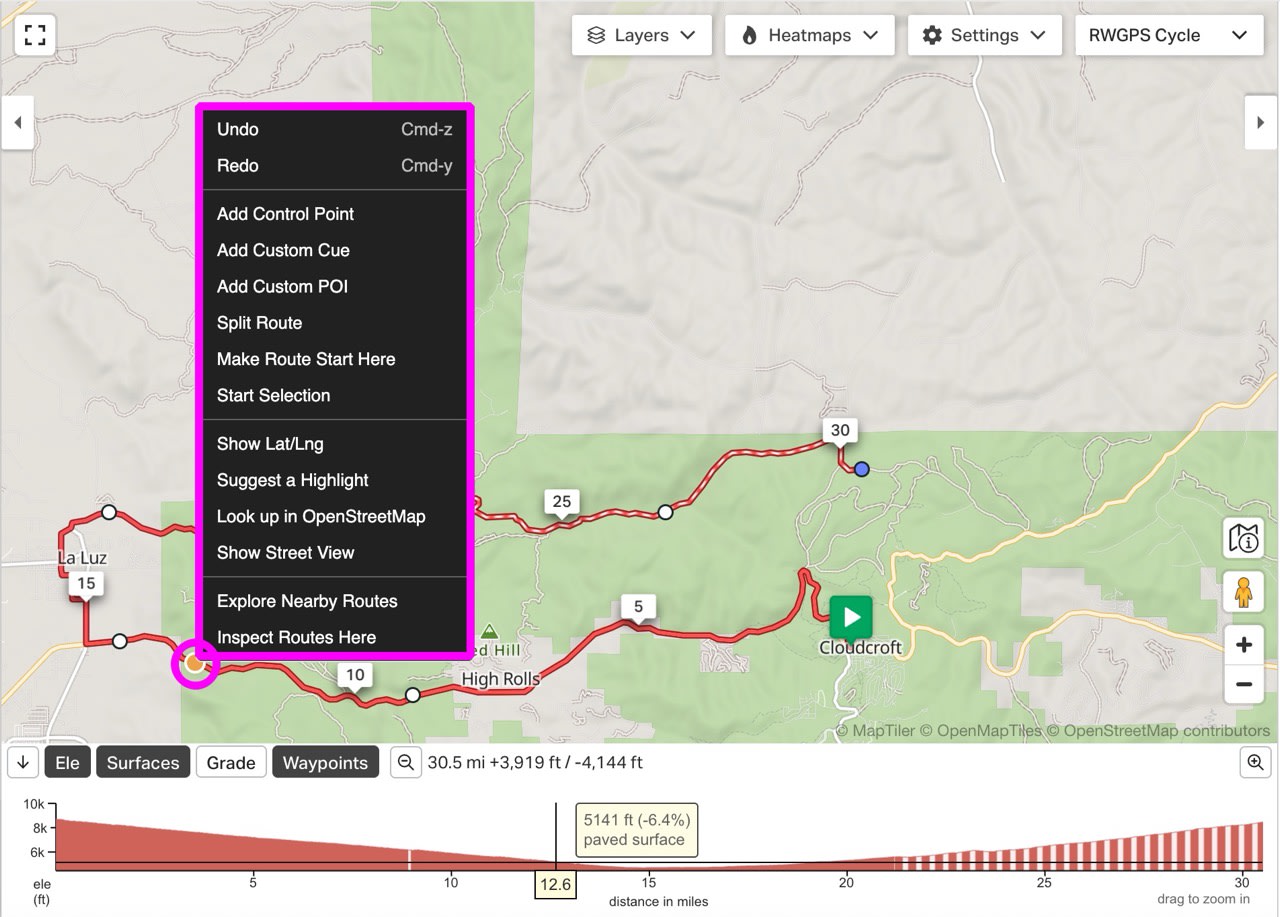
I use Ride With GPS to plan my cycling routes, but Strava, Komoot, cycle.travel, and plenty others offer similar functionality. The basic workflow involves importing the full EST GPX file as a base/tracing layer, creating a second layer for the actual day’s routes, then using a combination of Google Maps and RWGPS’s community-sourced locations and route planning tools to map the route between my start, end, and rest stops.
There are a few quirks to using the route planner that take some practice to figure out (for example, the route planner doesn’t always plot perfectly along your preferred trail and you might need to manually adjust it in small sections using a feature called “Control Points”), and many of the more robust tools require a subscription to use. I recommend carving out some time to get past the learning curve and glimpsing through their excellent Advanced Route Planning documentation and other support center articles for guidance.
After plotting a route, sending it to my bike computer for offline navigation was as easy as clicking a button in RWGPS.
But couldn’t I just use Google Maps to navigate from A to B?
A reasonable question, but no. Google Maps, being a general purpose mapping app, is not very well suited for navigating long distance cycling journeys. Part of this is because most long distance cyclists use one of the apps above for planning and tracking their rides, so Google doesn’t have reliable, current information on safe and popular cycling paths (or sometimes driving paths, for that matter!).
—
What about getting my bike home at the end? 🤔 #
To my surprise, almost none of the trip reports I found online covered how they returned home. If you found my post because you were also wondering the same, I’m here to help you figure it out!
The way I saw it, my options for getting home were as follows:
- Ride my bike back to NYC: A strong contender, for sure, and if I was a different, more bad-ass person, I might have seriously considered this one. I mean, what’s more impressive than saying you biked from NYC to Montréal and back?! Nothing, that’s what. However, while I enjoy cycling, I do not yet enjoy it enough to ride 800 miles in a 14-day span. So, alas, this idea was dead on arrival. I had a good laugh at the thought, though.
- Ride my bike back to Vermont, then take the Amtrak from there to NYC: This was one of the more common suggestions I saw mentioned deep in the comments section of some online forums. The ride from Montréal to the St. Albans train station in Vermont is a mostly flat 80 miles. The train ride from St. Albans back to New York City on the Vermonter is a casual 9 hours and costs about $90 with the bicycle add-on if you book reasonably in advance. Unfortunately, this train operates once a day and departs St. Albans at 9:15 am. That would require I either start from Montréal at an insanely early hour in the morning or, more realistically, spend an extra night in Vermont (translation: 1 day less in Montréal and an extra hotel + breakfast cost in Vermont). Additionally, as I planned to spend a week in Montréal exploring the city and celebrating my birthday, I expected I’d have more clothes on my return trip and would need to figure out how to transport that back to Vermont. Lastly and perhaps more importantly, I didn’t have very high confidence that I or my sit bones would be able to withstand another 5-6 hours of cycling back to Vermont. So while a reasonable option under different circumstances, I figured I’d discount this one as well.
- Take the Amtrak straight from Montréal to NYC: It is true Amtrak runs the Adirondack service between NYC and Montréal. Unfortunately, this particular Amtrak route does not currently allow bicycles on board, not even as checked luggage. It’s unclear if there are plans to change this in the near future. This seems like the biggest miss in the otherwise well-thought out Empire State Trail to Route Verte connection. If the Adirondack accepted bicycles, it would have been the easy choice, despite the 10-hour train ride.
- Take the FlixBus straight from Montréal to NYC: FlixBus’s official policy states that bicycles are allowed on certain buses for an additional fee. A few people online seem to have had success taking their bicycles onto the bus, but several others reported being denied boarding by the drivers, despite having a ticket permitting it. I didn’t want to risk being subject to a driver’s whims or misinterpretations of the policy and possibly being stranded, so I kept this one on the list but ranked it low while I considered other options.
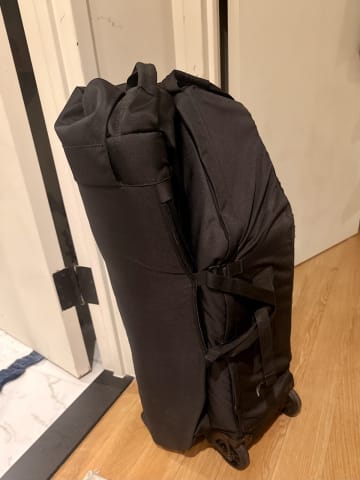
- Fly back from Montréal to NYC: LaGuardia Airport is only an hour and change from Montréal by air, and many US airlines now let you bring a bicycle as part of your checked baggage allowance. I’ve flown with my bicycle countless times and am fairly experienced with disassembling and re-assembling it. My bicycle bag — the excellent Transfer Case by Post Carry Co. — rolls up fairly compactly for storage, so I had a thought: Why not ship my bag ahead to Montréal? I could have had a bike shop in Montréal pack my bike into a padded cardboard box for me, but it seemed it would be unwieldy to maneuver to and from the airport on both ends. Plus, since I planned to spend a week being a tourist in Montréal, I decided to include a packing cube containing casual clothes and shoes in the shipping box.
So that’s exactly what I did! A few days before I set out on my trip, I swung by the UPS store to box up my bike bag and send it ahead to Montréal. An extra bonus with this option is I’d be forced to complete my trip one way or another. No backing out once I shipped my bag ahead! Just kidding, of course I could always abandon the ride itself, I’d just have to still get to Montréal at some point to pick up my bike bag and clothes.
It cost me a little under $180 to ship the entire box, plus around $27 in Canada for import duty for a total of $207. I paid for my return flight using airline miles and only spent about $12 out of pocket.
—
Where I slept #
During my research, I saw that many hotels in upstate New York and Vermont were either already sold out over the weekend or were charging extremely high nightly rates, most likely due to the huge popularity of Fall Foliage tourism (apparently, people like watching leaves change colors! Who would have guessed!). By setting out on a Sunday and timing the majority of my trip to fall on week days, I was able to avoid a very expensive weekend in Vermont. I was thankful to have a friend in Burlington open up her home to me on my penultimate night.
I also learned from online forums that many large or chain hotels tended to be okay with bringing your bicycle up to your room, so I decided to book those instead of the smaller, far more charming boutique-style hotels I’d have loved to stay at which tended to be less flexible about this. I certainly couldn’t risk losing my bicycle to theft if I was forced to store it outside overnight. My friend Bradley, who recently went a short trip along the EST chose to store their bicycle overnight at a bike shop to avoid this situation, a really clever solution. If you’re looking to do the same, be sure to call and confirm the shop’s opening hours ahead of time and that those hours would work around your riding schedule.
On a couple days, I couldn’t find affordable hotels close enough to the trail and resorted to booking rooms on Airbnb instead. In both cases, I messaged the hosts ahead of time to inform them I was traveling with a bicycle and to get their confirmation that I could store it indoors.
—
The final itinerary #
I wrote out my full plan including all routes, rest stops, and each day’s destination into a Notion document and shared it with my emergency contacts for their easy reference. Here is a snippet of that plan at a glance:
You can see the complete route collection on Ride with GPS here.
I didn’t end up making all of these rest stops or chose to go somewhere else instead once I arrived, but planning them ahead of time gave me fewer decisions to make in the moment and more familiarity with the route I’d be riding each day. It also helped me ensure I was well prepared for the “dead zones” along the EST where there are no available water or rest stops for nearly 30 miles.
How I Trained #
I was initially worried about having the stamina to ride day after day for 7 days straight. What if I overdo it, or wear myself out? After a test ride in April forced me to postpone my trip, I figured I’d be in pretty decent shape after a summer of training and racing. I also hoped the additional months of prep would give me enough time in the saddle to ensure I could ride several days in a row without getting too sore.
Riding a loaded bicycle would still be a new experience for me, not to mention I needed to test my gear and packing system, so I carved out time for a few practice rides on my fully packed bike. I’m really glad I did because those loaded test rides were far more challenging than I expected:
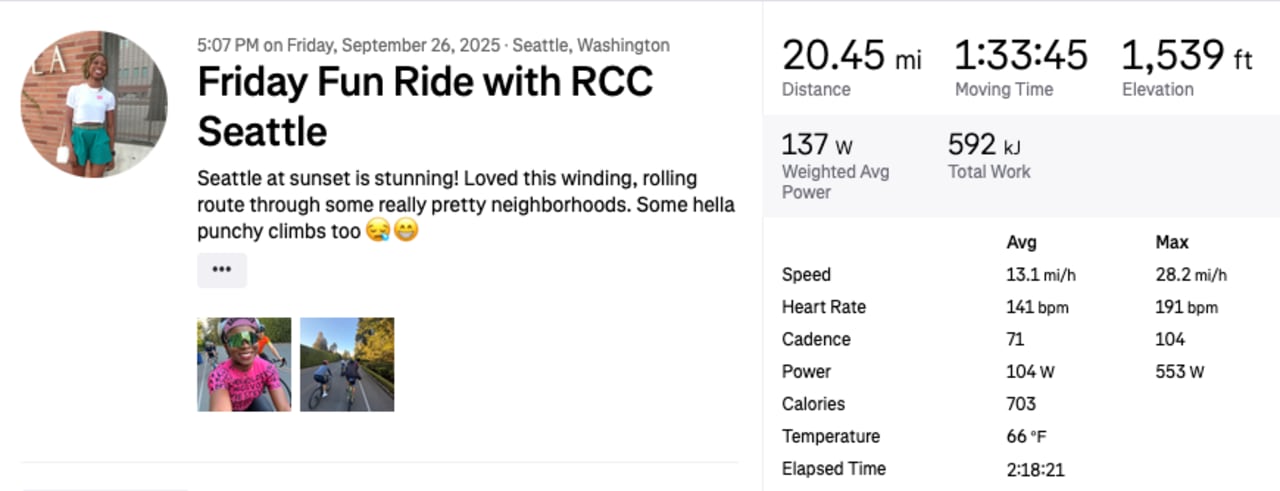
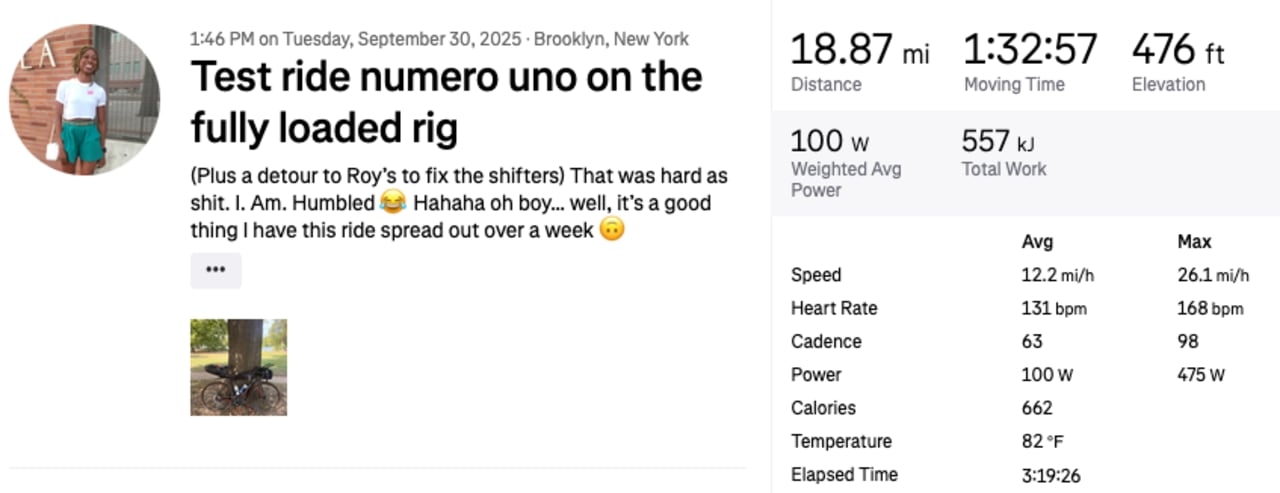
For context, it took me about the same amount of time to ride more distance with three times the elevation as it did that first loaded test ride only four days later. Who knew that carrying all that extra load would require more effort? It’s one thing to know it intellectually and another to actually feel the difference.
After the first loaded test ride, I dropped a few things from my packing list and adjusted my hydration setup before going on a second loaded test ride, which went far better and gave me a bit more confidence going into the trip. Those loaded test rides also helped me manage my expectations of how difficult the daily rides would be.
—
What I Rode On #
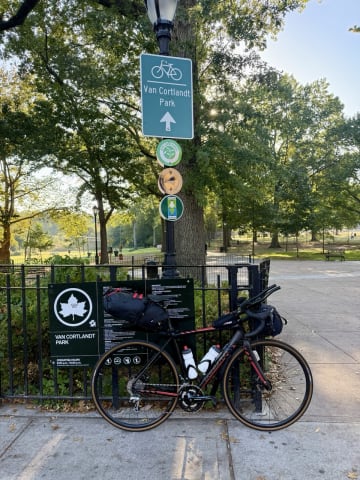
Here is a list of the equipment I used:
- Bicycle: I chose to ride on my old road bike, an aluminum frame 2016 Kona Esatto D. It’s a great bike that has served me well for many years, and I wanted to ride on something I was already familiar with. Kona does not list a maximum supported weight for their bicycles, so I contacted their support to ask about this. They responded quickly but skirted around my question about the weight limit, so to be safe, I decided I’d take the least amount of gear I could get away with.
- Tires: I took my bike into my local shop to determine the widest tire it could fit and settled on 30mm Panaracer Gravelking SS+ Folding Tires. I’ve read that wider tires are more comfortable and more resilient across a wider variety of road conditions, so I’d have liked to have gone with 32mm or 35mm if I had the choice. I chose gravel tires as a defense mechanism against potentially gravelly road conditions on the northern parts of the trail. In the end, I don’t think I needed them necessarily over road tires, but I don’t regret the choice and think I’d keep them for my next trip.
- Tubes: Nothing special, went with Kenda Presta Tubes as there was a package promotion when I bought the tires. The wheels that came with my bike are not tubeless-compatible, and I didn’t feel I needed the upgrade for this trip.
- Aerobars: I decided to ride with my clip-on aerobars on the recommendation of one of the mechanics at my local bike shop. What a great idea! They offered a break from the standard road riding positions and an opportunity to stretch my back and neck on long, flat stretches of the trail. I’m very glad I took them and would recommend the same. Mine are the Token TK9741-2 Aero Clip On Bars, but lots of other brands make good ones.
- Saddle bag: My extensive research led me to the Revelate Spinelock 16L saddle bag. I could not rave more about this bag. It’s extremely lightweight, yet sturdy and holds a ton of stuff when packed properly. I especially loved all the hooks and straps for attaching things, as well as the air purge valve, which helps it pack much more tightly and compactly. It felt sturdy and secure mounted to my saddle rails and did not sway at all during my rides. Highly recommend.
- Handlebar bag: I’ve had a Specialized x Fjällräven Handlebar Rack on my commuter bike for years, and I discovered by accident that it was compatible with a new line of handlebar bags that Fjällräven launched in 2025. I decided to try the 13L Hoja Handlebar Rolltop for my trip. Unfortunately, I do not recommend it for three reasons. For one, the bag constantly sagged no matter how tightly I fastened it to the rack, or the rack to my bicycle. Secondly, it was a rather snug fit between my 42cm handlebars, which meant it interfered with shifting unless I found a way to pack it slightly narrower than its natural width — a bit of a tricky task, considering its cavernous, unstructured shape. Lastly, it was a massive pain to get anything out of it at rest stops since I had to fully unclip it from around the rack, unroll it to access its contents, then try to re-pack it to fit between my shifters. This made it annoying as a storage solution for semi-frequently accessed things like my power bank, extra energy bars, my wallet, and so on. I actually discovered its flaws during my test rides but decided to try to manage it since I didn’t have time to try out alternatives.
- Top tube bag: I tested a couple generic 2-2.5L top tube and frame bags I found online but thought they bulged too much when packed and rubbed on one or both knees when pedaling. I didn’t have time to test other options, so I returned them and ended up taking my old 0.36L X-Lab Rocket Pocket top tube bag on my trip. A little smaller than I’d have preferred, but it worked fine to hold a few gels and energy bars for easy access while riding.
- Pedals: I have a pair of Favero Assioma DUO power meter pedals that I always travel with whenever I can’t take my bike. They’ve served me well for nearly five years, I have no complaints. I don’t think a power meter is a must for a bikepacking trip by any means, I just always use one when I ride and I like the data.
- Fenders: I have a set of Musguard OMNI front and rear tire fenders from when I backed them on Kickstarter in 2022. I was lucky it only rained once during my trip, overnight on the third night, but these mudguards came in handy the next morning when I rode through the still-wet streets. They are highly bendable and adjustable to suit many bikes, and I liked that they can be rolled up for storage when not in use.
- Navigation: I use a Garmin Edge 830 bike computer. As I stated earlier, I generally prefer using a bike computer to navigate while riding as the GPS is pretty accurate and the battery lasts several days on a single charge. It also helped with my efforts to disconnect from my phone and immerse myself in my surroundings.
- Bike lights: I rarely had to ride in the dark (until the last day, when I rolled into Montréal as the sun was setting), but I still packed a 350 lumen front light from Light & Motion. For my tail light, I always ride with a Garmin Varia RTL515 radar light. I’m not exaggerating when I say this is the single most important thing I took on my trip. It works by detecting vehicles (cars, trucks, motorcycles, other cyclists) approaching you from behind at a speed faster than you’re currently moving and simultaneously displays a warning dot on your bike computer screen, makes an audible alert, and flashes the radar’s tail light for the approaching vehicle’s visibility. This proved to be extremely useful once I got to the stretches of the trail that are on narrow shoulders next to high speed traffic. Sometimes when I saw there were multiple vehicles approaching quickly, for example due to a recently changed traffic light, I’d even pull off the shoulder entirely into the grass or dirt to let the speeding cars pass. I cannot recommend getting a radar light enough, and I’ll never bike anywhere without it. I did have to get an after-market mount to attach the light to my saddle bag. I got this one and it was easy to attach using the screws it came with.
- Bicycle maintenance tools: I traveled with 4-ounce containers of wet and dry chain lubricants, a few disposable latex gloves, tire levers, spare tubes, and a small multi-tool. I figured for anything more advanced, I could roll my bike to the nearest main road and call a taxi.
- Anti-chafe cream: I ordered a 10-pack of 9ml Chamois Butt’r anti-chafe cream. I really like the compact form factor as I could keep a small one in my top tube bag for re-application at rest stops and stash the rest in my saddle bag for use on subsequent days.
- Bike lock: I debated whether to take one at all, and the internet seems divided on this topic. In the end, I decided to travel with a Hiplok Z LOK 3-digit Combination Bike Lock. At less than 3 ounces, it’s not exactly the most secure lock, and I certainly wouldn’t leave my bike unattended for longer than a few minutes with just this protecting it. As a deterrent against opportunistic theft though, it offered some peace of mind on the few occasions I made a brief pit stop and couldn’t ask someone nearby to keep an eye on my bike.
- Entertainment: I couldn’t risk riding over 400 miles with only my thoughts to keep me entertained; I can’t think of a faster way to go mad! I traveled with my Aftershokz, which are bone-conducting headphones that transmit sound through the temporal bone directly to the inner ear using vibrations. They sit in front of (not inside) your ears, thus keeping your eardrums completely unobstructed so you can fully hear your surroundings while audio plays through a Bluetooth-connected device. They’re ideal for low traffic areas, but you’ll likely struggle with audio quality in high noise environments (you probably should be fully alert to your surroundings in such areas anyway). I have an older model of the OpenRun ones and they’ve served me great for over five years. I also packed an extra power bank for my phone and important cycling devices (bike computer, radar light) and pre-loaded my phone with downloaded podcasts, audiobooks, and music playlists. My minimalist packing setup did not leave me any room to bring my laptop, an iPad, or even a book, so for two whole weeks, my phone provided my only source of digital entertainment.
—
What I Wore #
It was 69°F the morning I set out from NYC, rising to the high-80s on that first day, but by the fourth day, the temperatures had dropped to a high of 60°F. By the sixth day, I was setting out on a frosty 32°F morning. In short, I needed to pack a range of clothing to support the variety in weather conditions. Due to the aforementioned weight and capacity constraints, I could not fit a second pair of cycling clothes in my bag, so I resolved that the first thing I’d do after checking in to my accommodation each day would be to hand-wash the day’s clothing, towel-dry them, then hang them up to air dry.
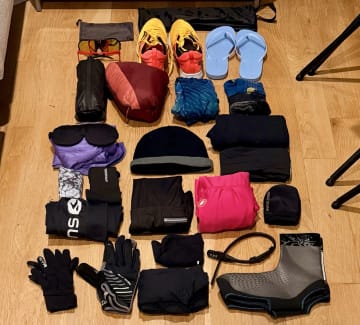
Here’s everything I traveled with:
Daily cycling gear (worn and washed every day, not pictured):
- 1 sports bra
- 1 sleeveless base layer
- 1 short sleeved jersey
- 1 sleeveless, packable gilet/vest — only wore this on the first day.
- 1 pair of bib shorts — on long rides, I love wearing drop tail bibs (for quick and easy bathroom use) with cargo pockets (for quick access to phone, tissues, chapstick, etc.).
- 1 pair of socks
- 1 pair of fingerless gloves
- 1 cycling cap — doubles as a visor, hides my helmet hair, prevents scalp sweat from dripping into my eyes, and lets everyone know I’m from Brooklyn 😄
- 1 pair of cycling sunglasses — mine are tinted and don’t work well on overcast conditions, but thankfully I didn’t have too many of those.
Cold weather cycling (starting on day 4, I wore these everyday over my daily cycling clothes):
- 1 pair of lightweight gloves — I used my ski liners and they worked great.
- 1 pair of thicker, medium-weight gloves — handy (hah!) on the really cold mornings, although tricky dexterity-wise for shifting and braking.
- 1 cycling jacket — I’m obsessed with my Castelli Perfetto Ros jacket; it’s somehow breathable yet warm, lightweight yet waterproof, and works great across a variety of conditions.
- 1 neck buff — valuable ear and neck cover when temperatures dropped.
- 1 pair of cycling leg warmers
- 1 pair of cycling arm warmers
- 1 set of cycling toe covers
- 1 set of neoprene cycling overshoes — I have the Shimano S-Phyre Insulated Shoe Covers and they kept my toes dry and warm on chilly mornings later into my trip.
Evening clothes:
- A few sets of underwear
- 1 pair of lightweight sleeping clothes
- 1 pair of insulated tights
- 1 long sleeve merino wool top
- 1 pair of super light sneakers
- 1 packable down jacket
- 1 pair of lightweight running shoes — I had an old pair of the Saucony Fastwitch 9, which only weigh about 5 ounces combined.
—
What I Ate & Drank #
Since my trip was in a relatively urban area, with civilization never more than a few miles away from the trail even in the most remote stretches, and since I planned to have a proper breakfast, lunch, and dinner everyday, I didn’t feel I needed to bring 7 days of nutrition and hydration along. What I instead prioritized were:
- Water bottles — I traveled with two 20 oz water bottles and kept plain water in one and a flavored drink mix (see below) in the other.
- Electrolyte drink mixes — these served a dual function of giving me something flavored to drink other than plain water, as well as a sodium replenishment for what I lost in sweat while riding. I didn’t math it out in any detail; I simply went with one travel-size drink mix packet for one bottle and topped it up with a new packet when that bottle ran out. I wasn’t worried about an exact quantity as I figured I could replenish at a bike shop along the way if I ran out. I really like all of Skratch’s hydration products; that’s pretty much all I use.
- A few gels and energy bars — for emergency snacking while riding, especially useful when I skipped a rest stop or had to ride a bit longer to the next one. I packed a few from Skratch, GU, Maurten, and Picky Bars (which recently shut down, RIP). It was important for me to pack a decent variety of products I liked in order to minimize flavor fatigue.
- A couple instant oatmeal packets (not shown in the picture) — these held me over on mornings where I couldn’t get to a café or diner before heading out for the day.
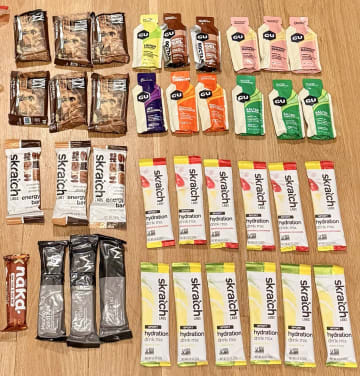
I kept this simple and went with what I had on hand and knew I liked. I didn’t end up using everything I took, but I was glad to have all of it on me. I’ve bonked in endurance events before and now err on the side of slightly over-packing vs. under-packing my nutrition.
In closing… #
Final Recommendations #
- Check operational hours of transportation and rest stops: This is an easy one to miss with potentially trip-derailing consequences. Lots of cafés don’t open on Mondays, for example, which could be a truly stressful discovery when you’re completely out of water and miles from the nearest alternative. And don’t be like me and rely on rarely updated websites for the current operational status of smaller services like local ferries. Where available, I’d suggest checking social media for more recent updates and announcements.
- Have a plan; share your plan: Plotting my daily routes and rest stops up front helped me minimize surprises (although it’s likely not possible to completely eliminate all surprises, as you can see from my trip!). It also meant I had a pre-set itinerary I could share with my close contacts so that they could follow my journey from afar. Additionally, I used Apple’s Find My to share my location in realtime and posted my completed rides every day to Strava so people could see my progress.
- Test your equipment: A popular mantra in racing is this: Nothing new on race day. I would say for an extended, multi-day trip like this, the same mantra applies. Don’t let day 3 of your trip be the very first time you’re trying a particular pair of shorts, or a set of clip-on aerobars, or a storage solution, or even your fully packed bike. There are few things more unpleasant than chafing in places you didn’t anticipate or developing a knot in that one corner of your neck from an untested riding position and then having to abort your trip or ride through that discomfort. Make time to pack up everything you plan to take with you, wear the exact kit you intend to ride with, and go on one or more test rides before your trip to be absolutely sure you’re comfortable with everything.
- Study the trail and be prepared: Can you imagine if I hadn’t known that on day 5 of my trip, there would be no water or rest stops in the 28 miles between my lunch stop in Whitehall and my accommodation in Ticonderoga? If I had neglected to refill both my bottles or grab an extra muffin and didn’t have any extra snacks on me, I might have truly hated myself by the time I got to my destination. You should also anticipate losing cell service in parts of the trail, especially in the wilderness, and have a plan for that if it might impact your trip. In my case, I did that by saving offline maps for the region on Google Maps, installing the RWGPS app on my phone, and pre-downloading my audio entertainment. Some bikepackers even travel with a paper map, so if that’s your vibe, definitely go for it.
- Be flexible, be reasonably self-sufficient: I stated in my last post that I didn’t pre-commit to non-refundable bookings upfront. This allowed me to adjust my plan for days 3 through 6 in response to the extreme anxieties I was feeling in the first couple of days. There might be other reasons to deviate from your original plans, for example if a transportation service isn’t running or you fell ill and needed to call it a day a little earlier than planned. If you have the flexibility, I’d encourage you to consider having a destination and itinerary in mind and adjusting as you go based on how you’re feeling during your ride. It’s also really essential to have a plan for contingencies. I’m somewhat adept at fixing small bicycle issues with the tools I brought with me, but more complicated things might have required a visit to a bike shop. Having an idea of when and how to get off the trail to find a taxi or roll my bike to a shop (some of which I pre-saved in Google Maps) gave me peace of mind on that front.
- Have so much fun!: Remember why you’re on this trip in the first place. Whether it’s to feel more connected to nature or humanity, whether it’s to be awed by the sights along the way, whether it’s to prove to yourself that you’re capable of something difficult and brave; try not to lose sight of it. Stop and smell the literal roses. Take all the pictures. Laugh. Talk to the animals. Not every day might go amazingly. You might get rained on or develop some unexpected bicycle mishaps; you can’t really predict the future, but you can plan for it, and I hope these two posts help you feel better prepared. And remember no matter what happens along the way, tomorrow will be a new day.
—
Final Thoughts #
This trip opened my eyes to a type of experience in nature that I feel is really only achievable on two wheels. I’ve been riding for a while and had sort of intuited this over the years, but it was something else entirely to experience it for myself on a multi-day trip. On my bicycle, I was able to go much further and for far longer than hiking or running would have taken me. There is certainly room for both kinds of trips, but I really enjoyed the rhythmic feeling of pedaling along in the woods, of passing through multiple towns in one day, of knowing each day would take me the longest and furthest I’ve ever ridden from home.
I was also extremely anxious (without fully realizing why) about the whole “doing it by myself” angle to this and questioned my motive multiple times, but all things considered, I actually think this trip or even just a portion of it is one of the more accessible ways to get a taste of bikepacking. The trails are all well-marked and mostly in good condition, and depending on the time of year you go, you’re highly likely to encounter other trail users for much of your way. Whenever I passed other cyclists and we nodded at each other, I found it strangely comforting to know even without saying it that we were all sharing in this desire for a deeper connection with the outdoors, which we could only get by actually spending time in it as we were doing.
Acknowledgements #
Special thanks to the authors of the following trip reports that gave me an idea of what to expect and helped tremendously with my planning:
- Biking the Empire State Trail: New York City to Montréal — Danny White
- NYC -> Montreal Bike Ride — Peixian
- I Rode to Canada: NYC to the Border on the Empire State Trail — Naveen Wall
- Bronx to Montreal- Empire State Trail — u/blahdre
I’m also thankful for all of the trip guidance I got from these Reddit communities:
Lastly, thanks to Bradley Dettmer, Dez Udezue, and Tade Fayomi for feedback on both essays.
Other Useful Resources #
- The Empire State Trail’s excellent website
- Interactive map and trail documentation for Québec’s La Route Verte
- Interactive map and a good old-fashioned PDF map of Vermont’s Champlain bikeway system
- A Visual Tour of New York’s 750-Mile Bicycle Route (gift article) — Jane Margolies and Wm. Ferguson, New York Times
- Bikepacking On A Road Bike - Tips And Road Bike Set Ups (archive link) — Codey Orgill
- Packing lists for Credit Card Bike Touring — Mats Henricson
- What to Pack: The best gear for self supported credit card touring on the road — Zach Overholt, Bike Rumor
- Intro to Bikepacking — REI
- Intro to Bike Touring — REI