Anchor links are deceptively simple at first glance: click a button, scroll to the heading, and done. But if you ever had to implement them, you might have encountered the
The most simple solution is to add
Practical: shift the trigger line
Maybe instead of adding extra padding,
Good: translate the trigger points
Instead of shifting the trigger line, we could
The example visualizations now show the location of these ‘virtual headings’. So, while the heading is still at the same place in the article, we visualize where its trigger point is.
In the example, we see one problem arising: the first heading is now too far up. The nice part of this new approach is that we can fix this quite elegantly, since we can shift the individual virtual headings with ease. But what would be a good way to do this?
Great: translate trigger points fractionally
If we think about it, we don’t need to translate all the trigger points. There’s only a few conditions that need to be met:
- The headings need to be reachable.
- The headings need to stay in order.
We can meet these conditions by translating the trigger points
Awesome: create a custom mapping function
While the fractional solution works, in the sense that our conditions are met, it does have some flaws. We have chosen a trigger line that’s 25% down from the top of the viewport. It would be nice if we can actually minimize the deviation from this ideal line across all headings. The closer the triggers happen to this (mind you — semi-arbitrarily chosen) line, the better the user experience should be. Minimizing deviation feels like a good heuristic. This for sure will make the users happier and result in increased shareholder value.
Let’s minimize the
Side quest: minimization functions
To explore this idea we need to bust out… Python. Here, we (read: Claude and I) implemented a SLSQP (Sequential Least Squares Programming) is an optimization algorithm used to solve constrained nonlinear problems. It works by iteratively improving a solution while satisfying equality and inequality constraints. At each step, it approximates the problem using simpler quadratic models and linear constraints, making it efficient for problems where smooth gradients are available. SLSQP is commonly used in engineering, machine learning, and operations research when both the objective and the constraints are differentiable.
- Anchor penalty: How far a virtual heading is moved from its original location. Minimizing this keeps virtual headings close to their original position. ()
- Section penalty: How much the size of each virtual section (the space between two virtual headings) differs from the original section size. Minimizing this ensures that sections don’t become disproportionately short or long in terms of scroll distance. ()
We combine these into a total loss , where the weights and control the trade-off ().
We define constraints to:
- Keep virtual headings inside the page boundaries.
- Ensure the first heading doesn’t float upward (its virtual position must be >= its original position).
- Keep virtual headings in order ().
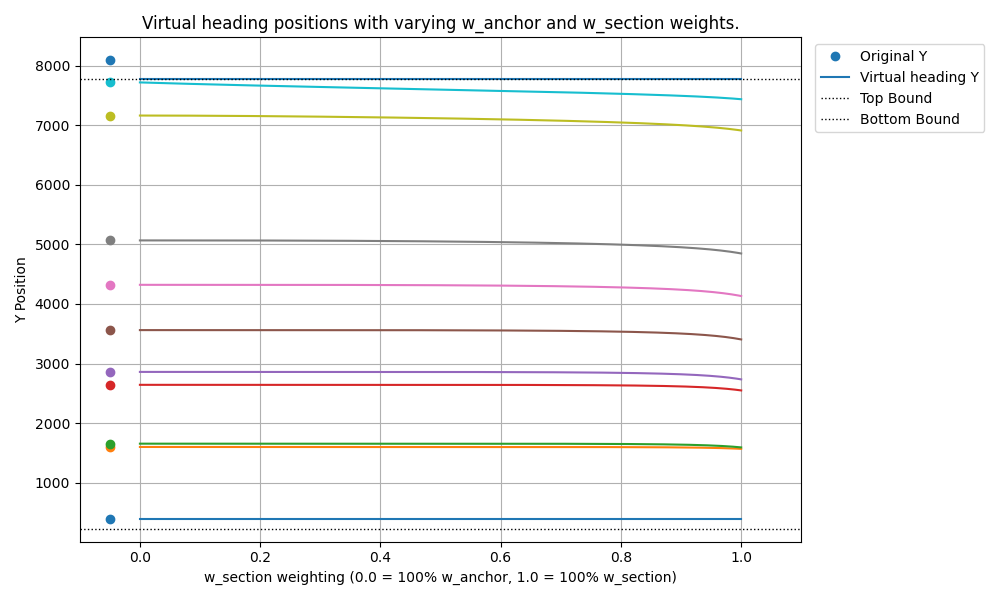
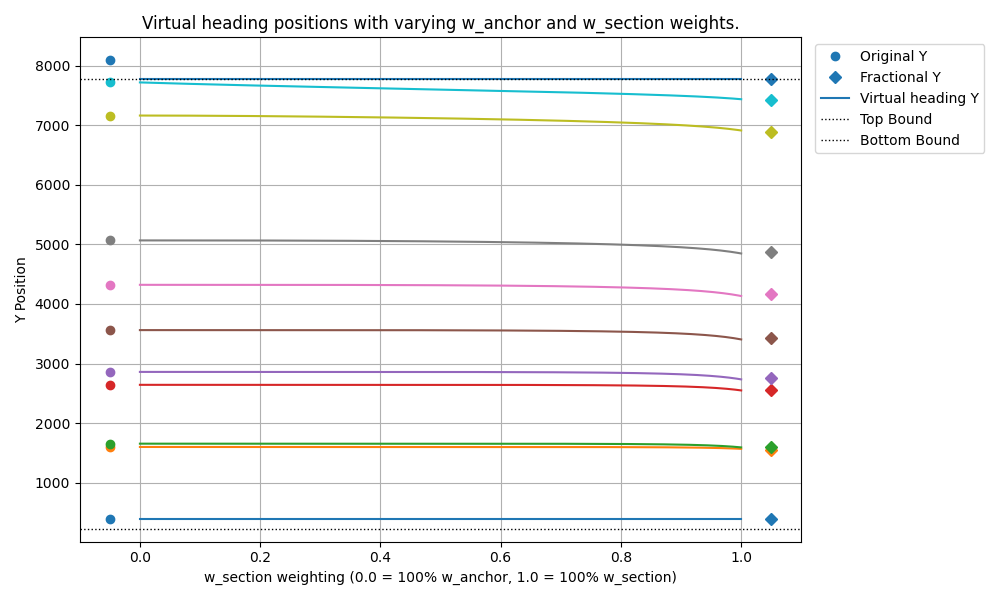
From this, we generate a plot showing how the virtual headings’ locations change as we vary the weights (specifically, as increases from 0 to 1).
Running that code gives us 

Realizations
Staring at that optimization graph sparked a thought. Okay, maybe two thoughts. First, that need to preserve section spacing really kicks in towards the end of the page, where headings get forcibly shoved upwards to stay reachable, squashing the final sections together. Second, let’s consider the behavior of the ‘fractional translation’ method on an edge case.
Imagine, if you will, taking the entire Bible, from the “In the beginning” of Genesis to the final “Amen” of Revelation, and rendering it as one continuous, scrollable webpage. (For the tech bros among us: you could alternatively imagine gluing all of Paul Graham’s essays back-to-back). Now, suppose the very last heading, maybe “Revelation Chapter 22”, is just 200 pixels too low to hit our trigger line when scrolled to.
Does our previous ‘fractional translation’ make sense here? It means taking those 200 pixels of required uplift and meticulously spreading that adjustment across every single heading all the way back to the start. The Ten Commandments get a tiny bump, the Psalms slightly more, all culminating in Revelation 22 getting the full 200px boost.
Actually, if you think about it, with a fractional translation, the error (the distance between the virtual and original headings) grows with the page length. So if the page tends to infinity, so does the error! This would of course be sloppy, and something users could immediately notice as feeling off. So how are we going to fix this?
The final version
This leads to our desired behavior for a smarter mapping function:
- For headings near the end of the page, apply more adjustment (act like high ).
- For headings near the beginning of the page, apply less (or ideally no) adjustment (act like high ).
- The transition between these states should be smooth.
We need a function that maps a heading’s normalized position (where is the first heading, is the last) to an ‘adjustment factor’ . This factor determines how much of the maximum required uplift gets applied to the heading at position .
We need this mapping function to have specific properties:
- It must start at zero: .
- It must end at one: .
- The transition should start gently: .
- The transition should end gently: .
It turns out that we can borrow a function from the field of computer graphics to solve this problem. The
This function provides a smooth transition over the entire range . But what if we don’t want the transition to start right away? What if we want the adjustment factor to remain 0 until reaches a certain point, say , and then smoothly transition to 1 by the time reaches 1?
We can achieve this by preprocessing our input before feeding it into the smoothstep function. Let’s define an intermediate variable that represents the progress within the transition phase, which occurs between and . We want to go from 0 to 1 as goes from to 1. The formula for this linear mapping is:
Now, we need to handle the cases where is outside the range.
- If , then is negative. We want to be 0 in this case.
- If , then is greater than 1. We want to be 1 in this case. (Although is defined on , clamping ensures robustness).
We can achieve this clamping using min and max functions:
This value now behaves exactly as we need: it’s 0 for , linearly increases from 0 to 1 for , and is 1 for .
Finally, we apply the smoothstep function to this clamped and scaled input to get our final adjustment factor :
This allows us to use a parameter (where ) to
Let’s pick and see what this
It’s…
Validation
So, we are finally done. We’ve gone to depths that no man has ever gone before to fix anchor links. A truly Carmack-esque feat that will be remembered for generations to come. Let’s ask the lead designer what 
… Oh well, at least we got a blog post out of it.
Want overengineered anchor links for your project? Get in touch!