Back in the early ’90s, I had an Amiga 2000 with just one expansion card: a SCSI controller paired with a massive 290 MB hard drive. Getting software and games to run from the hard drive—with only 1 MB of chip RAM—required a lot of tricks. But it was fun, and it taught me a lot about computers.
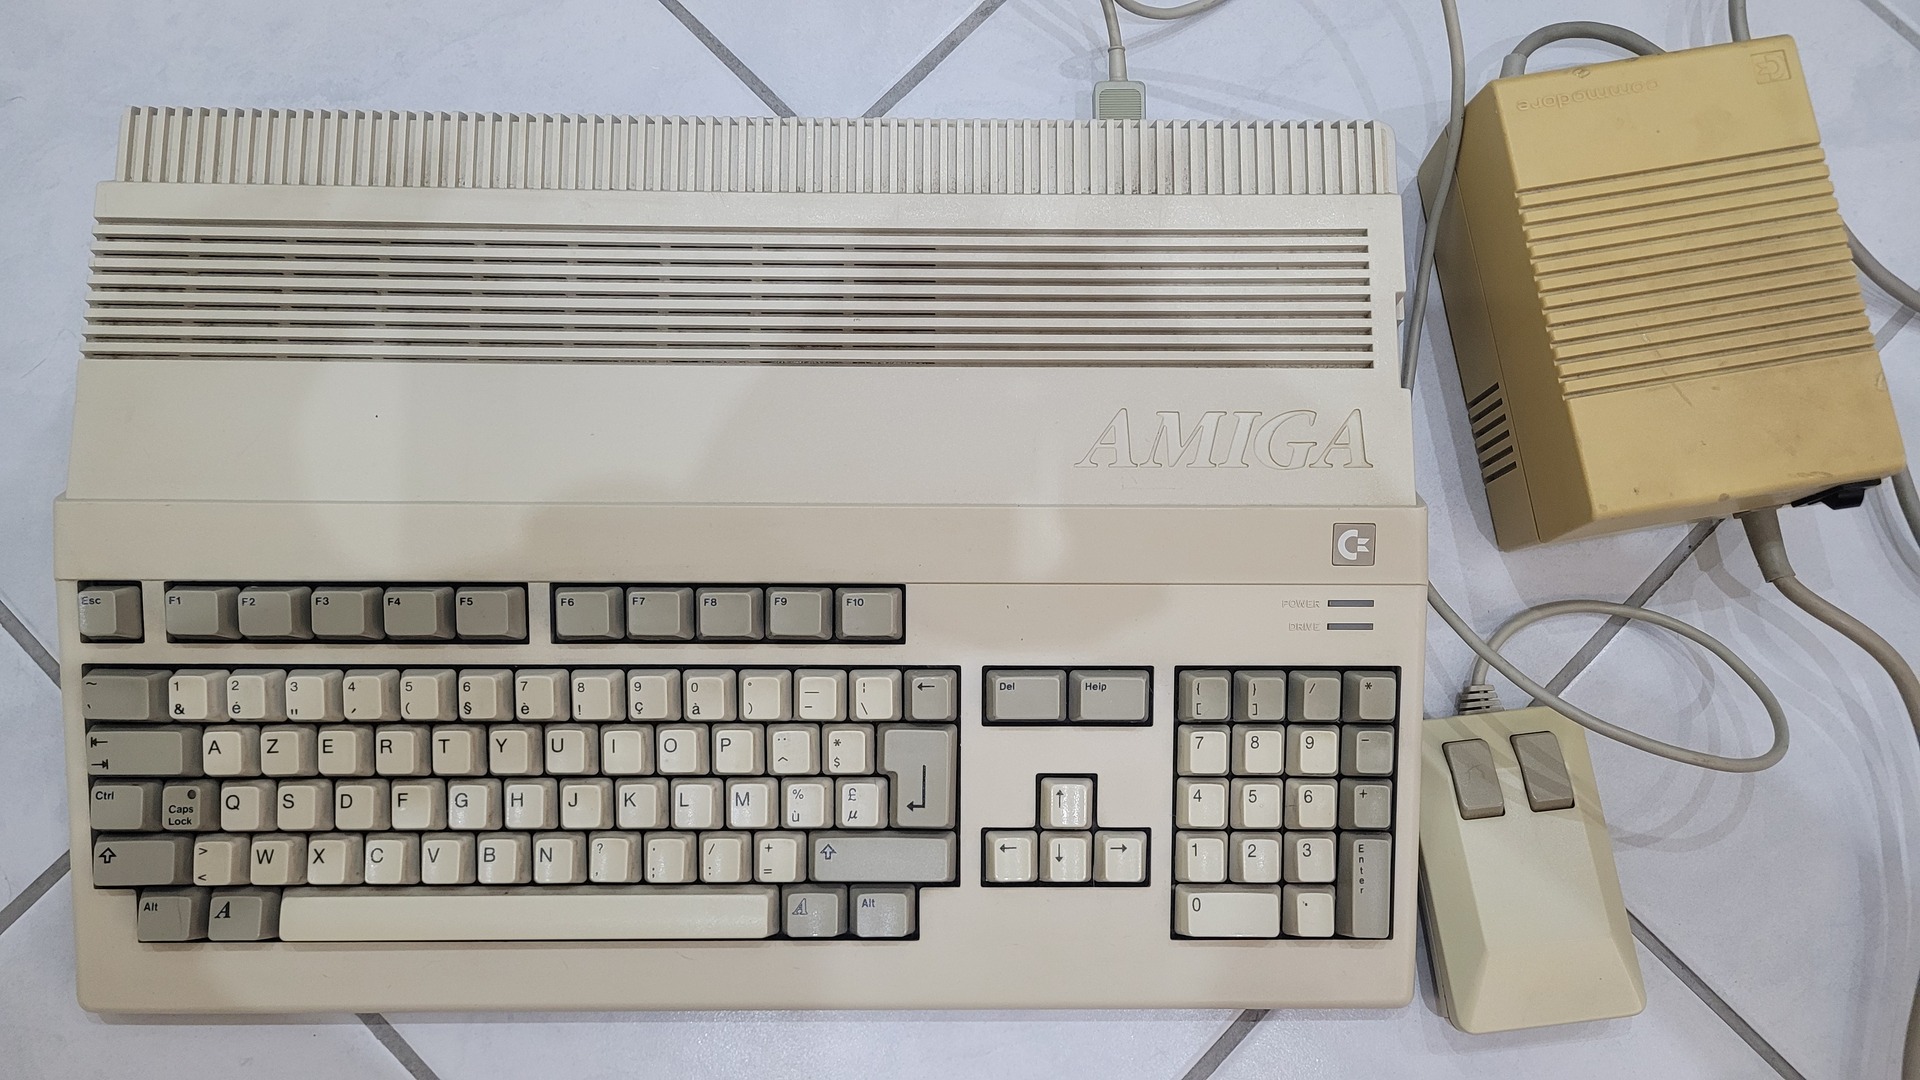
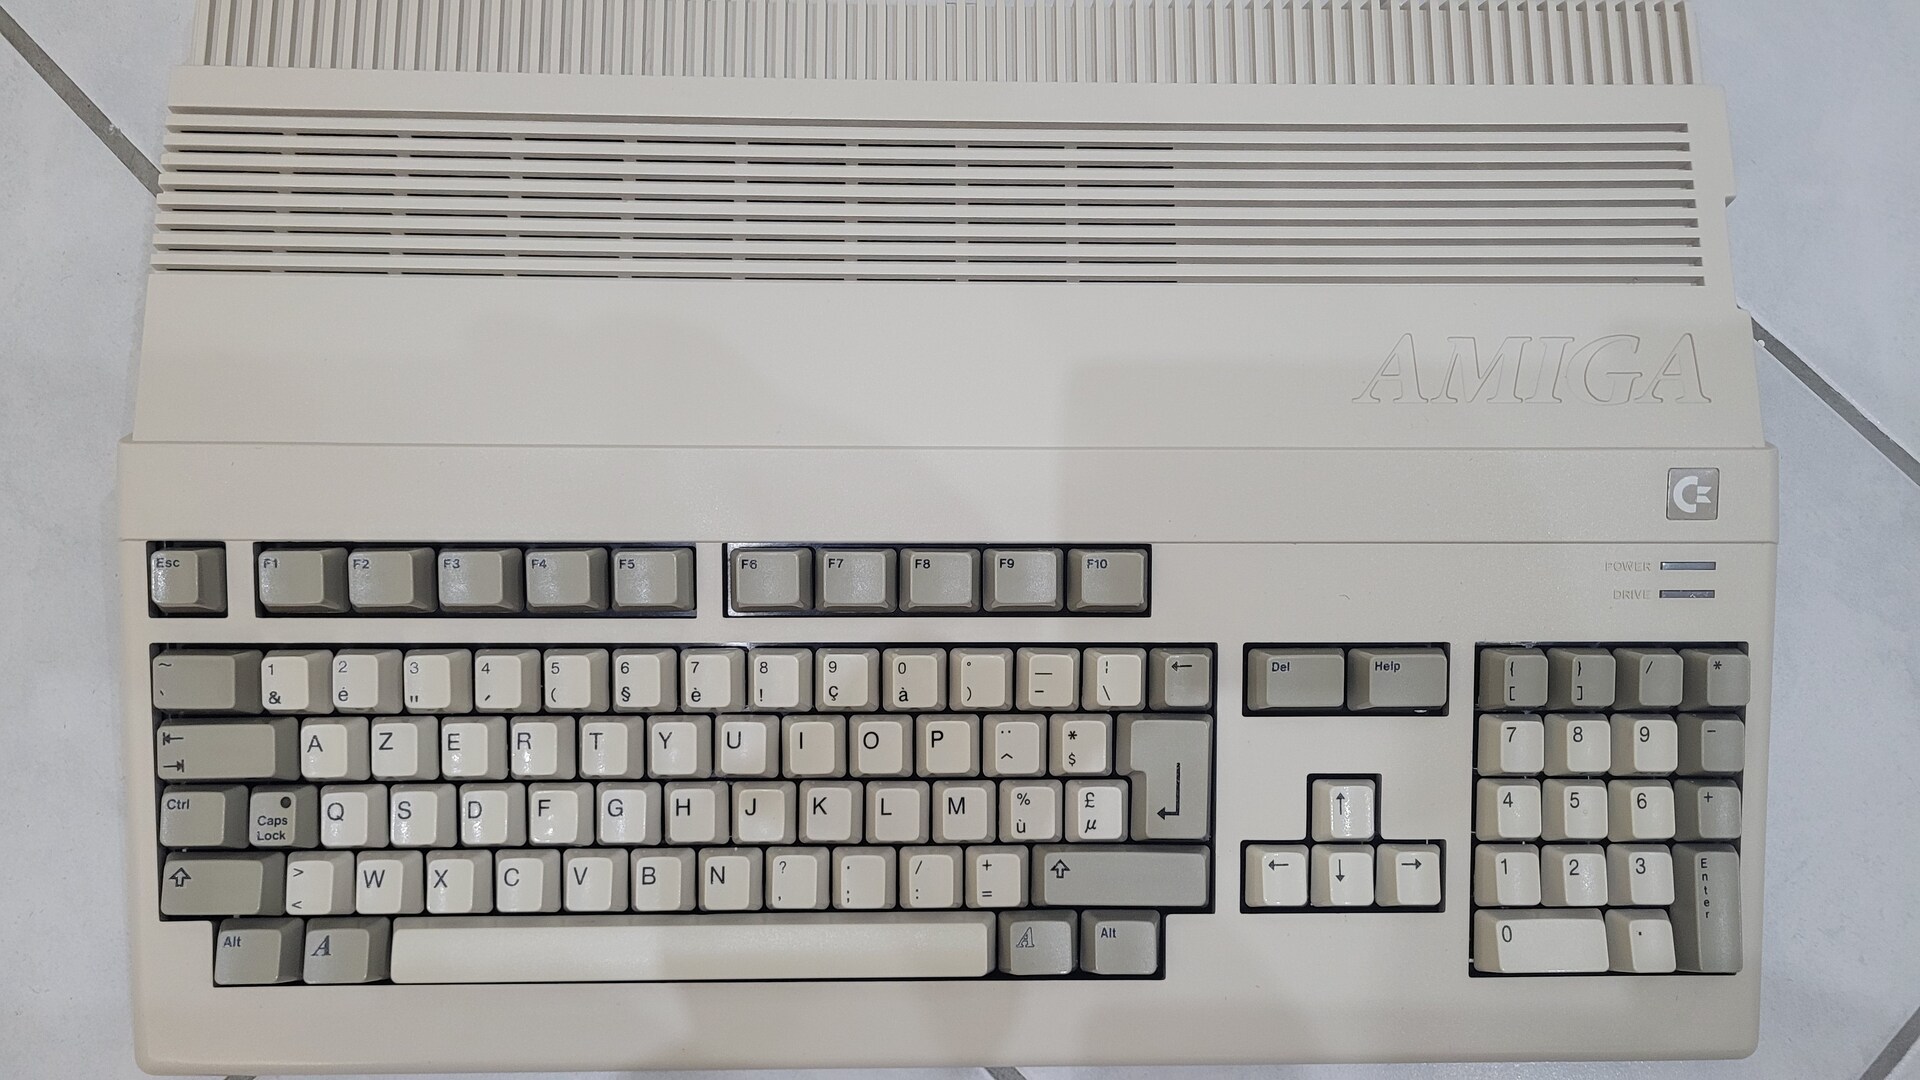
A few months ago, I stumbled upon a cheap Amiga 500, and I couldn’t resist. I decided to restore it from the ground up and add a GottaGoFast RAM + IDE controller to finally build what would have been my dream machine in 1990: an Amiga running OS 1.3 with fast RAM!
This is the story of my pimped Amiga 500: 1 MB chip RAM, 8 MB fast RAM, and 512 MB of storage. Quite a beast for its time! 🙂
Used Materials
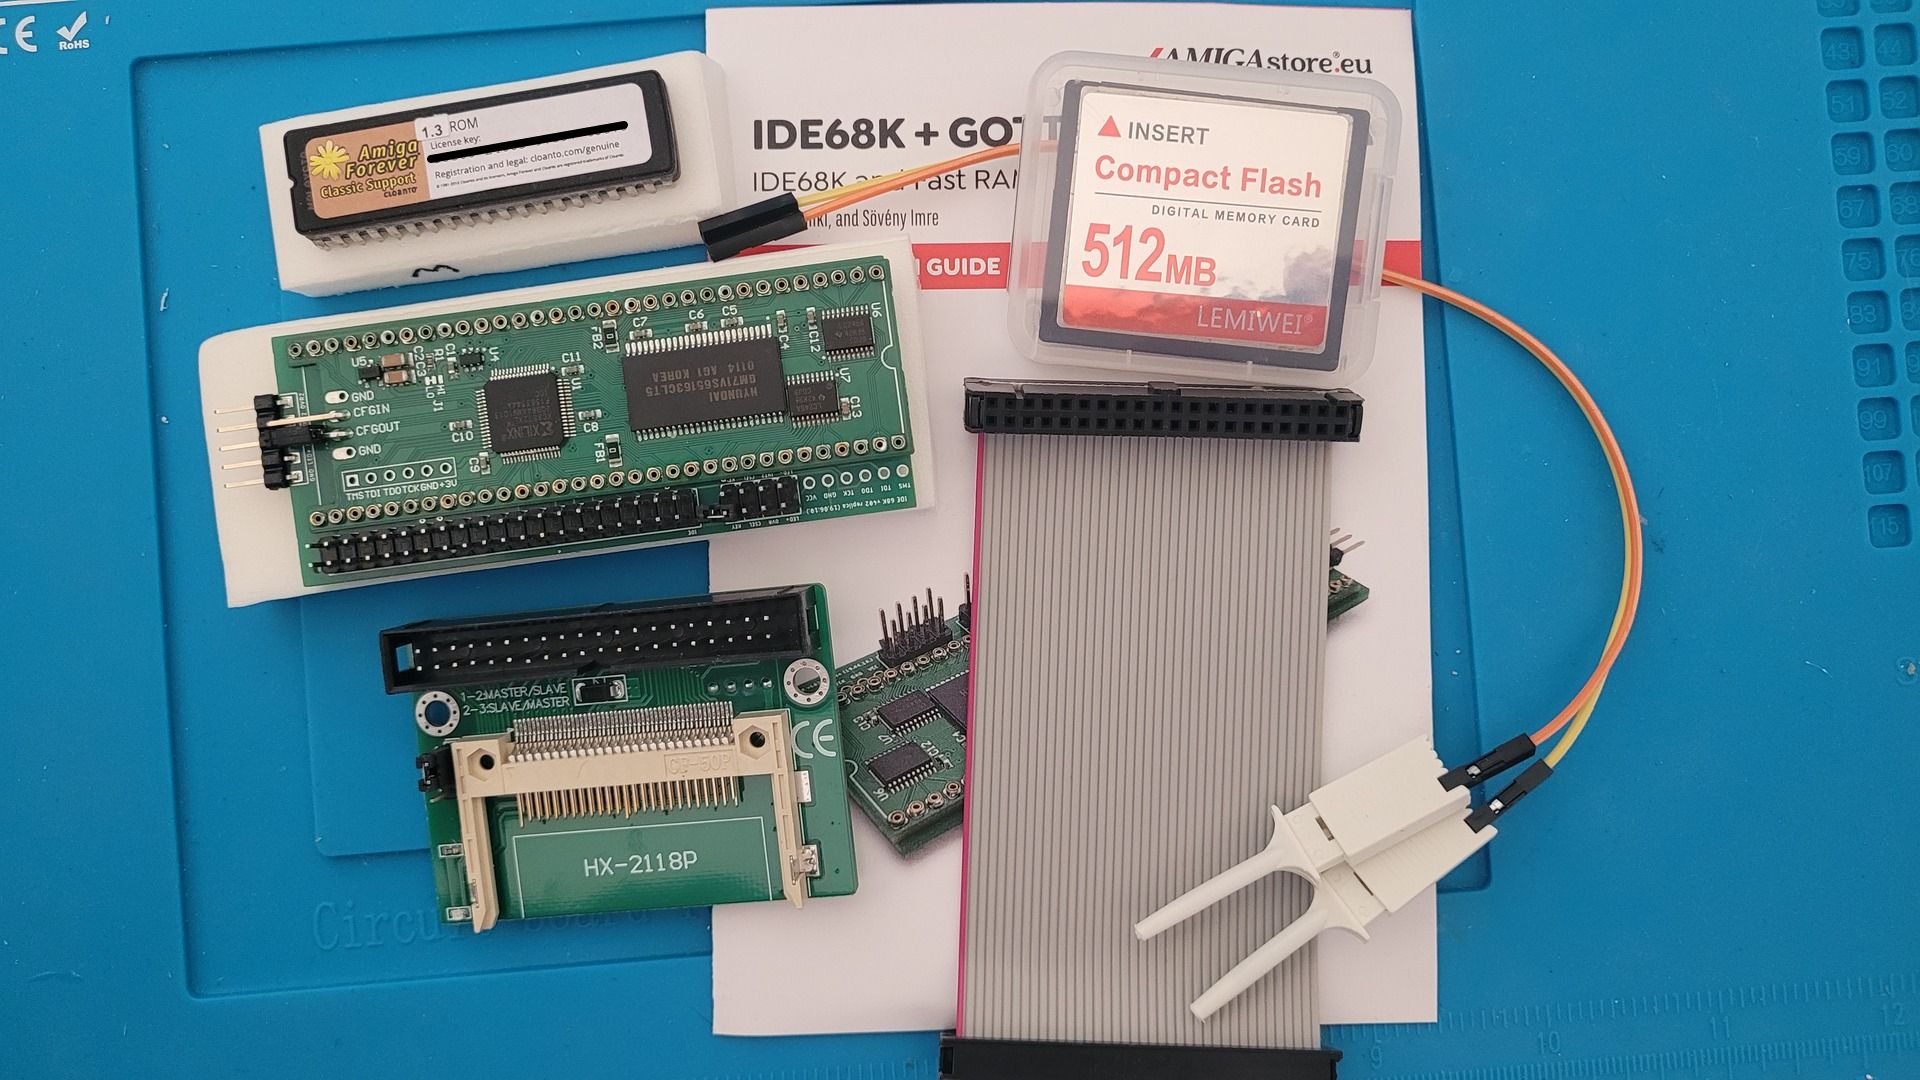
Here is the hardwares pieces I used:

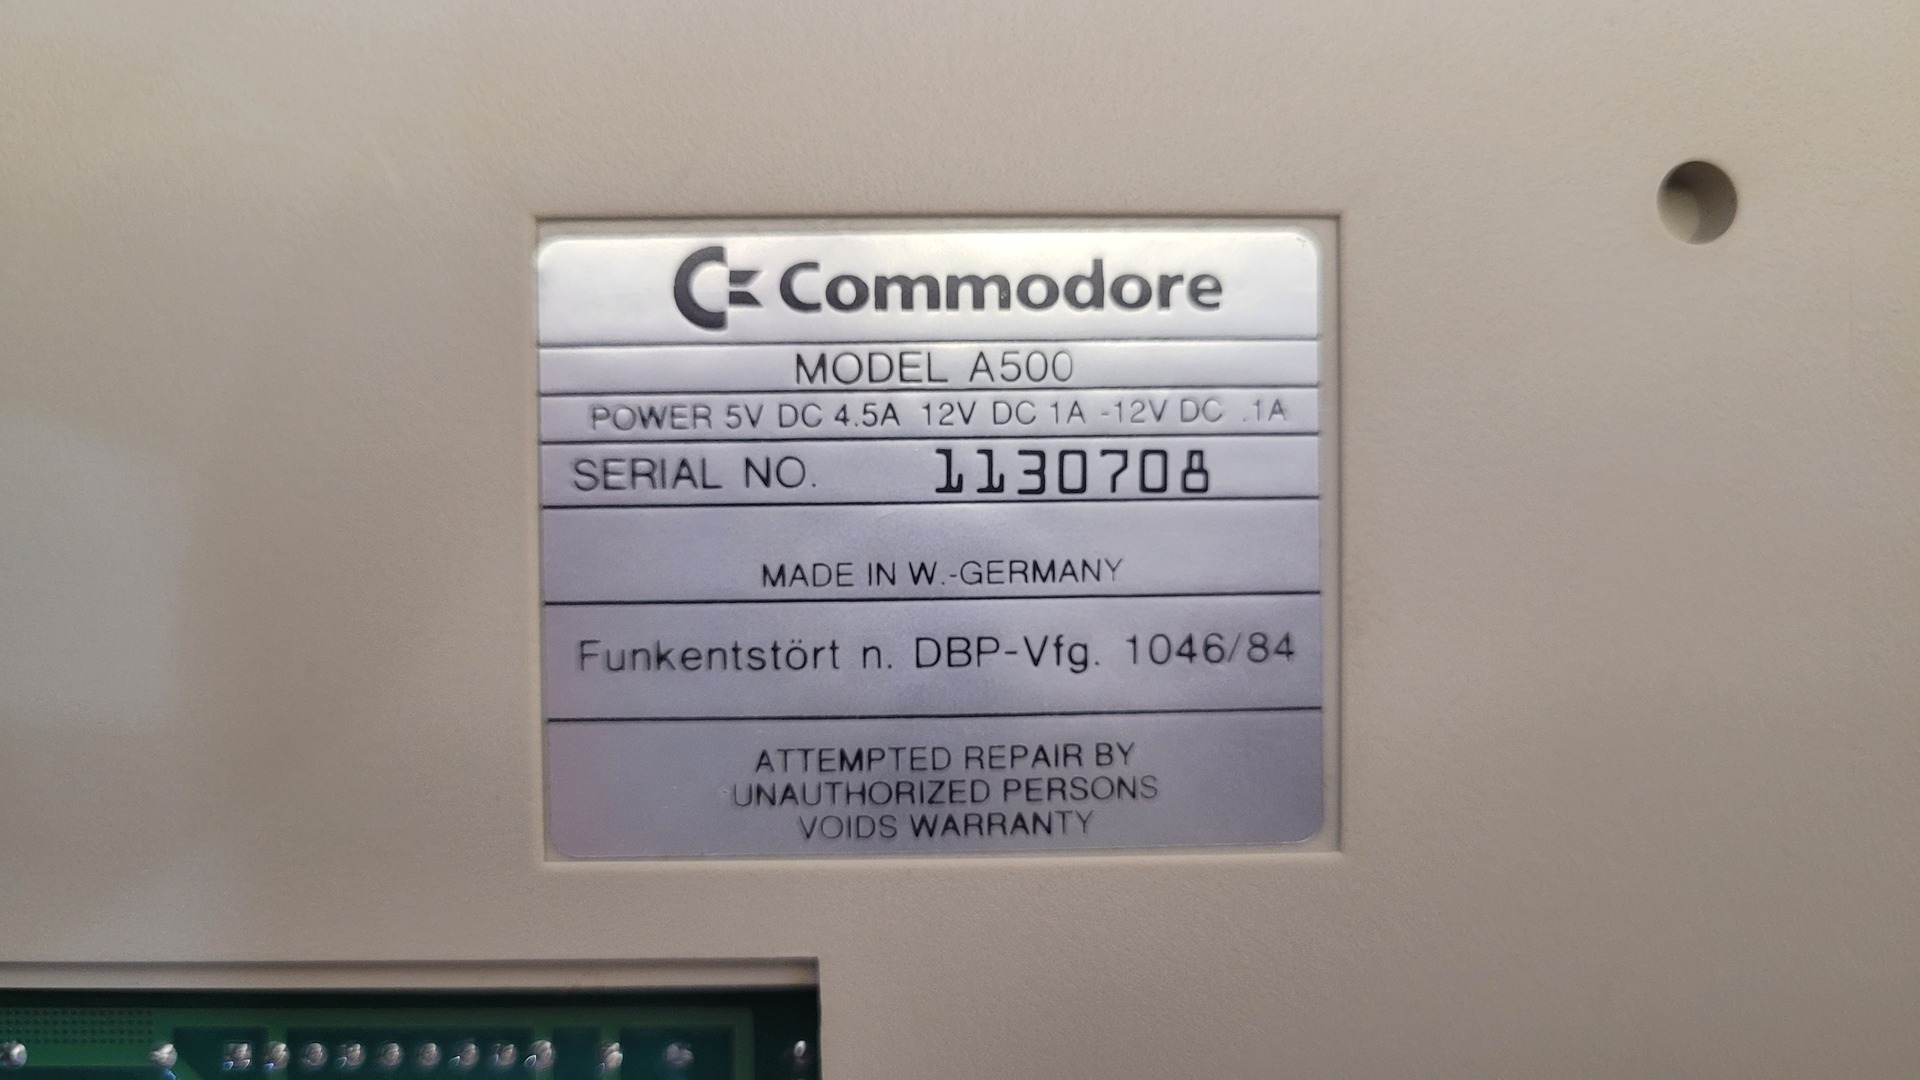
- Amiga 500 I bought with a “512K memory expansions”
- IDE68K + GottaGo FastRAM 8MB from AmigaStore.eu
- A 512M CompaqFlash card (LIMEI, “professional grade”)
- A 40 pin 3.5in IDE ribbon cable
- A dremel to creare a compaqflash slot
- Some (dupond) wires and solder
- Some pin headers
- A multimeter
- Isopropyl alchool
- Q-tips
- Facom “Contact Spay”
- Ambro-sol galvanized zinc spray paint
- A driller and a dremel
First boot
At first, I had a hard time getting a Workbench disk to boot properly — even though the game disks I tested worked just fine. (They probably have better error correction routines.)
Each time I tried to start Workbench from different floppies, I ran into either “Read/Write Error” or “Please insert disk in drive 0!” messages. After several attempts and a few frustrating retries, I finally managed to reach a command prompt.
That’s when I noticed something strange: the system was reporting 1 MB of chip RAM. Wait a second — this is an Amiga 500, not a 500+! Even with a memory expansion, it should normally show 512 KB chip RAM and 512 KB slow RAM. This means my A500 must have been modified to convert the slow RAM into chip RAM. (For reference: “slow RAM” sits on the same bus as chip memory, but it’s not directly addressable by the custom chips.)

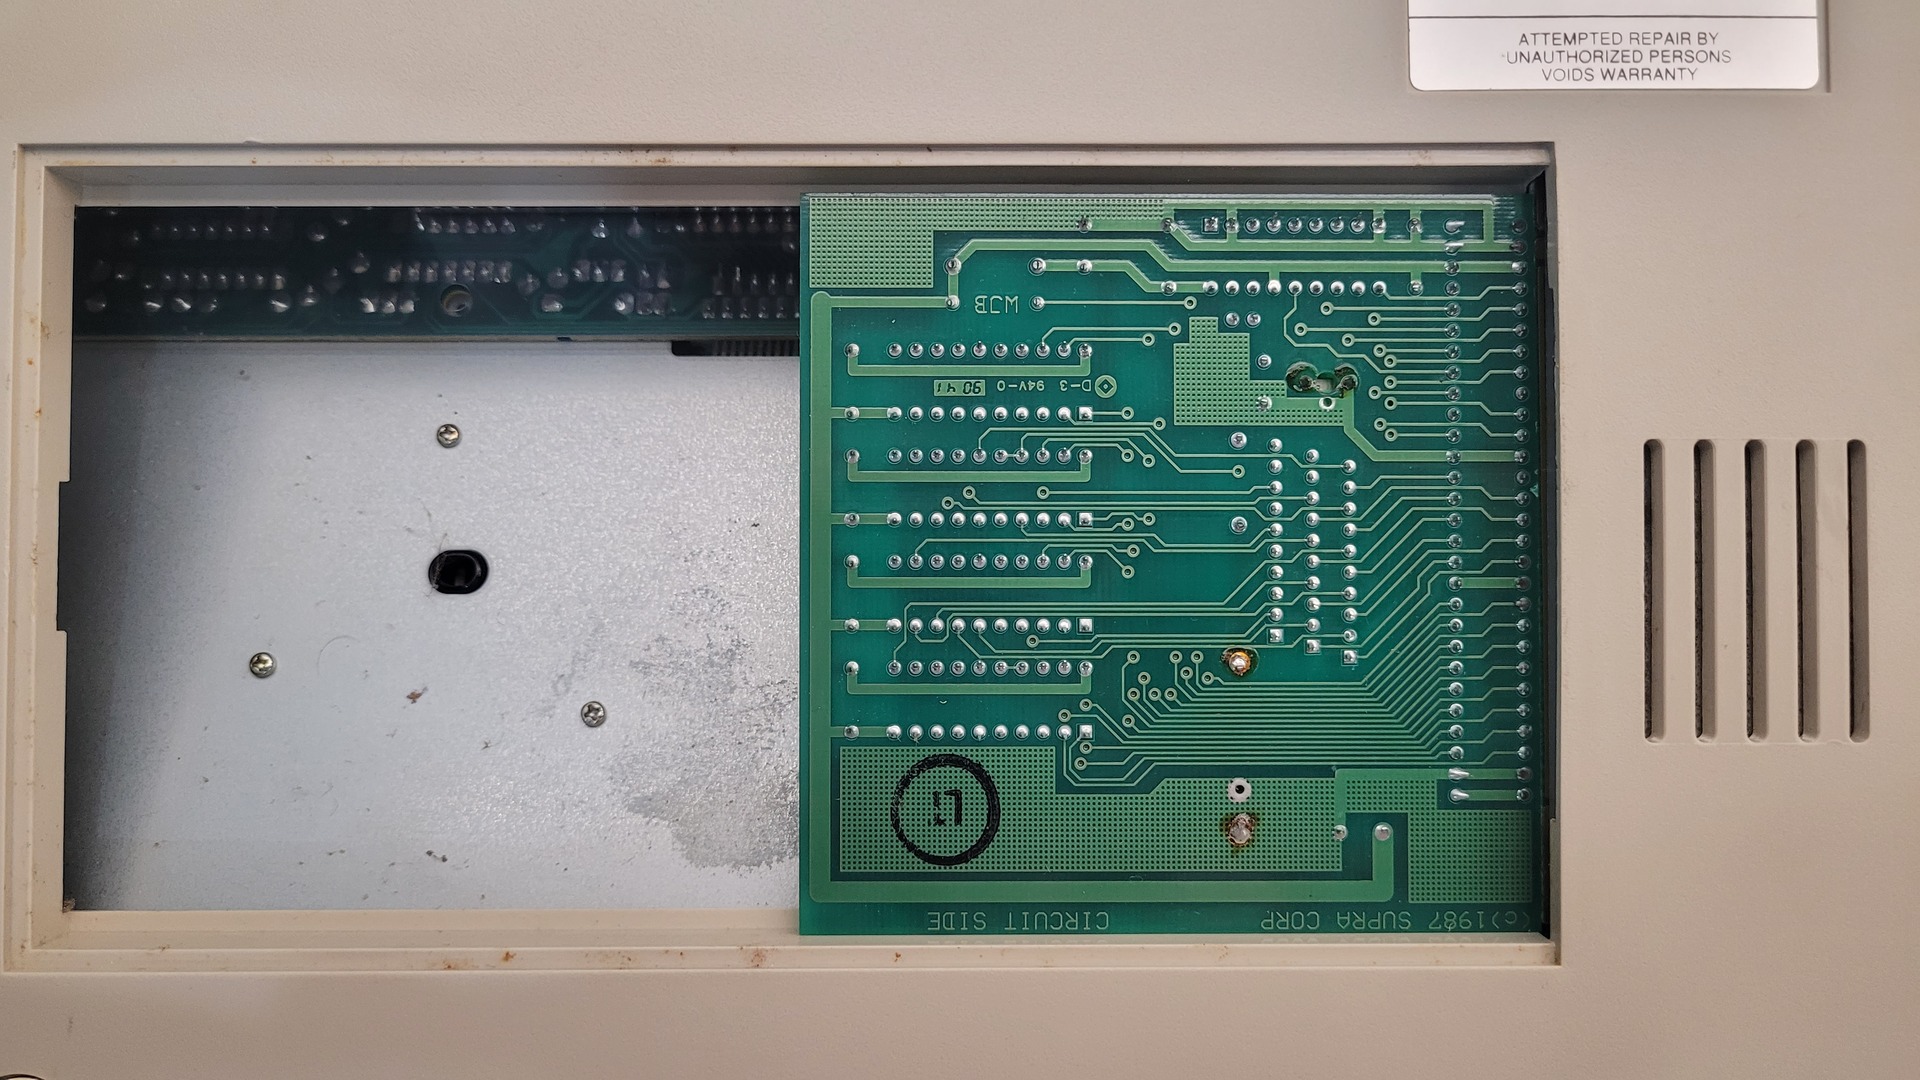
Inside
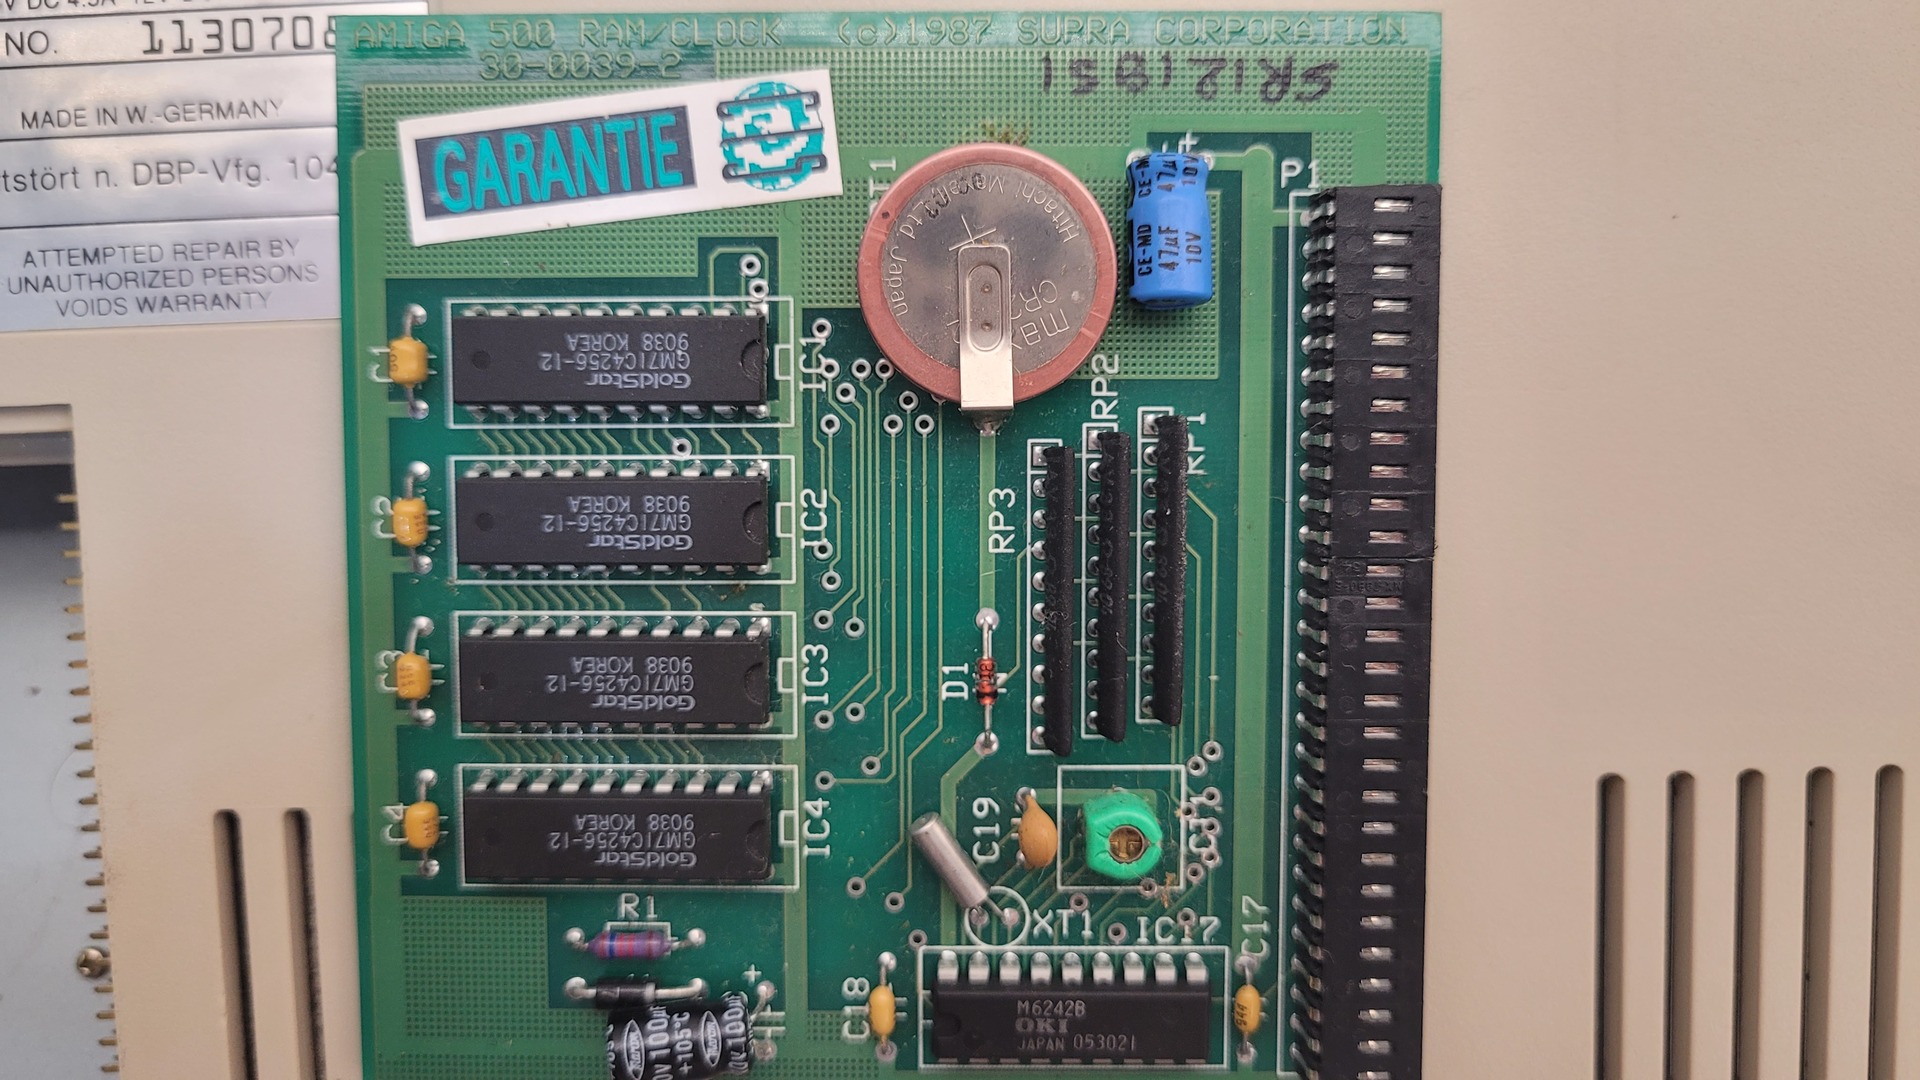
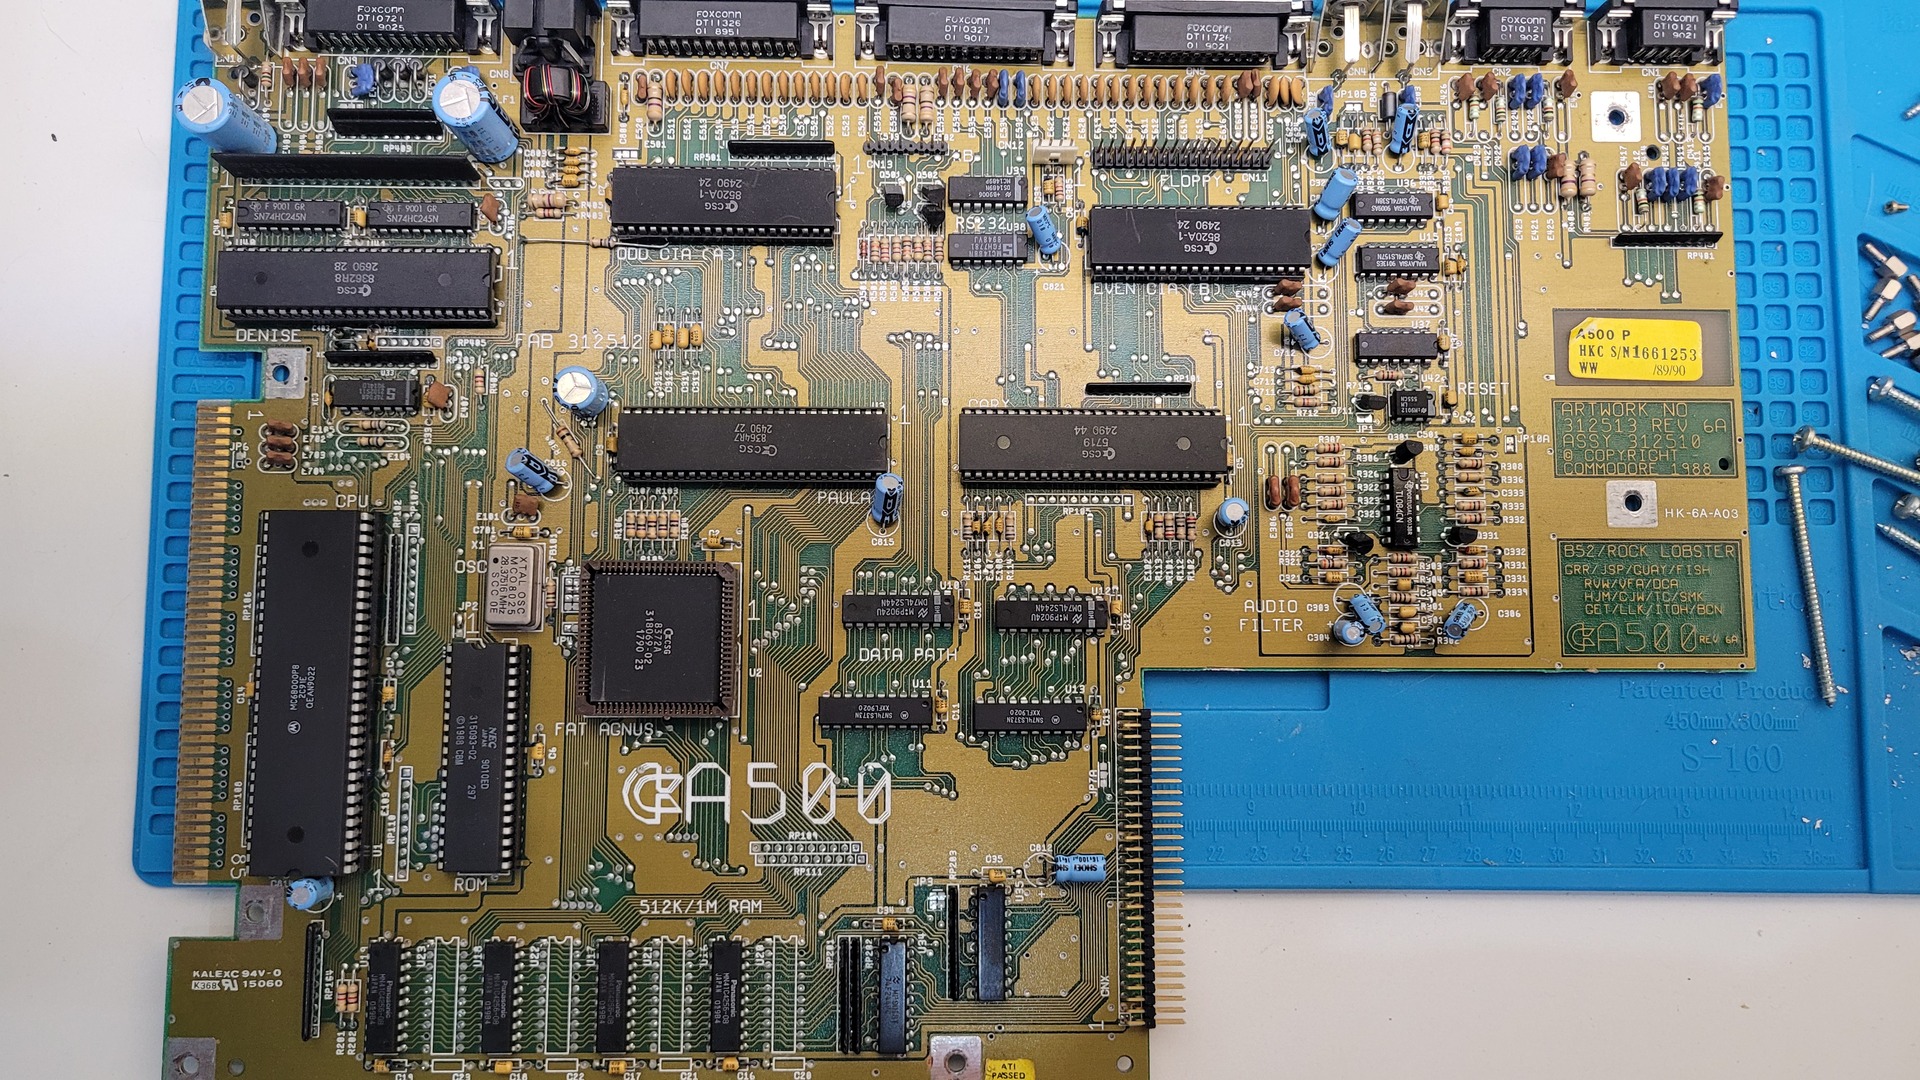
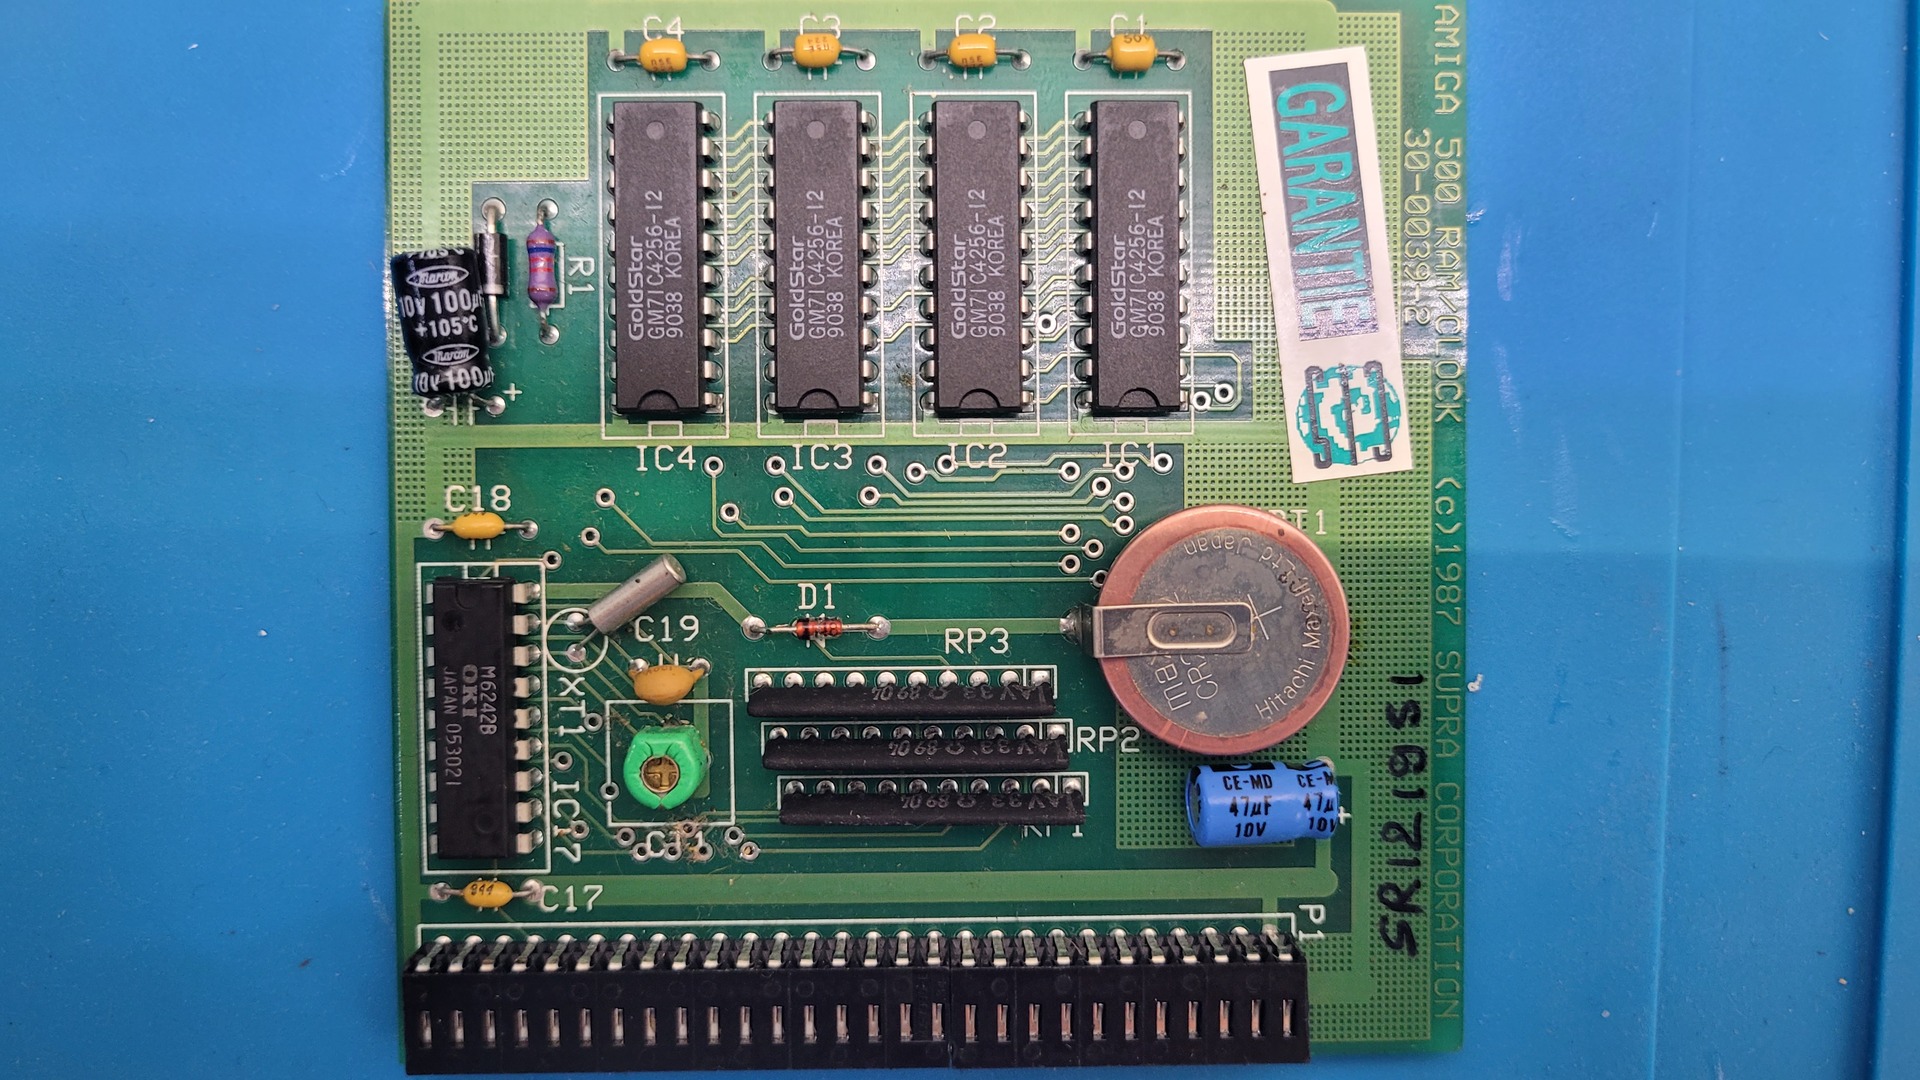
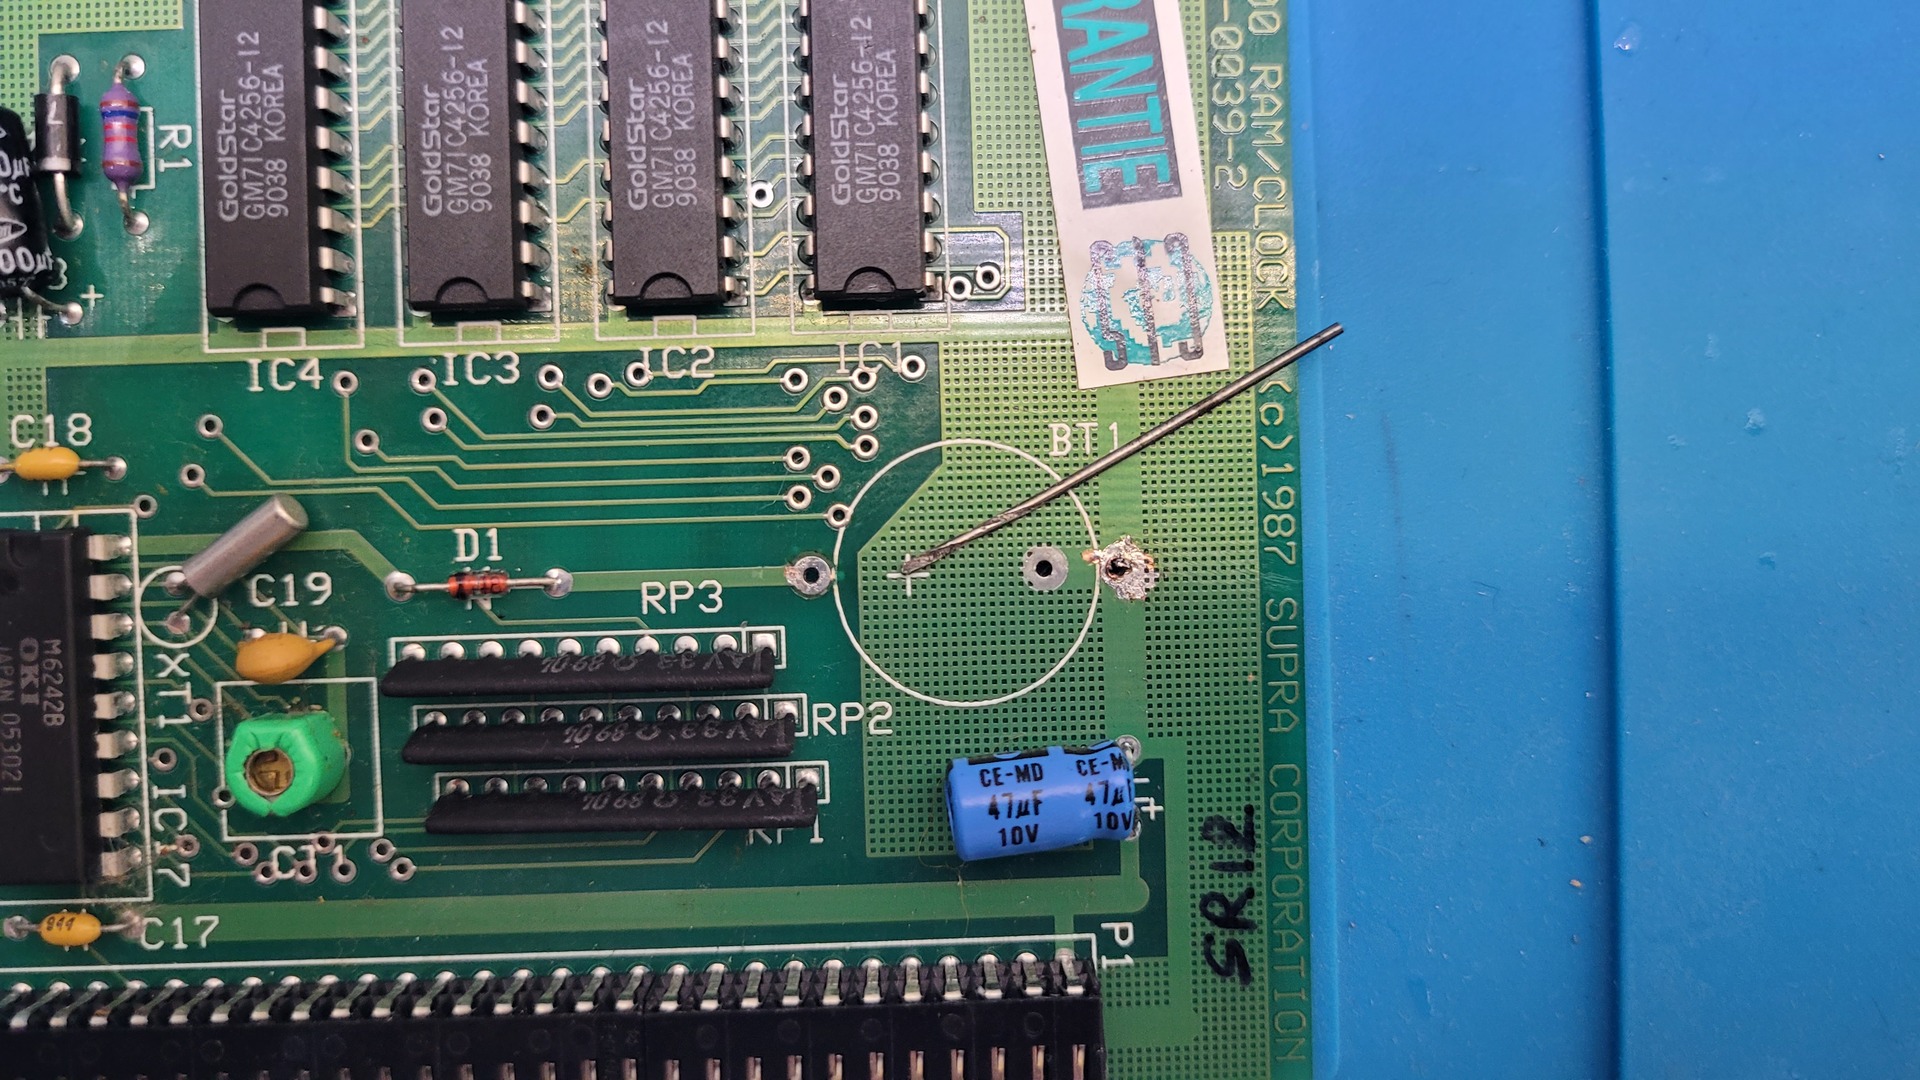
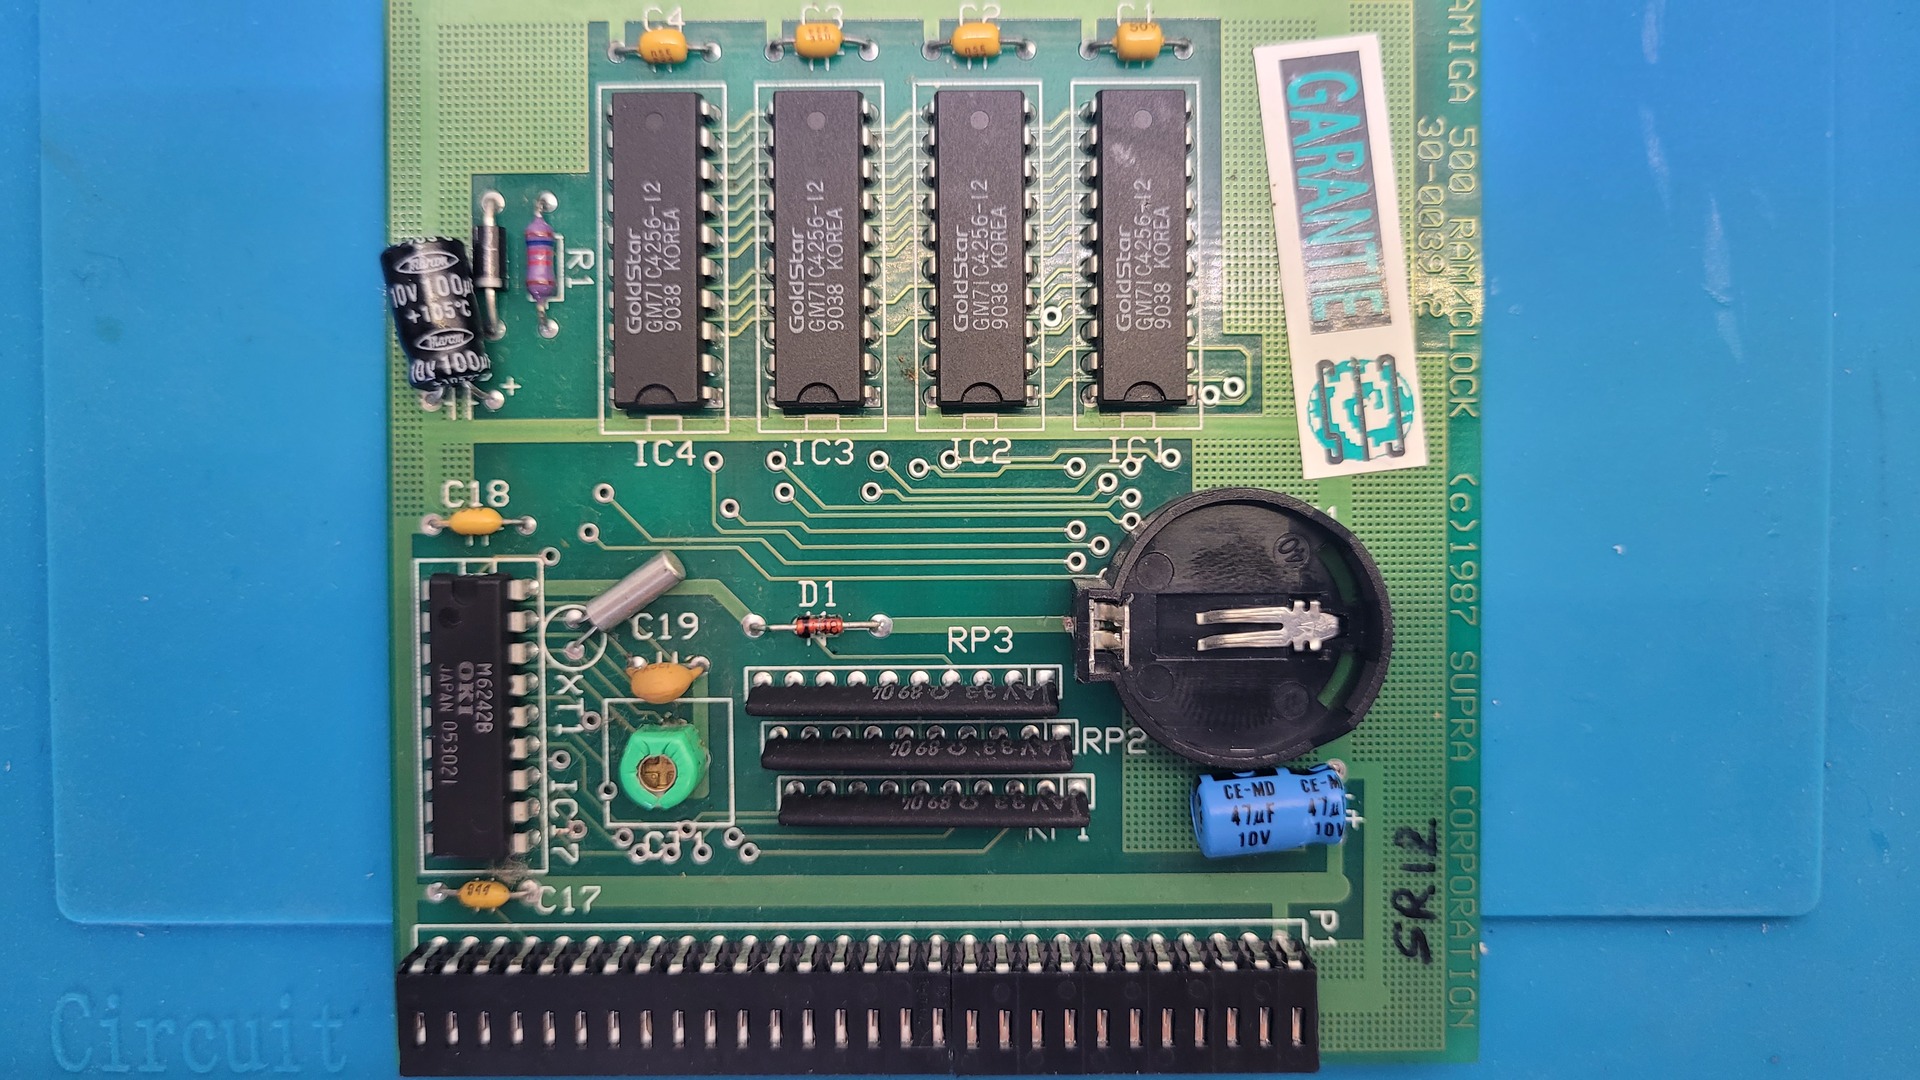
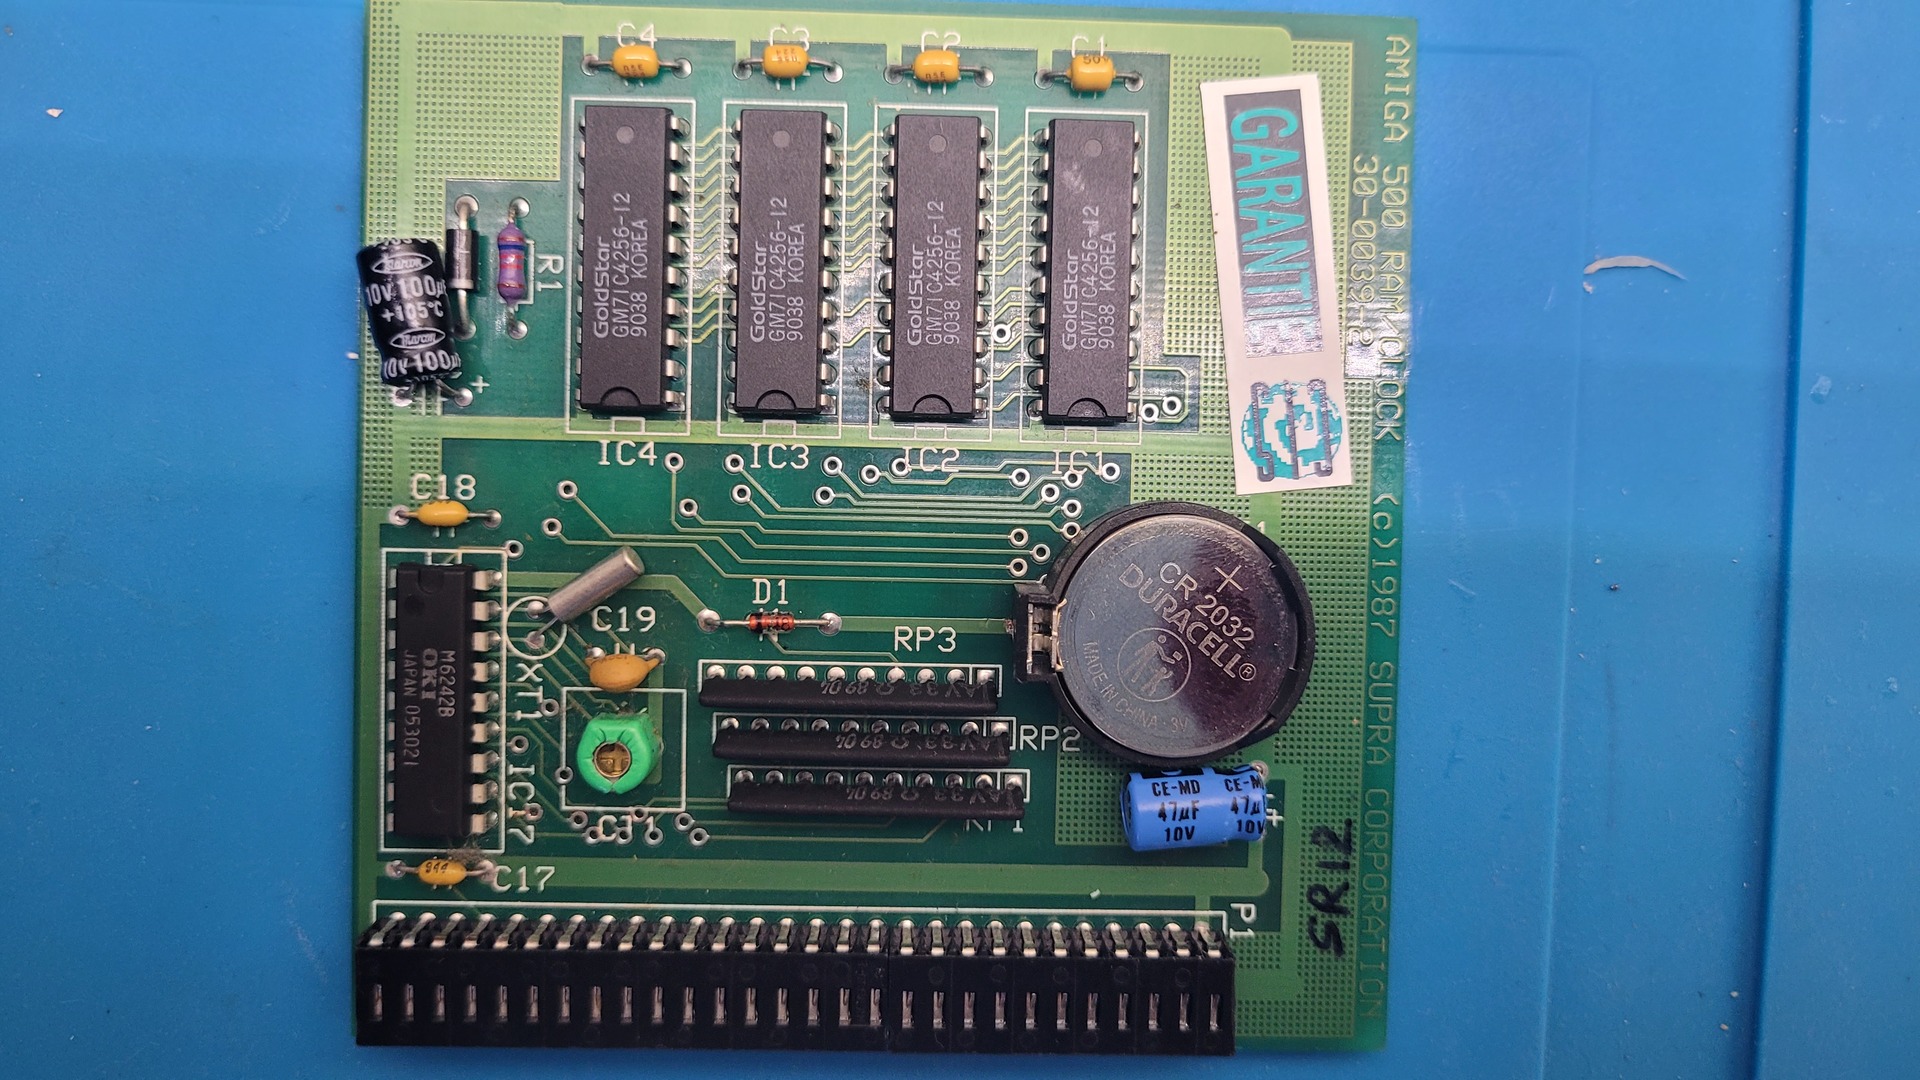
Of course, I found a memory expansion installed: a SupraRam 500 Rev.2 (details here), identifiable by the four DIP switches. It’s a very neat card — the battery uses a standard coin cell, which is much less prone to leaking than typical NiMH batteries.
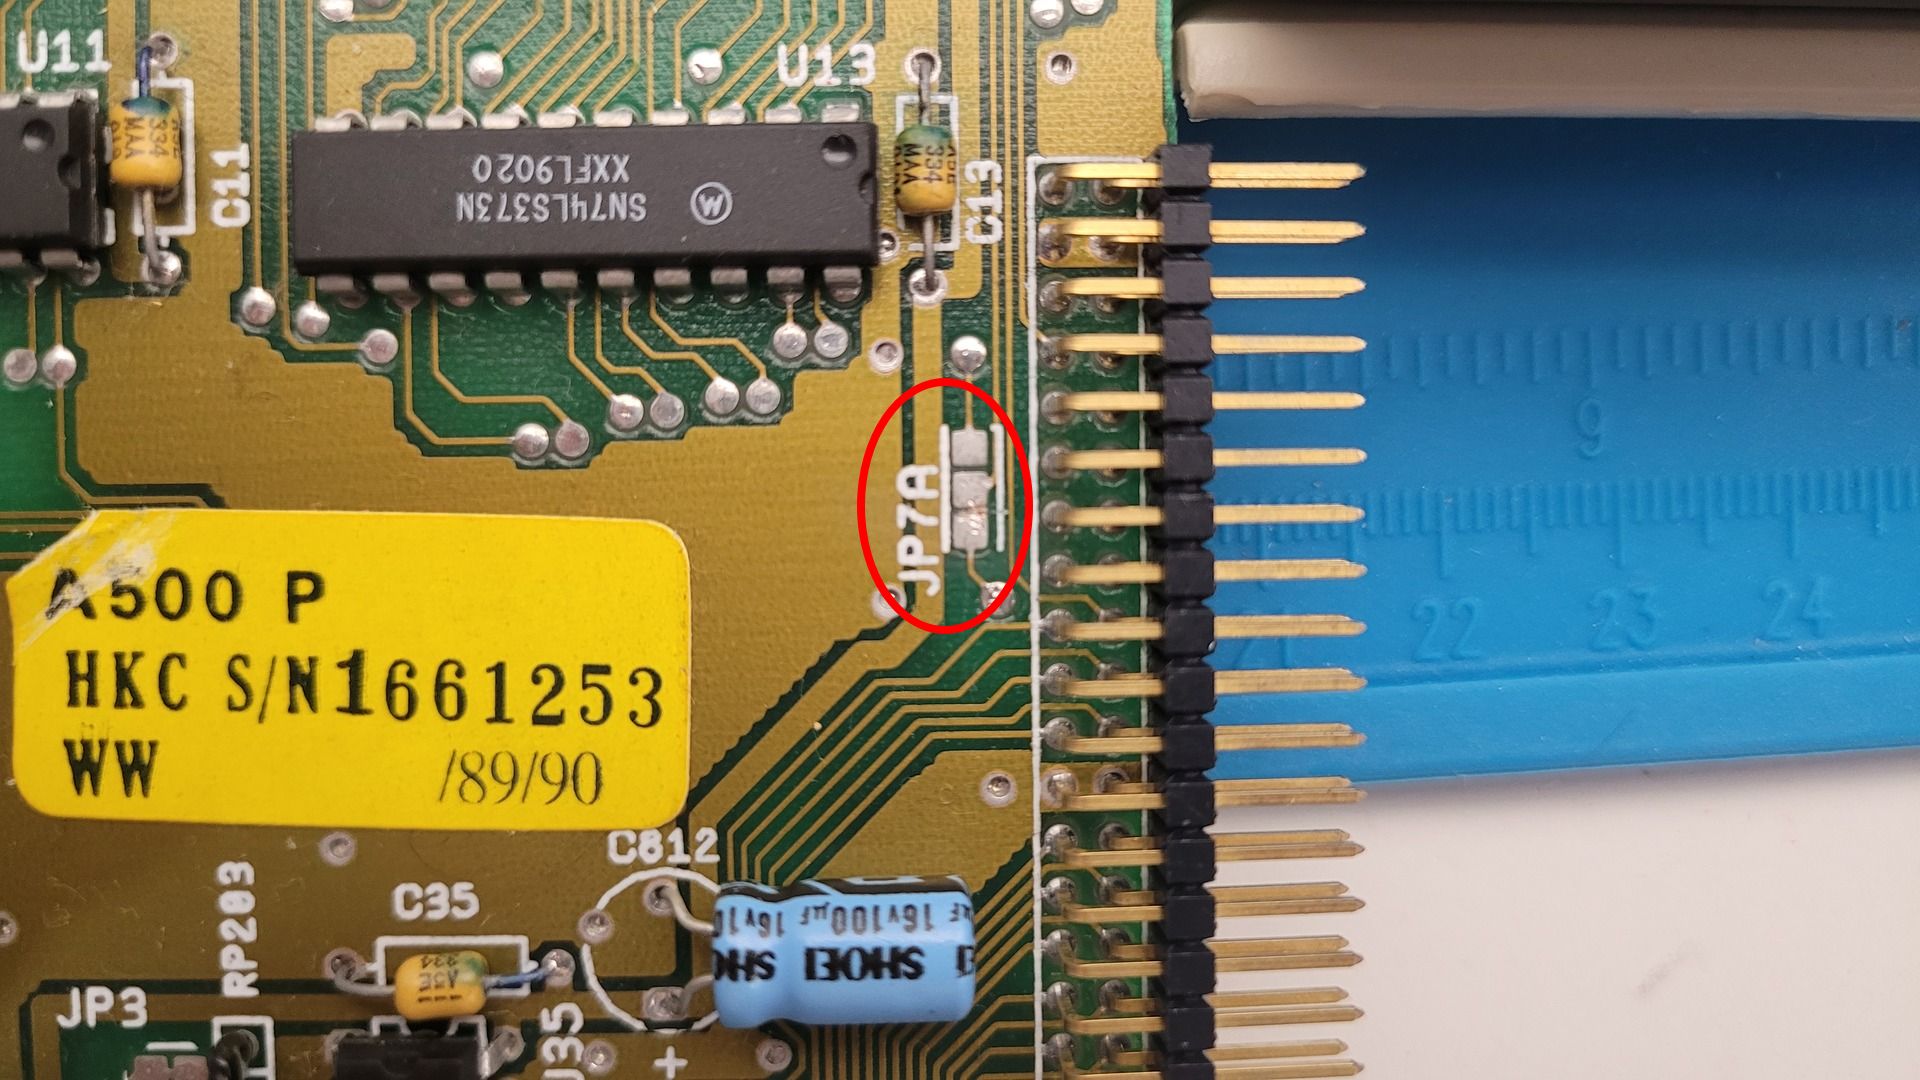
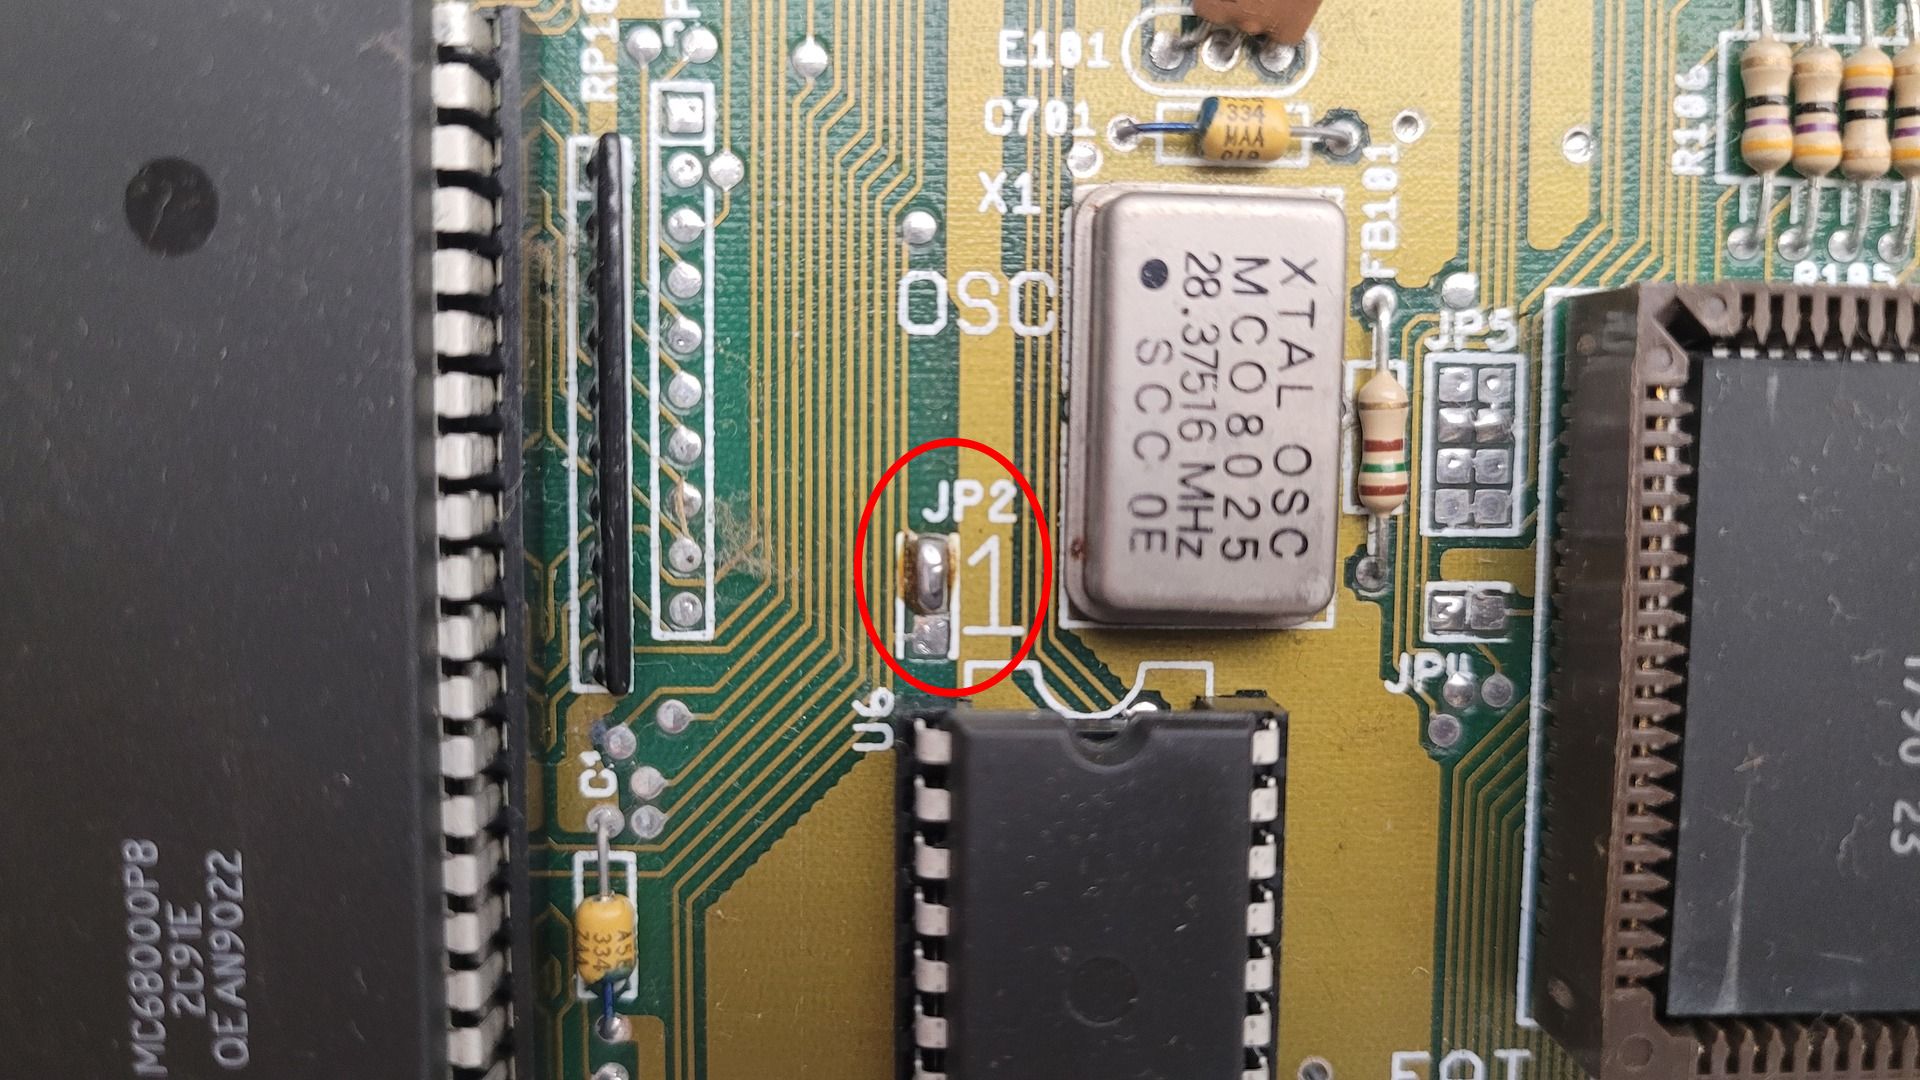
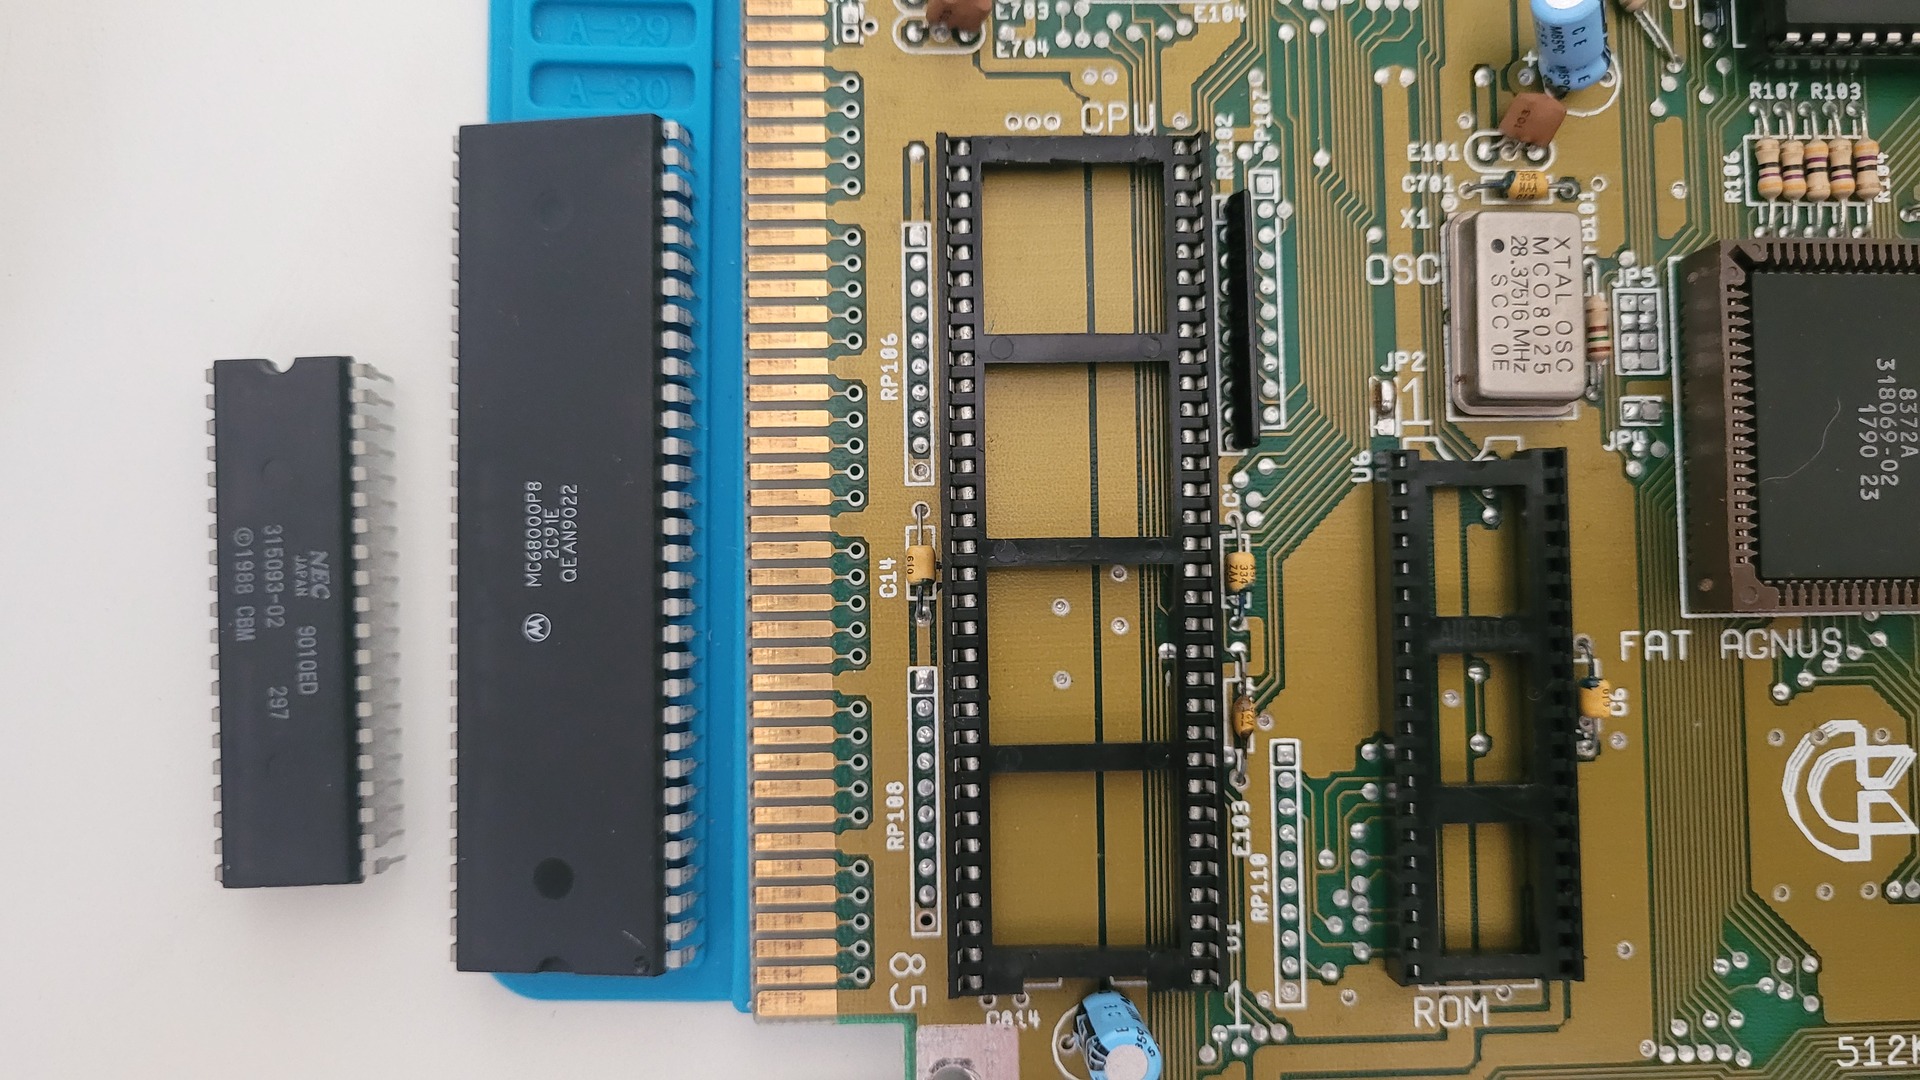
The motherboard is a Rev 6A, which is internally ready for 1 MB of chip RAM but only has 512 KB installed. Judging by the setup, this Amiga seems to have been modified to provide 1 MB chip RAM: the JP7A jumper is fully open, and JP2 has pins 1 and 2 shorted!
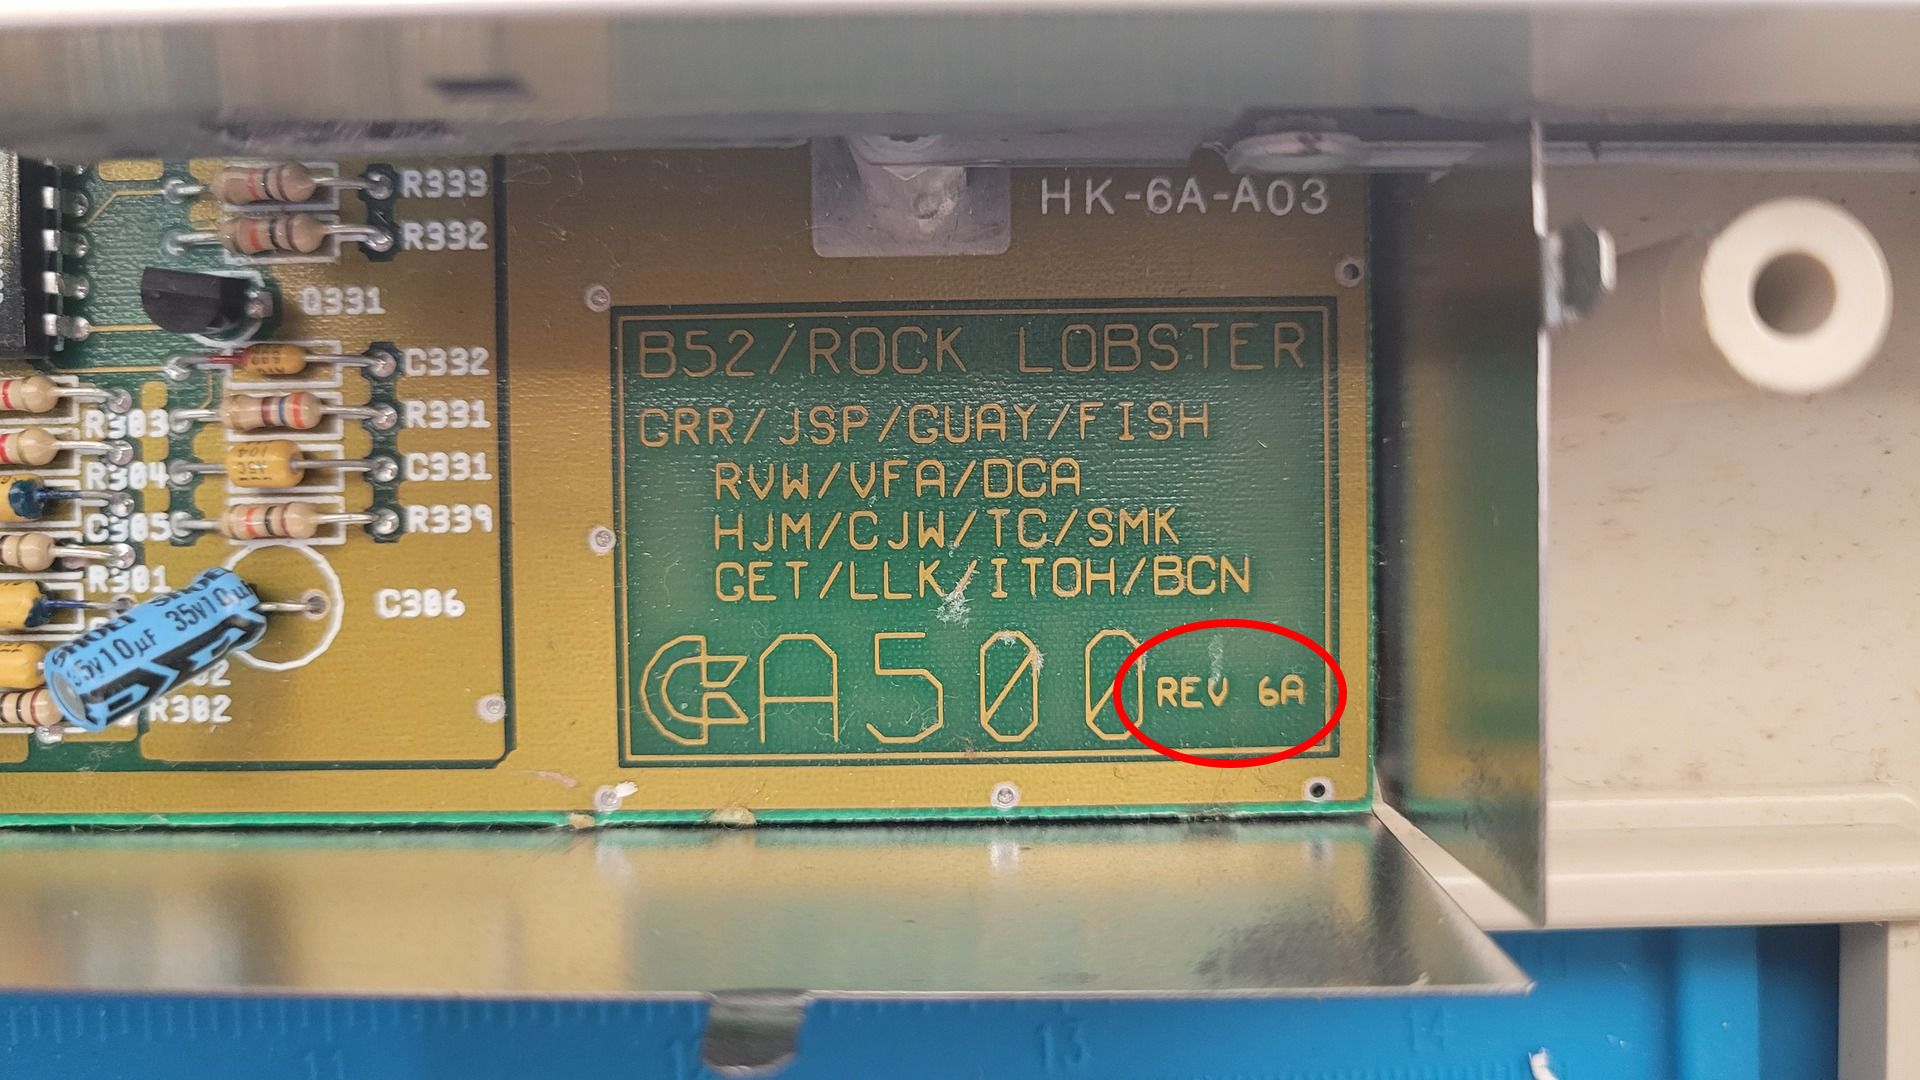
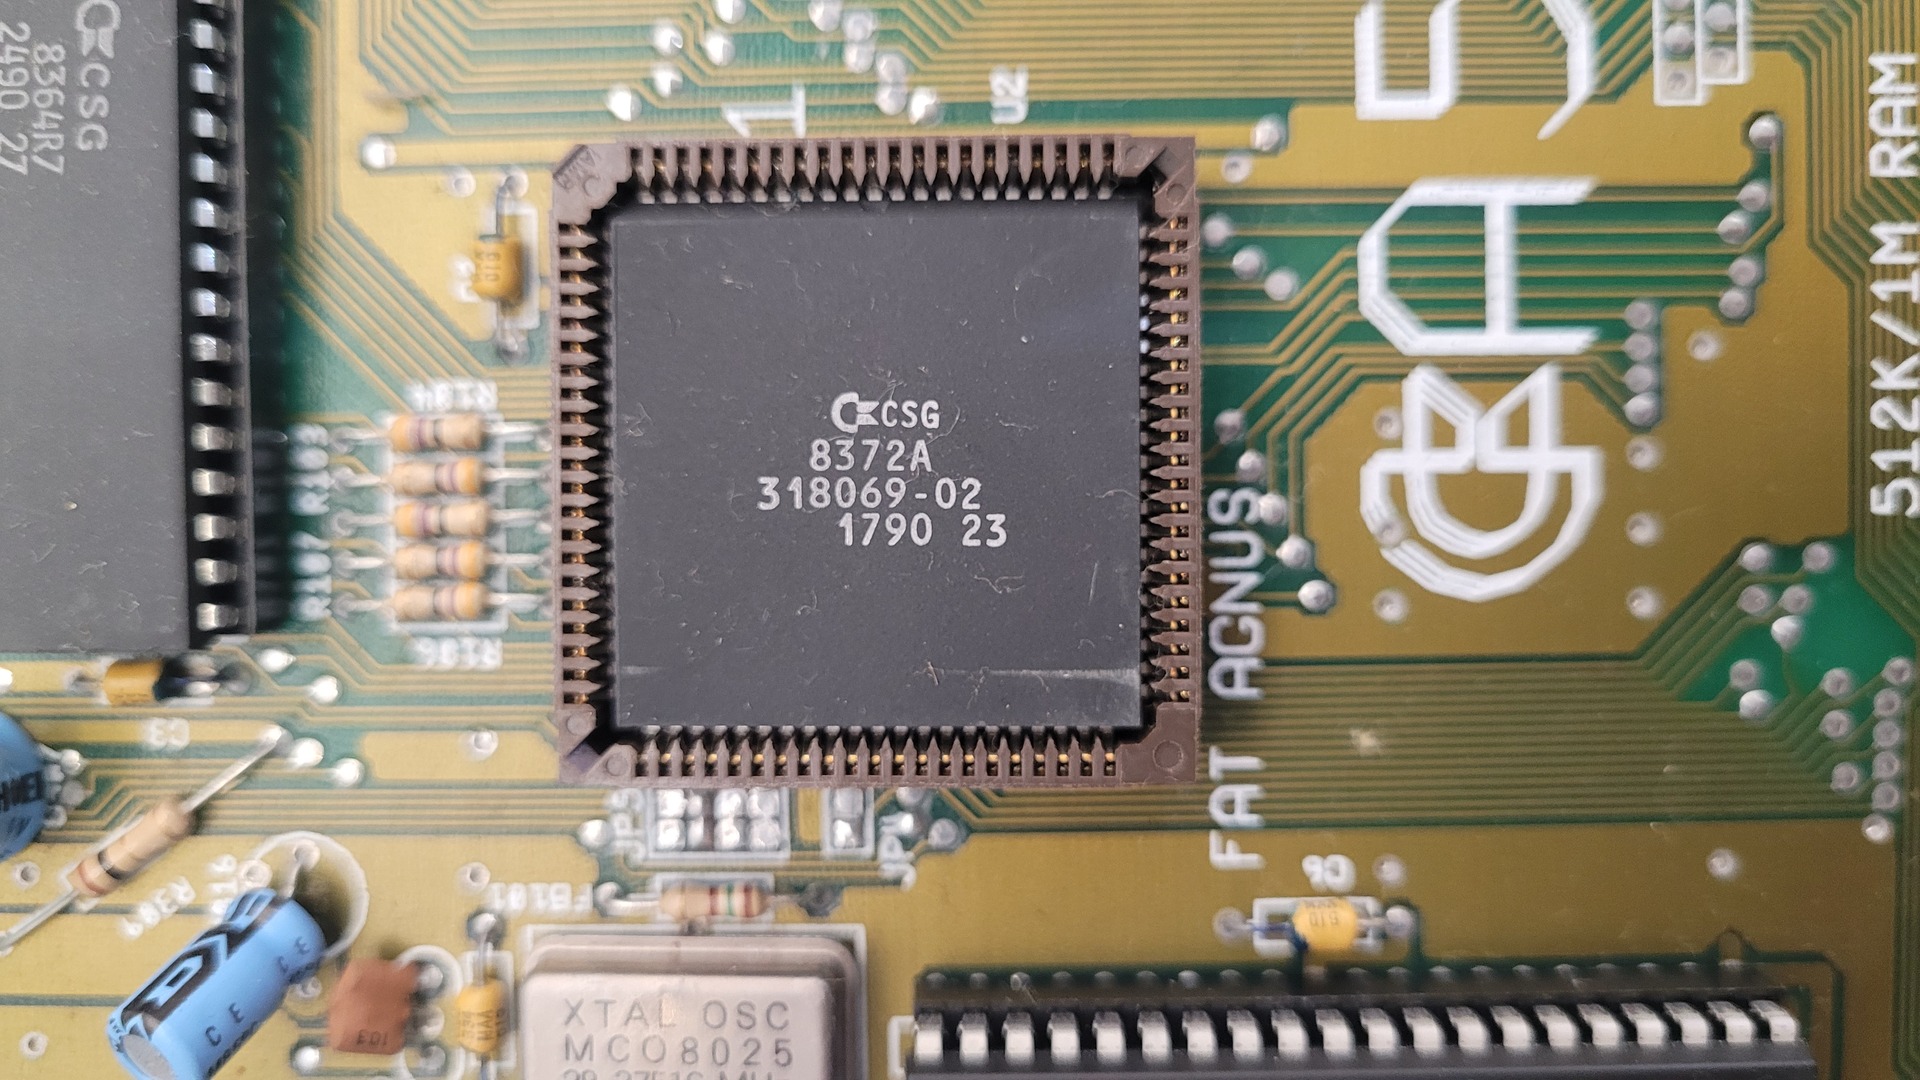
Inside, there’s a fat Agnus 8372A (capable of addressing 1 MB chip RAM) paired with a Denise R8 (OCS) rather than a SuperDenise (ECS). While it’s not an ECS setup, this combination at least allows Extra Half-Brite (EHB) mode.
Hardware restoration
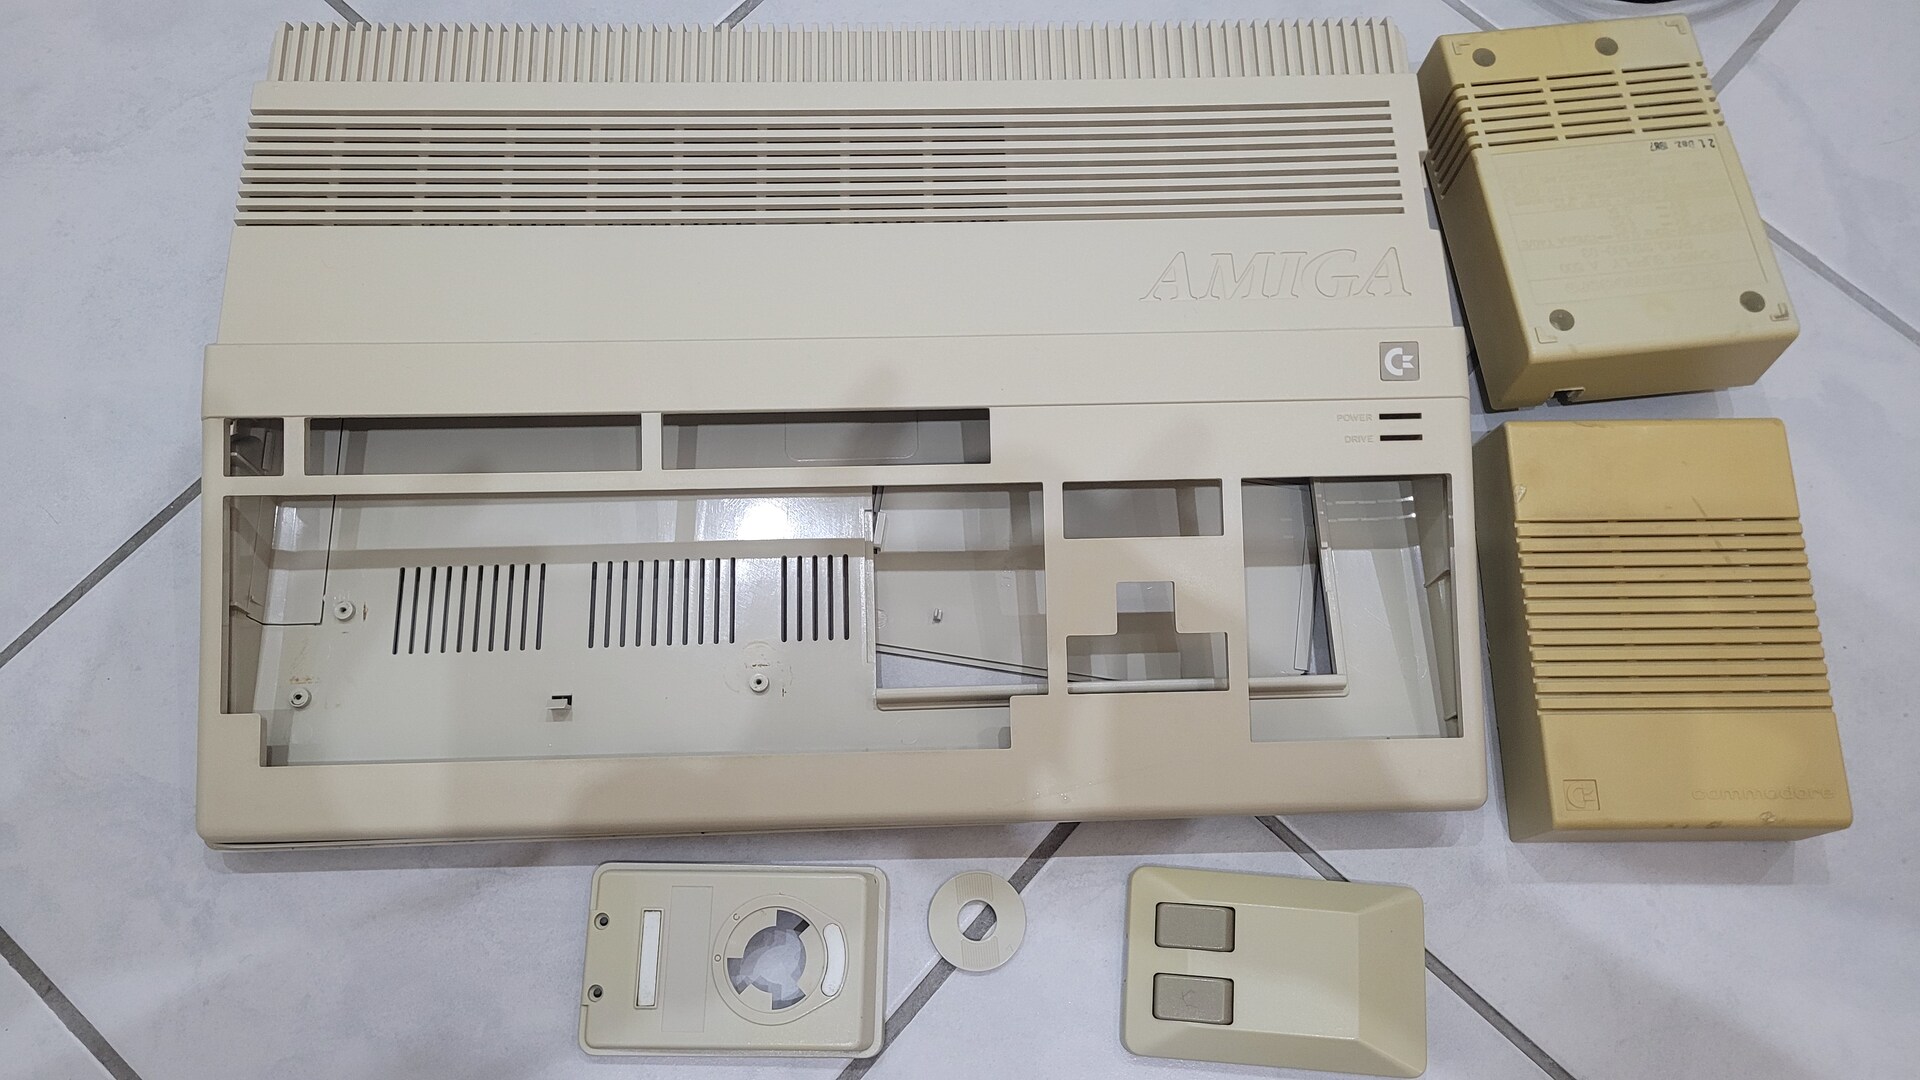
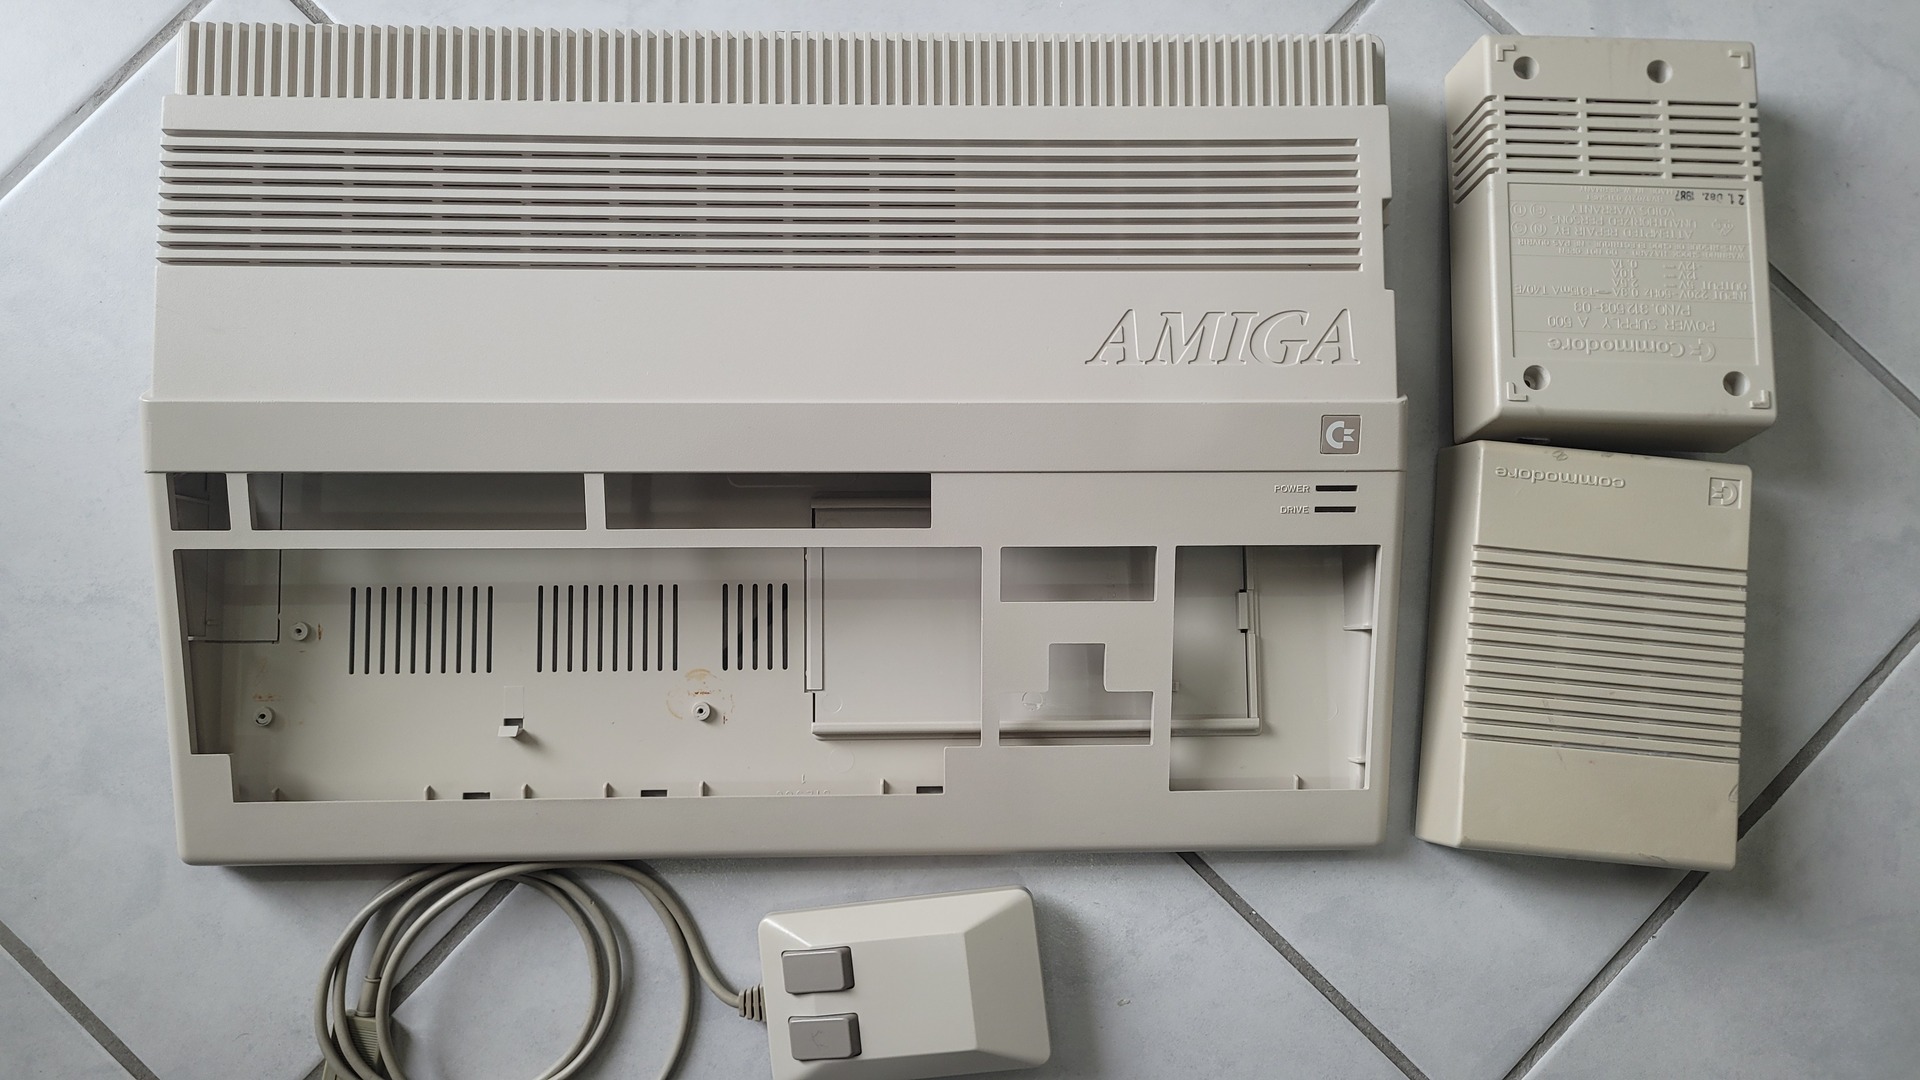
Plastics
The plastics on this Amiga were just a bit yellowed — nothing too severe. I was able to recover them easily using the same Retrobright box I used for my pimped Amiga 600.
The power supply, however, had a noticeably stronger yellow tint compared to the other parts. I applied Retrobright to all components, and for the power supply, I gave it a longer exposure. It hasn’t fully returned to its original color, but it’s much improved.
On the left: before cleaning and Retrobright; on the right: after treatment:
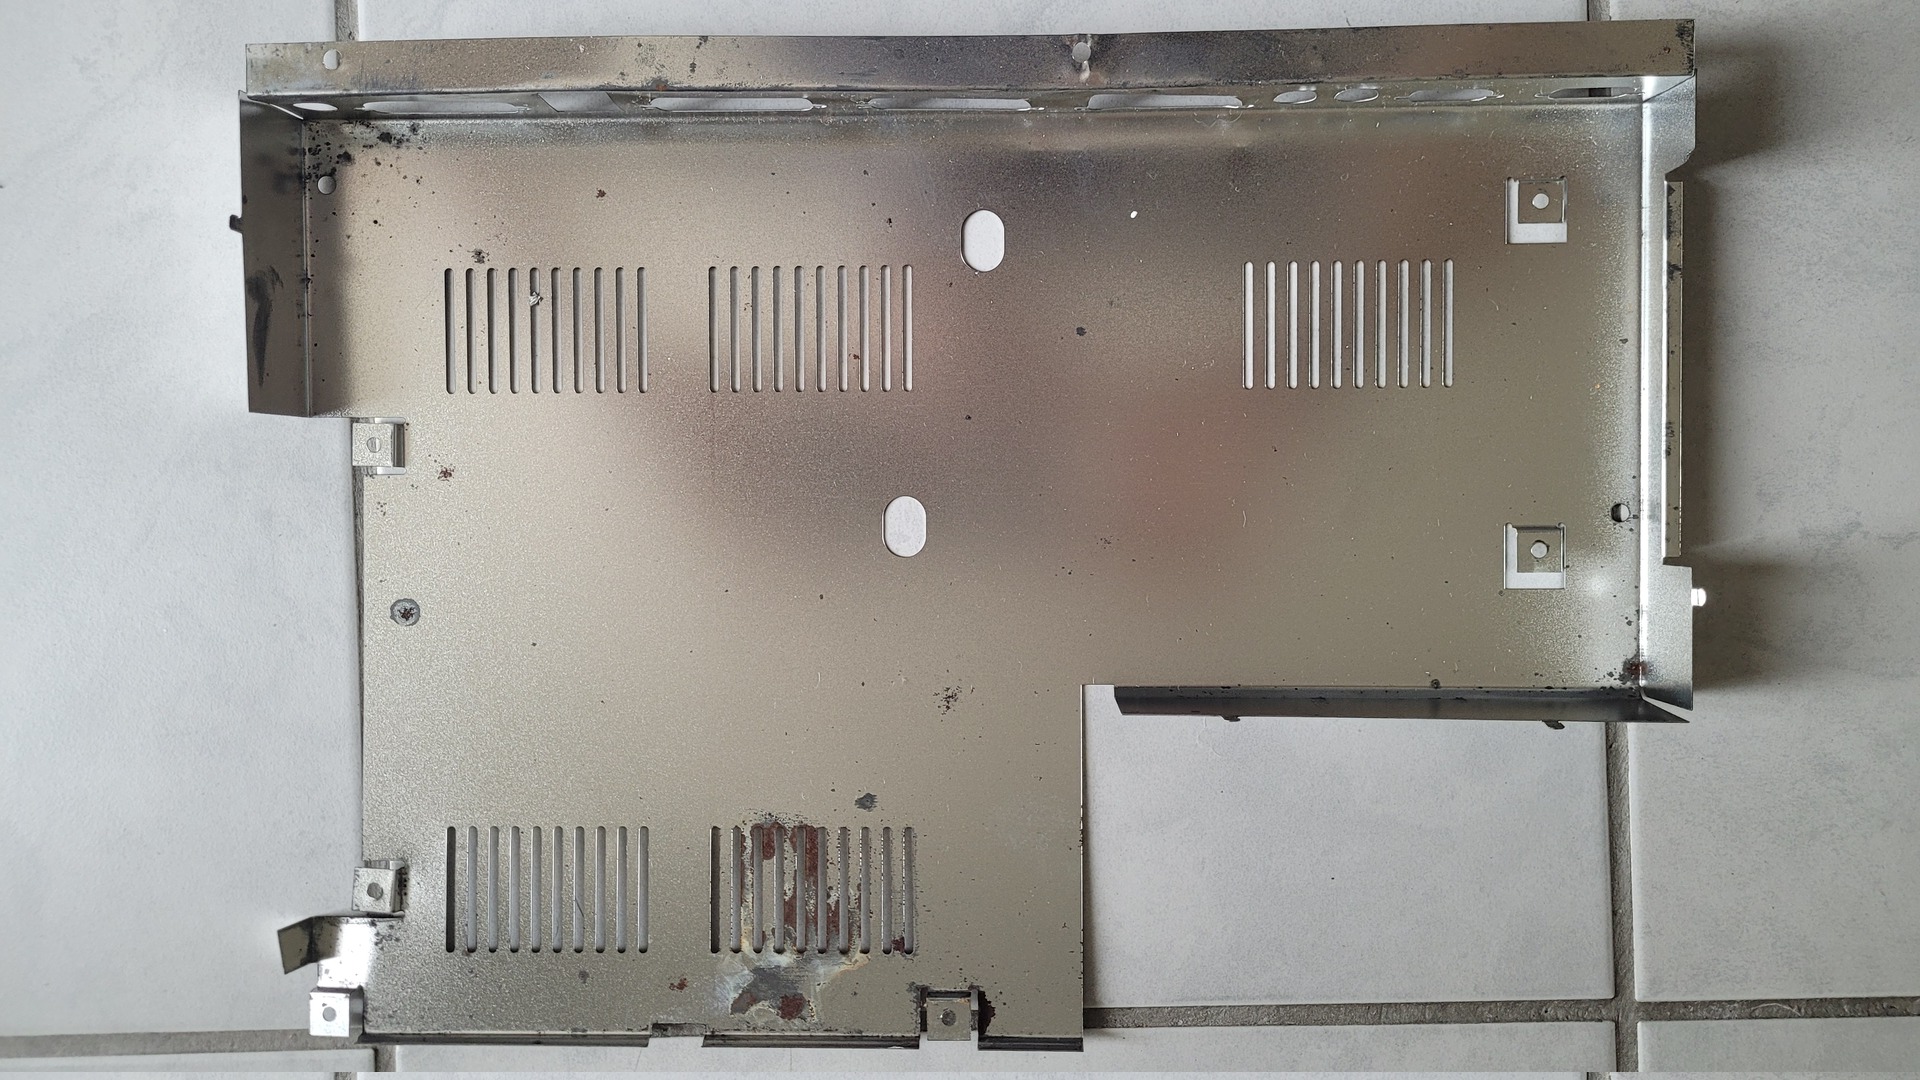
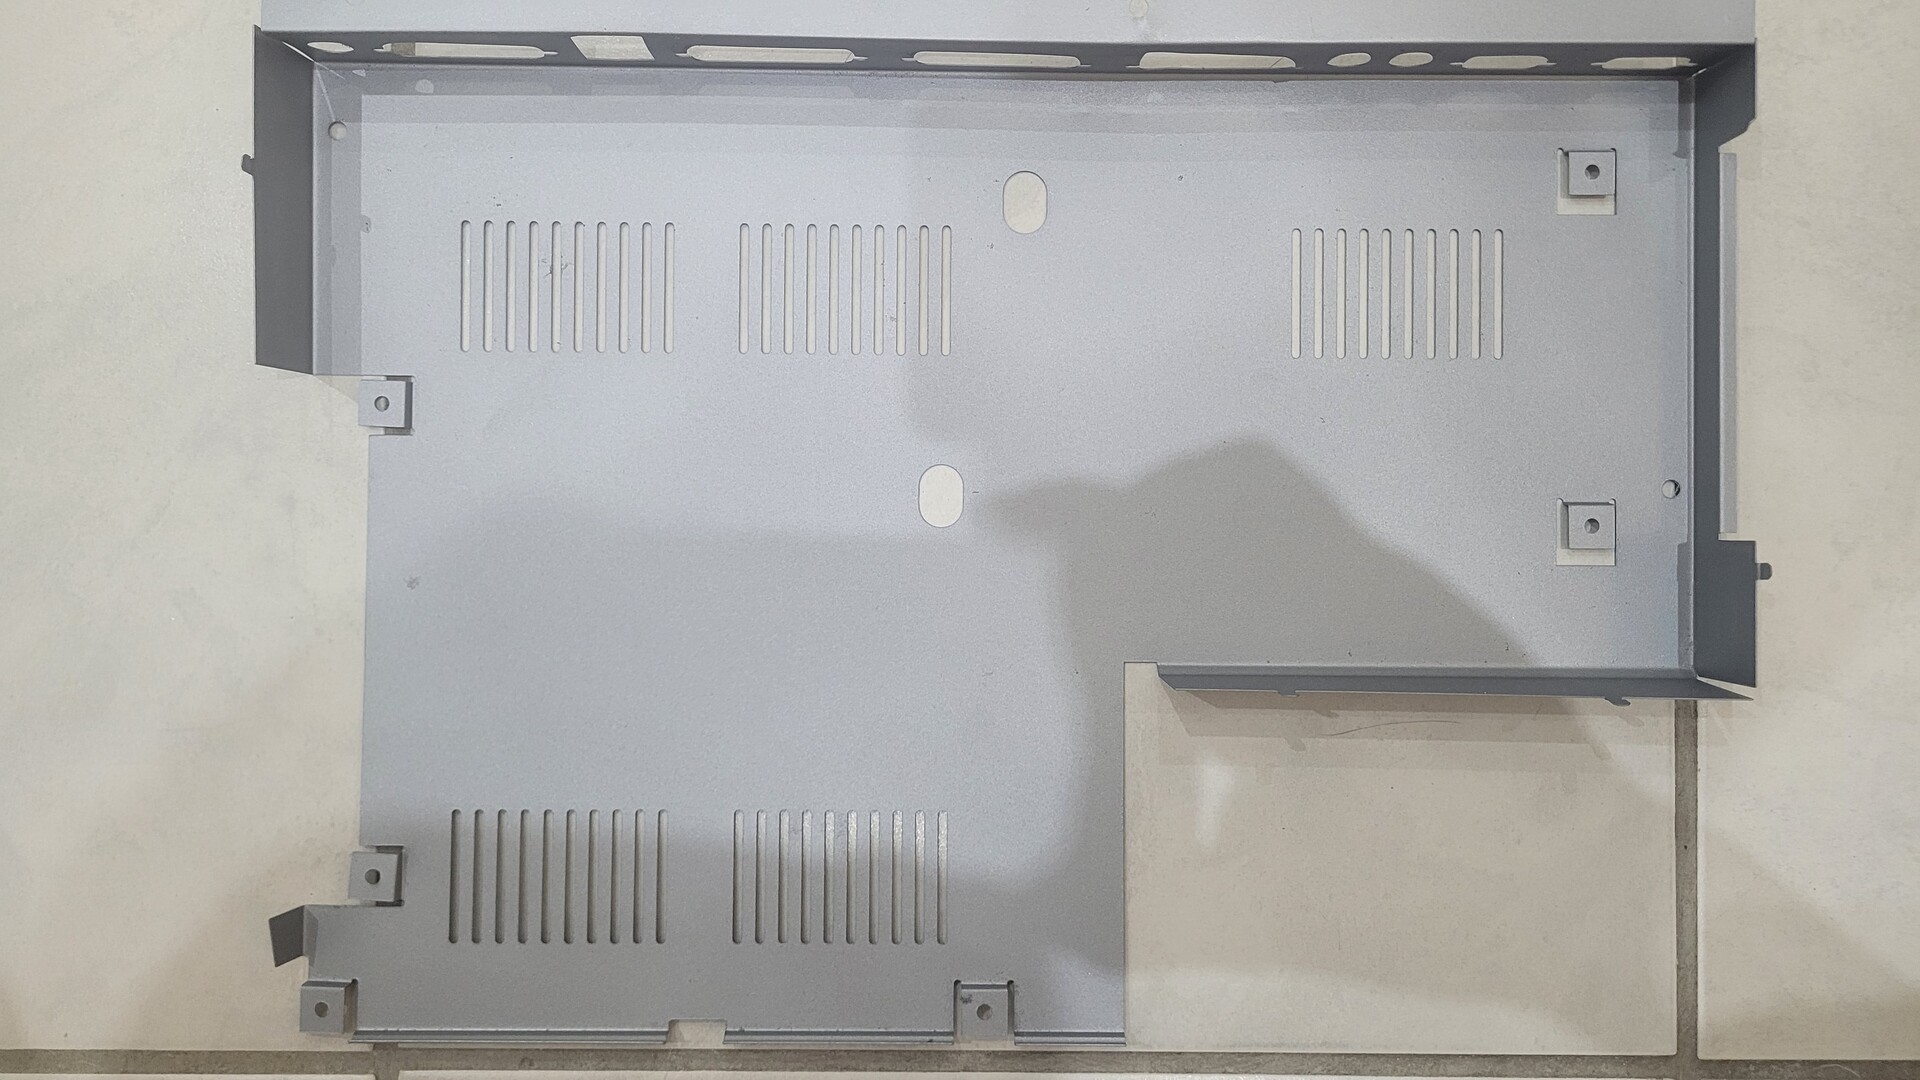
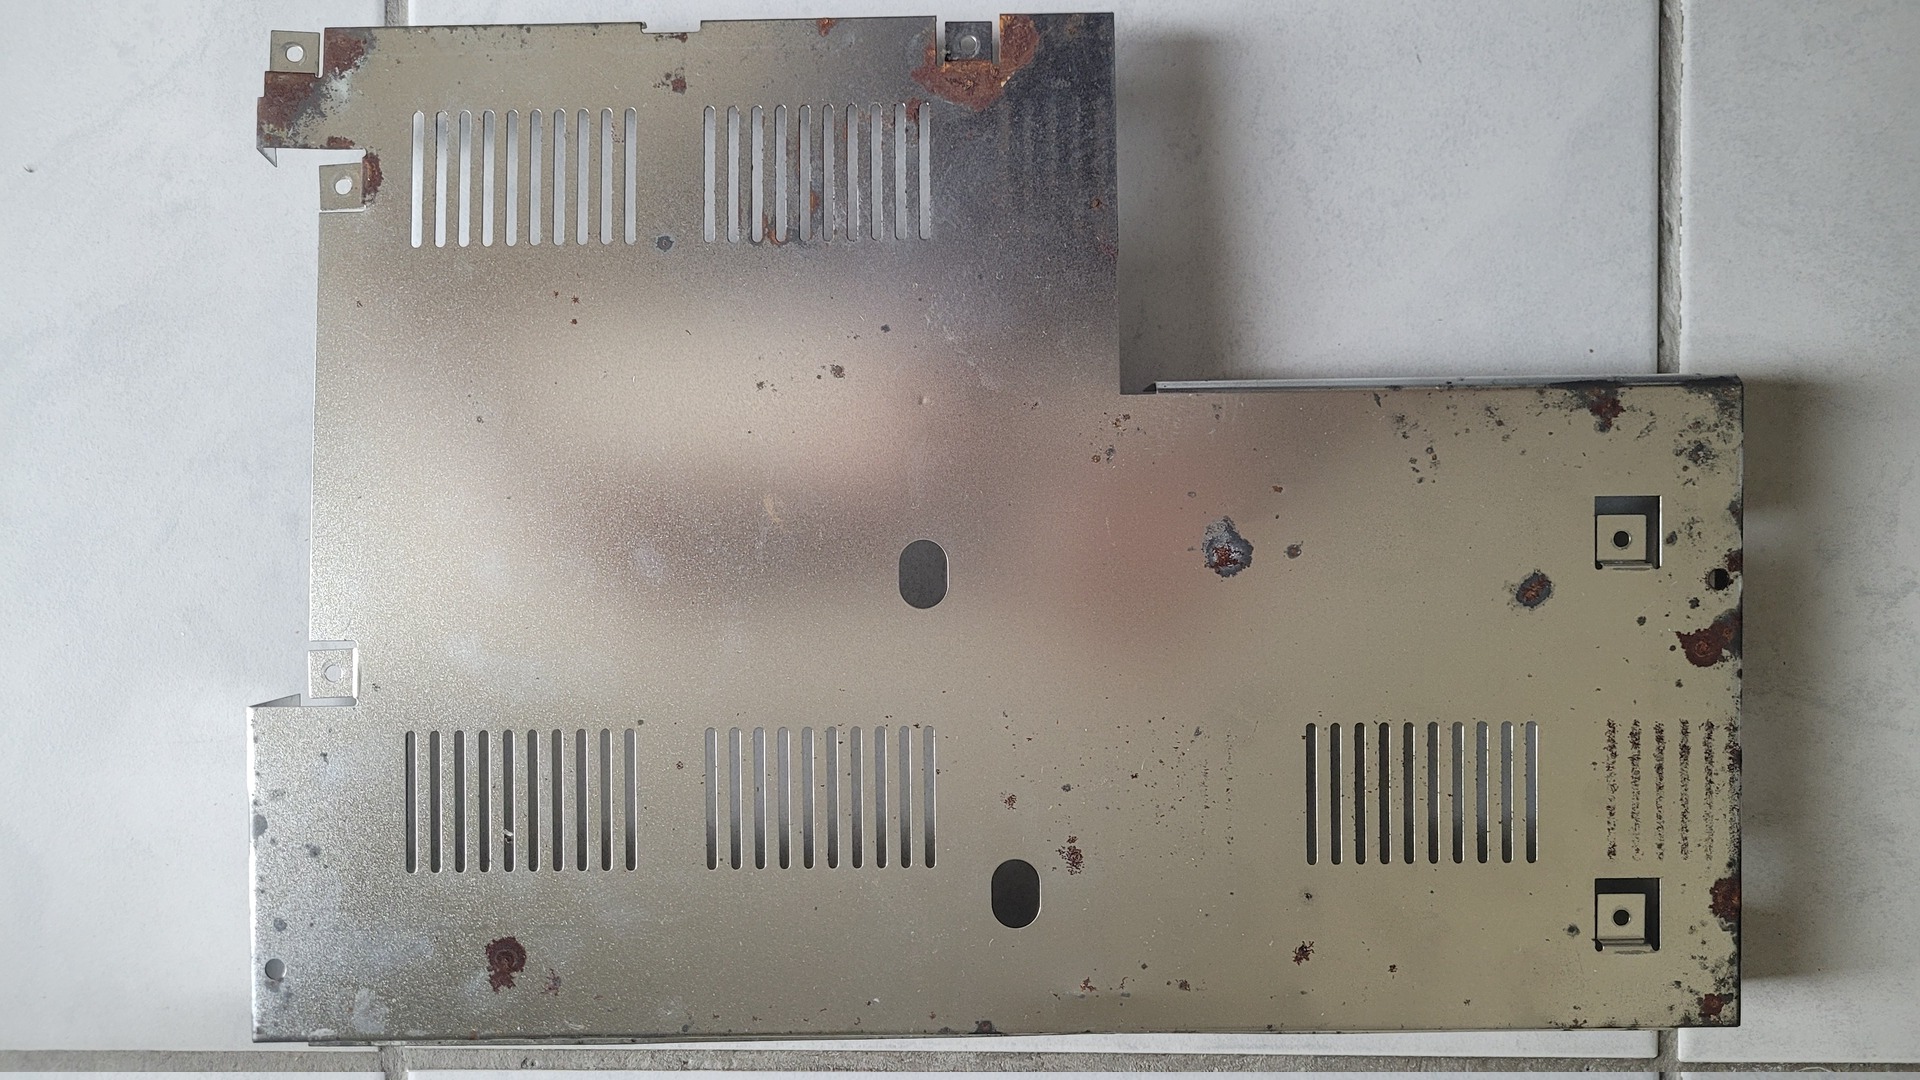
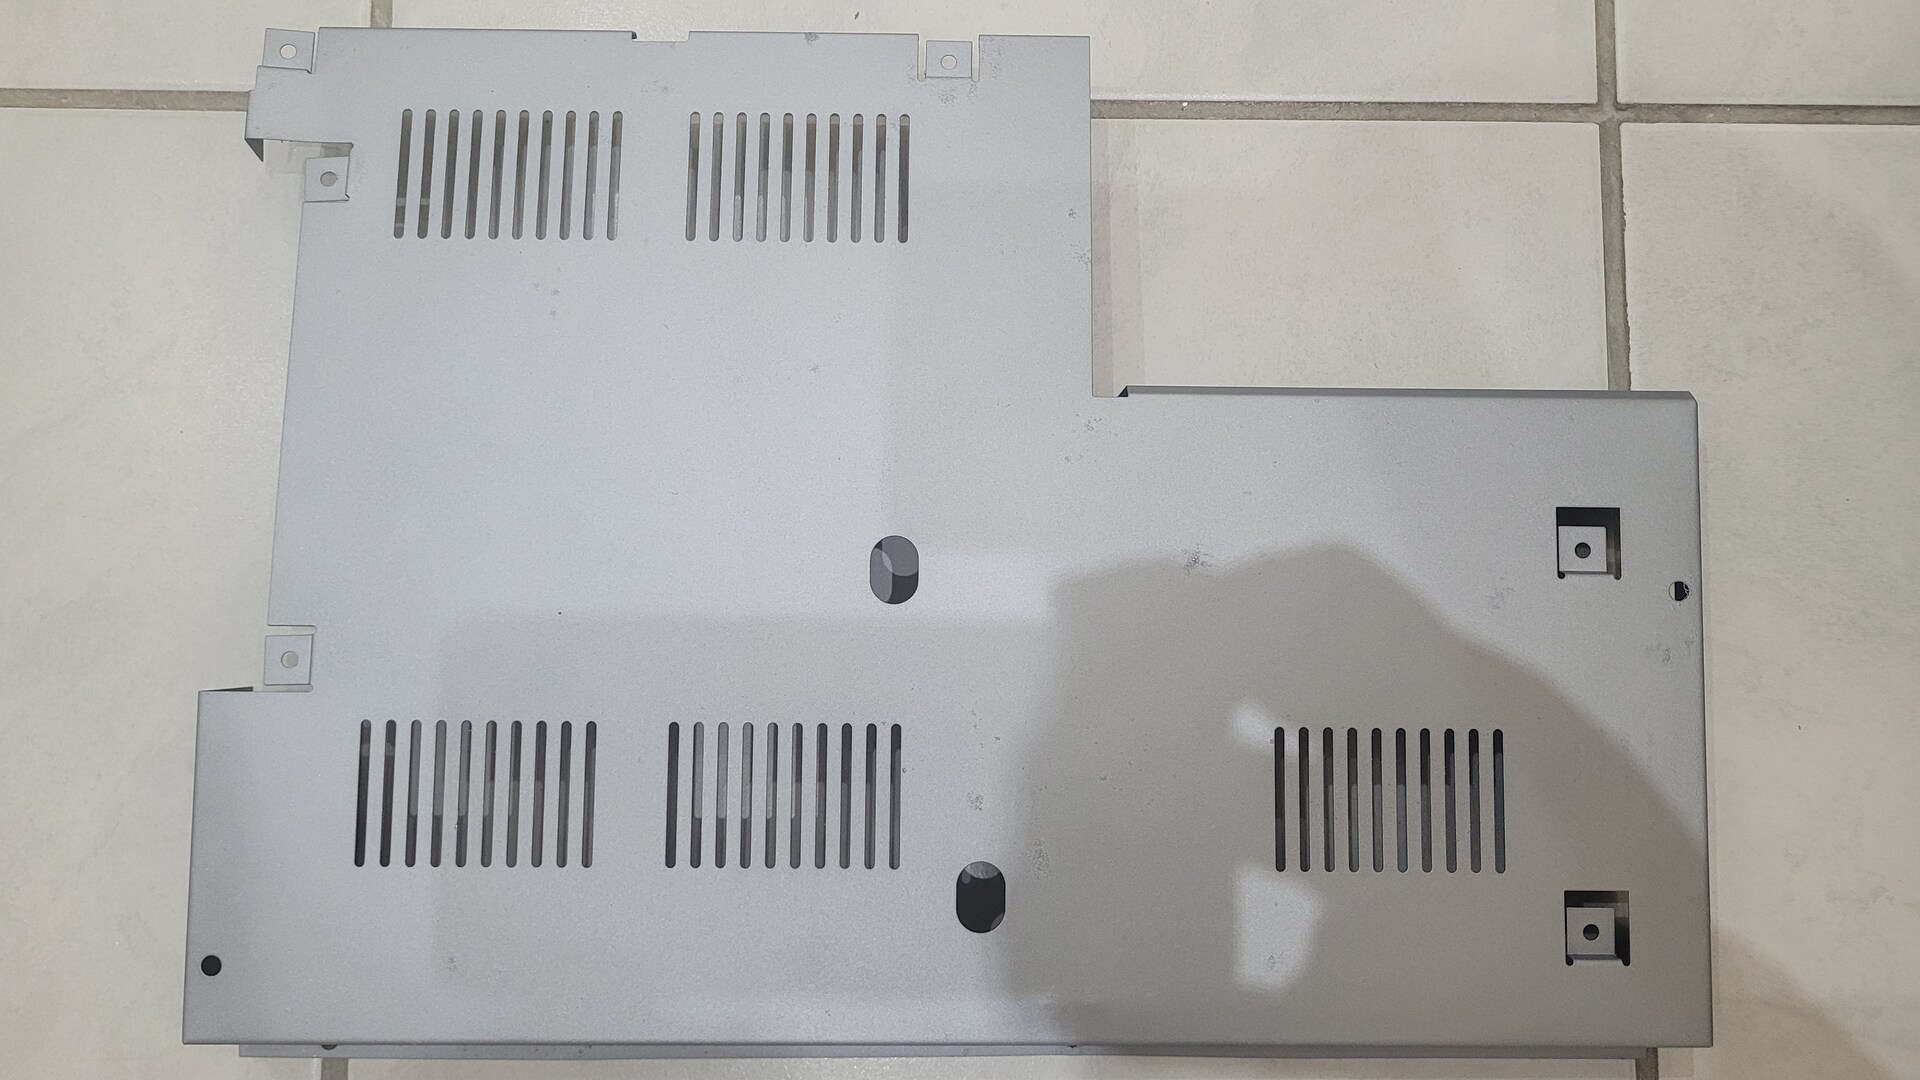
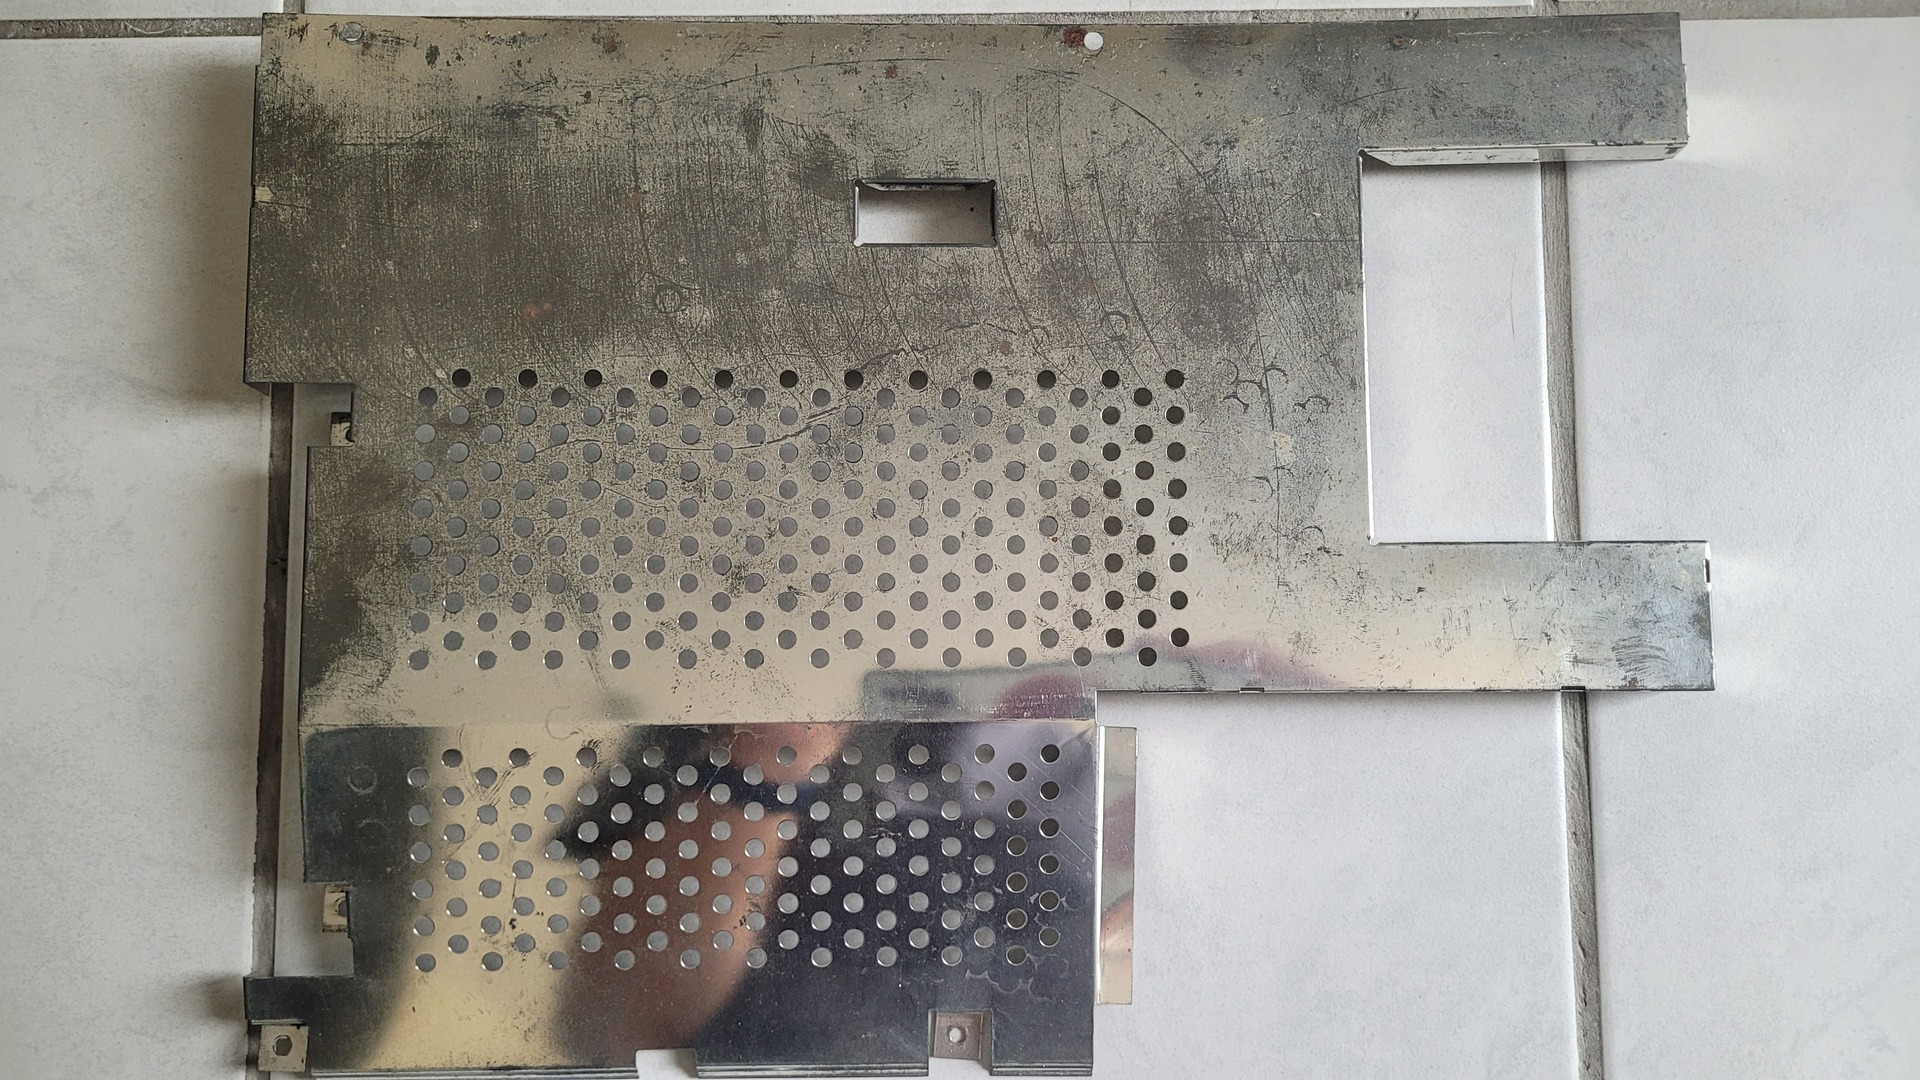
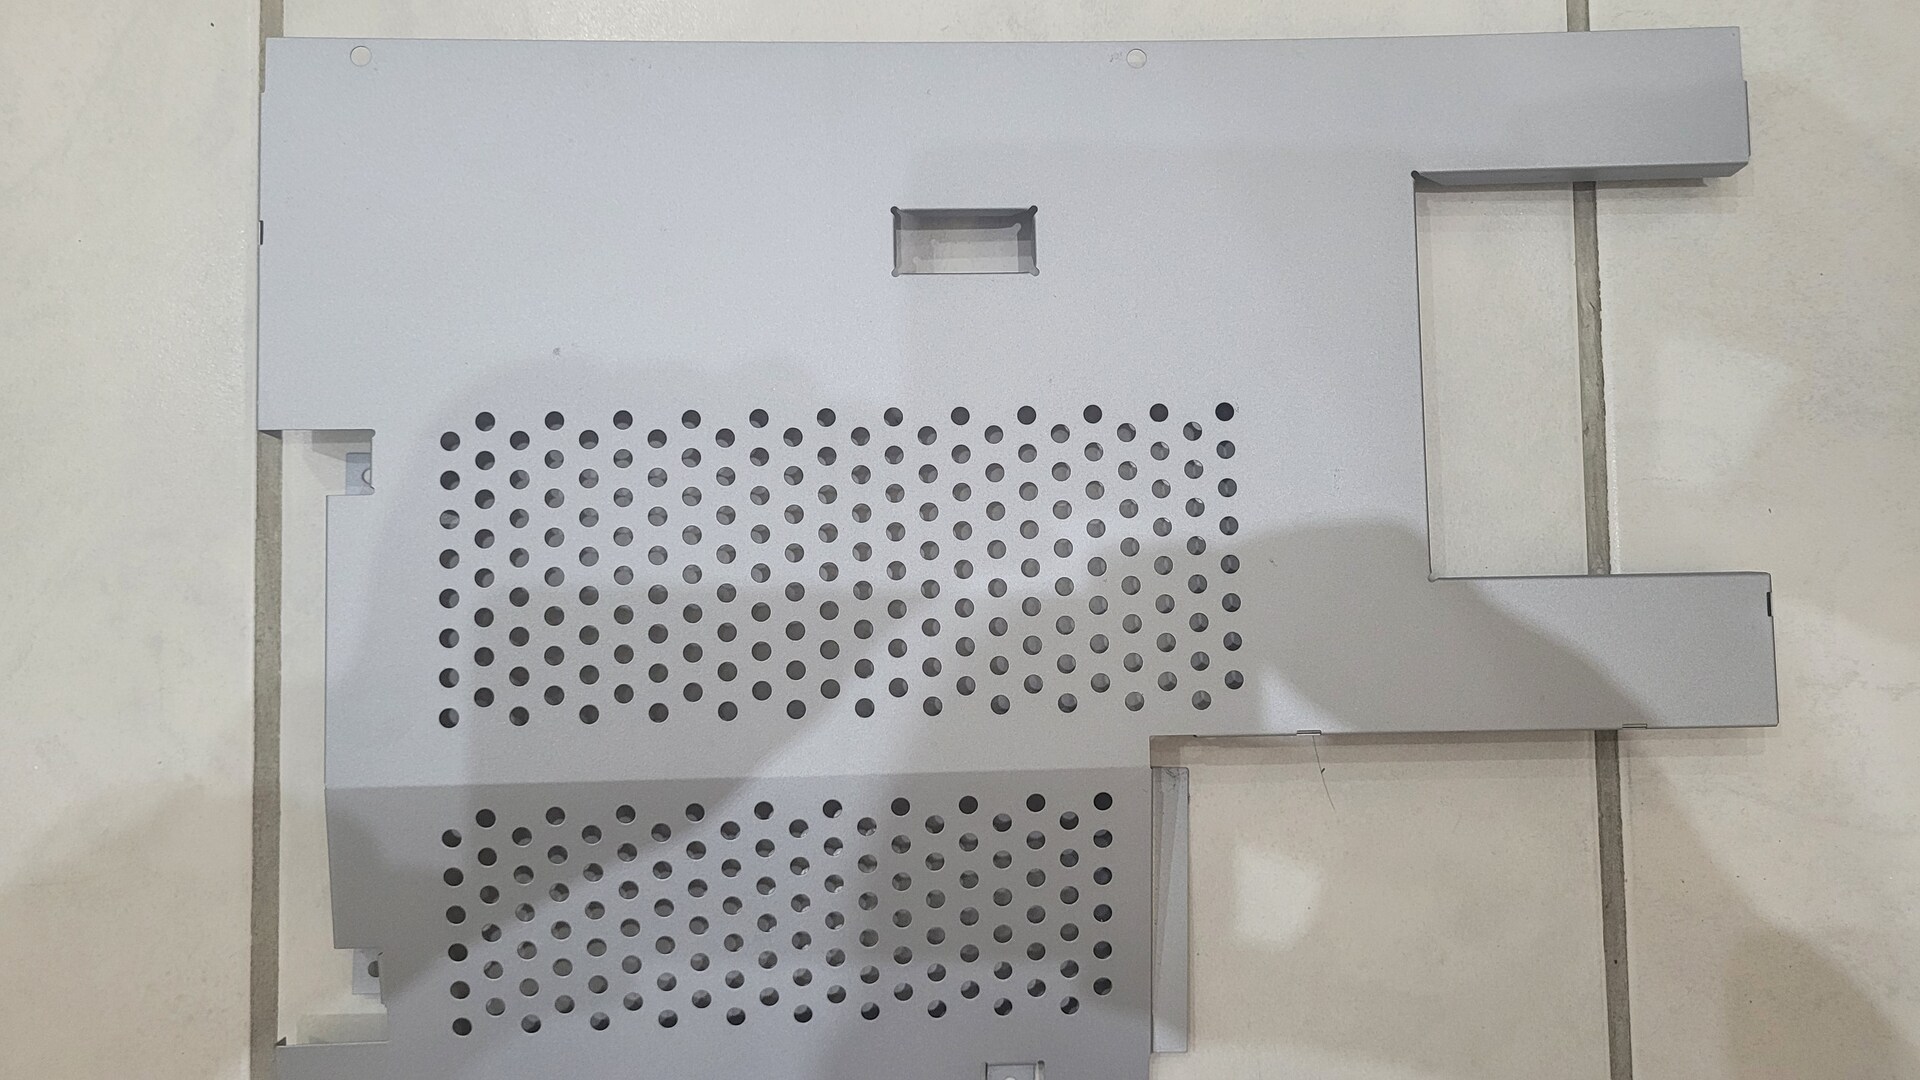
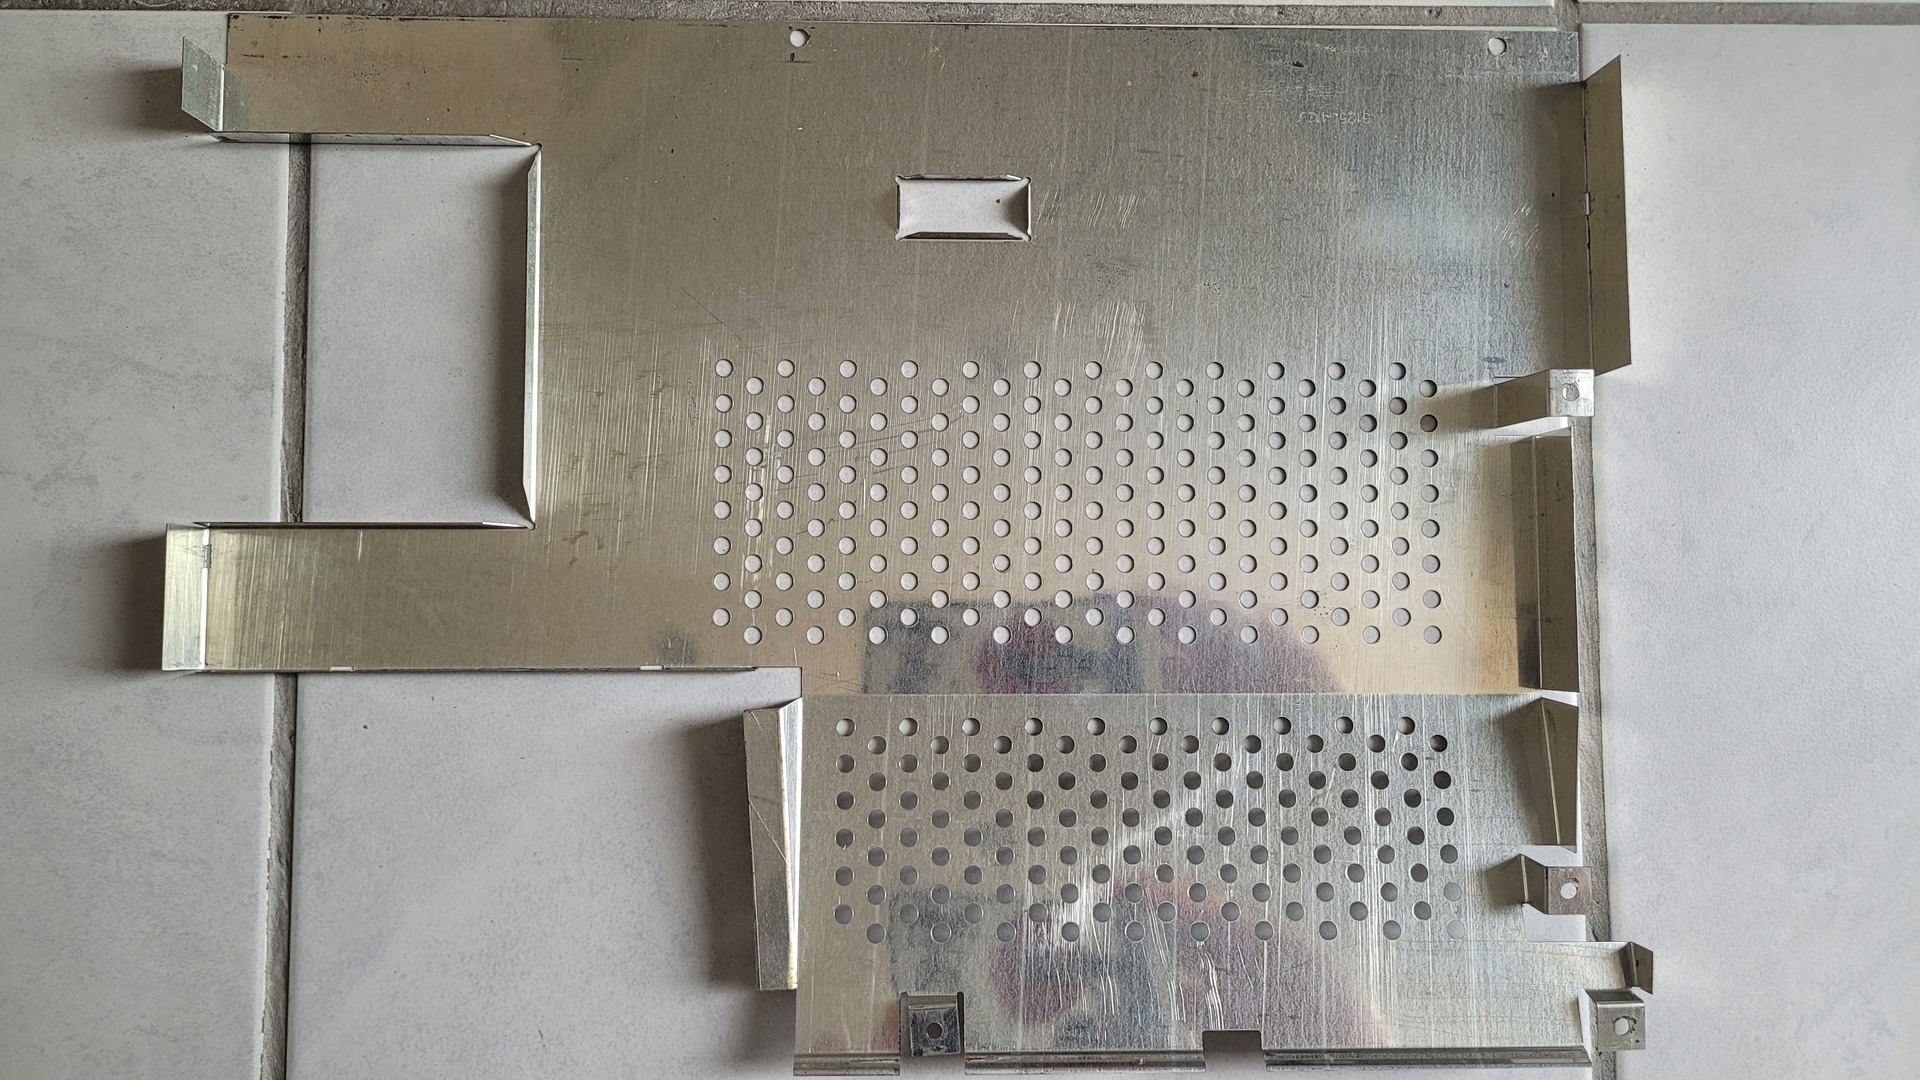
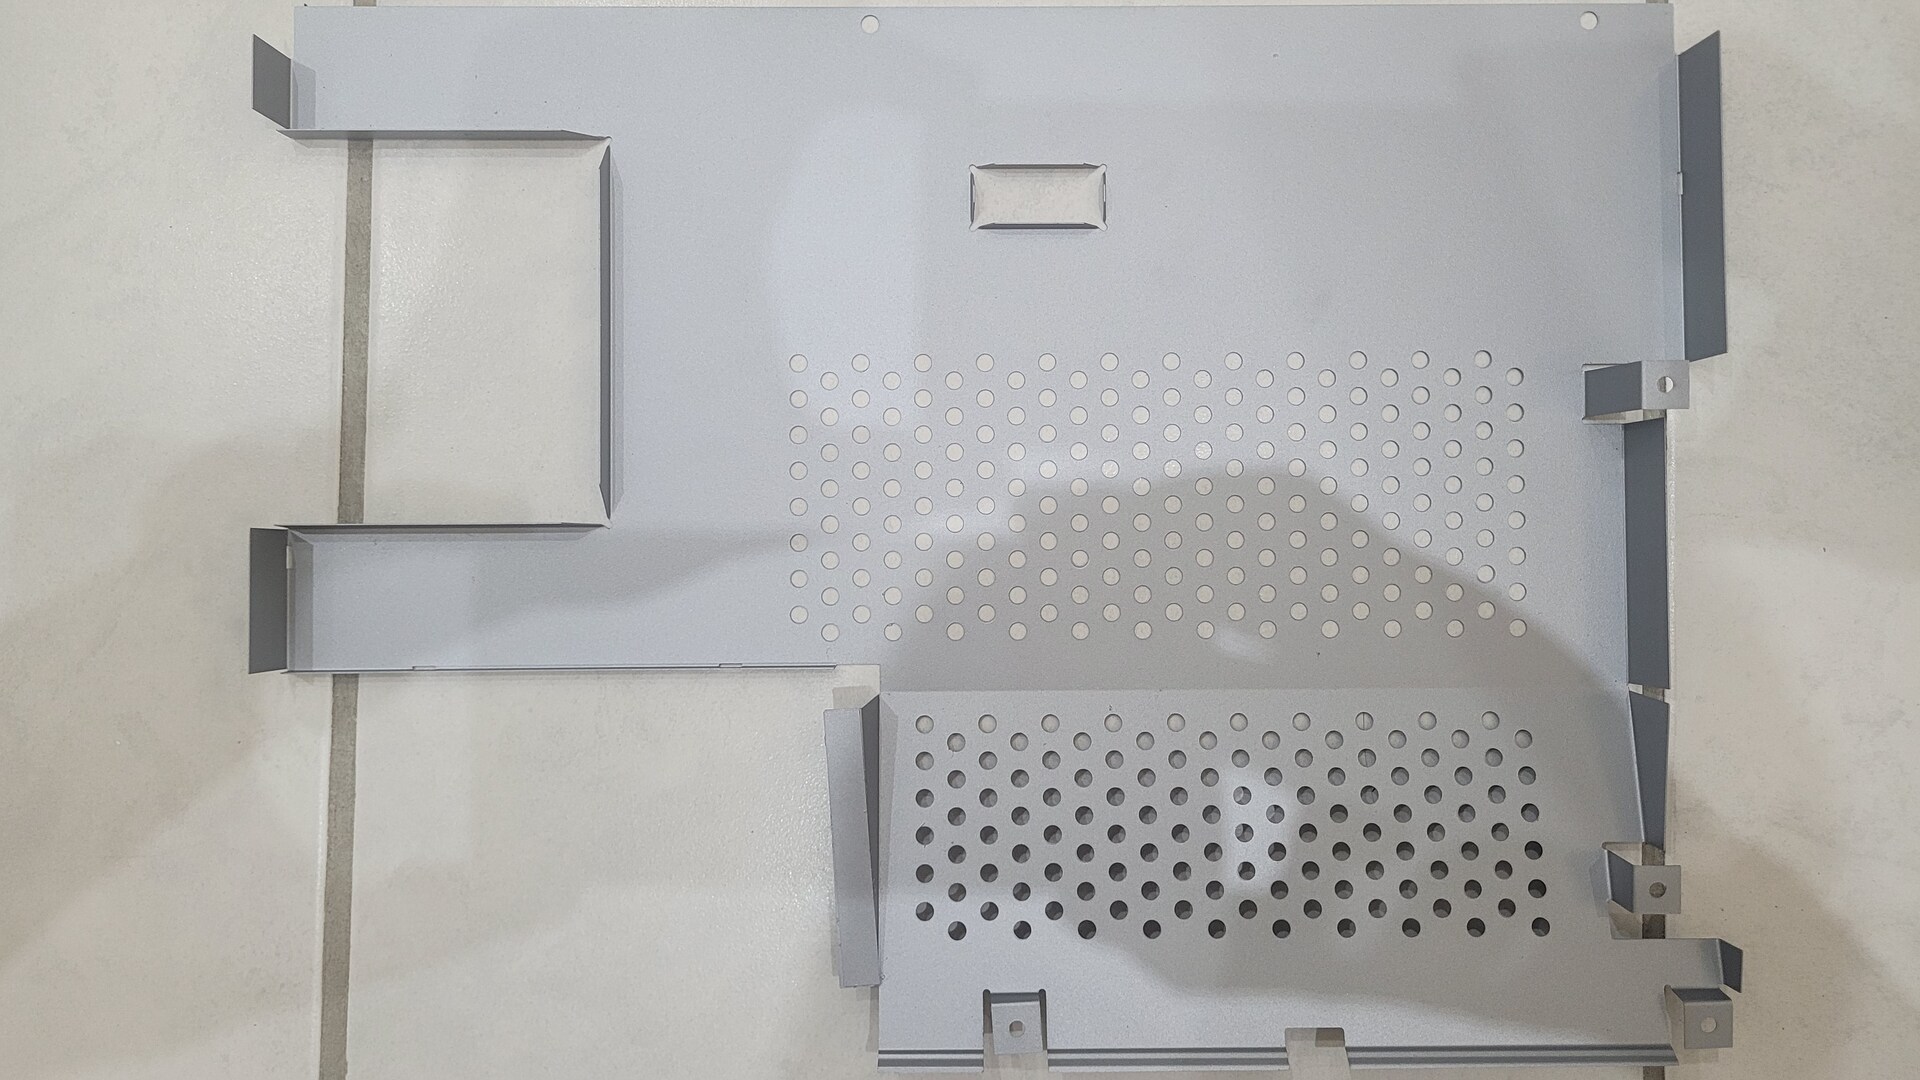
Metallic shield
Both the upper and lower shield parts were in poor condition, showing some corrosion. While these shields aren’t strictly necessary for the Amiga to function, I wanted to keep my A500 as authentic as possible.
I treated the metal with Ambro-Sol spray (98% zinc) — a kind of metallic paint that also protects against corrosion. Before painting, I lightly sanded all corroded areas to ensure a smooth finish. The paint has a matte finish, which I actually prefer over the original look.
On the left: before painting; on the right: after treatment:
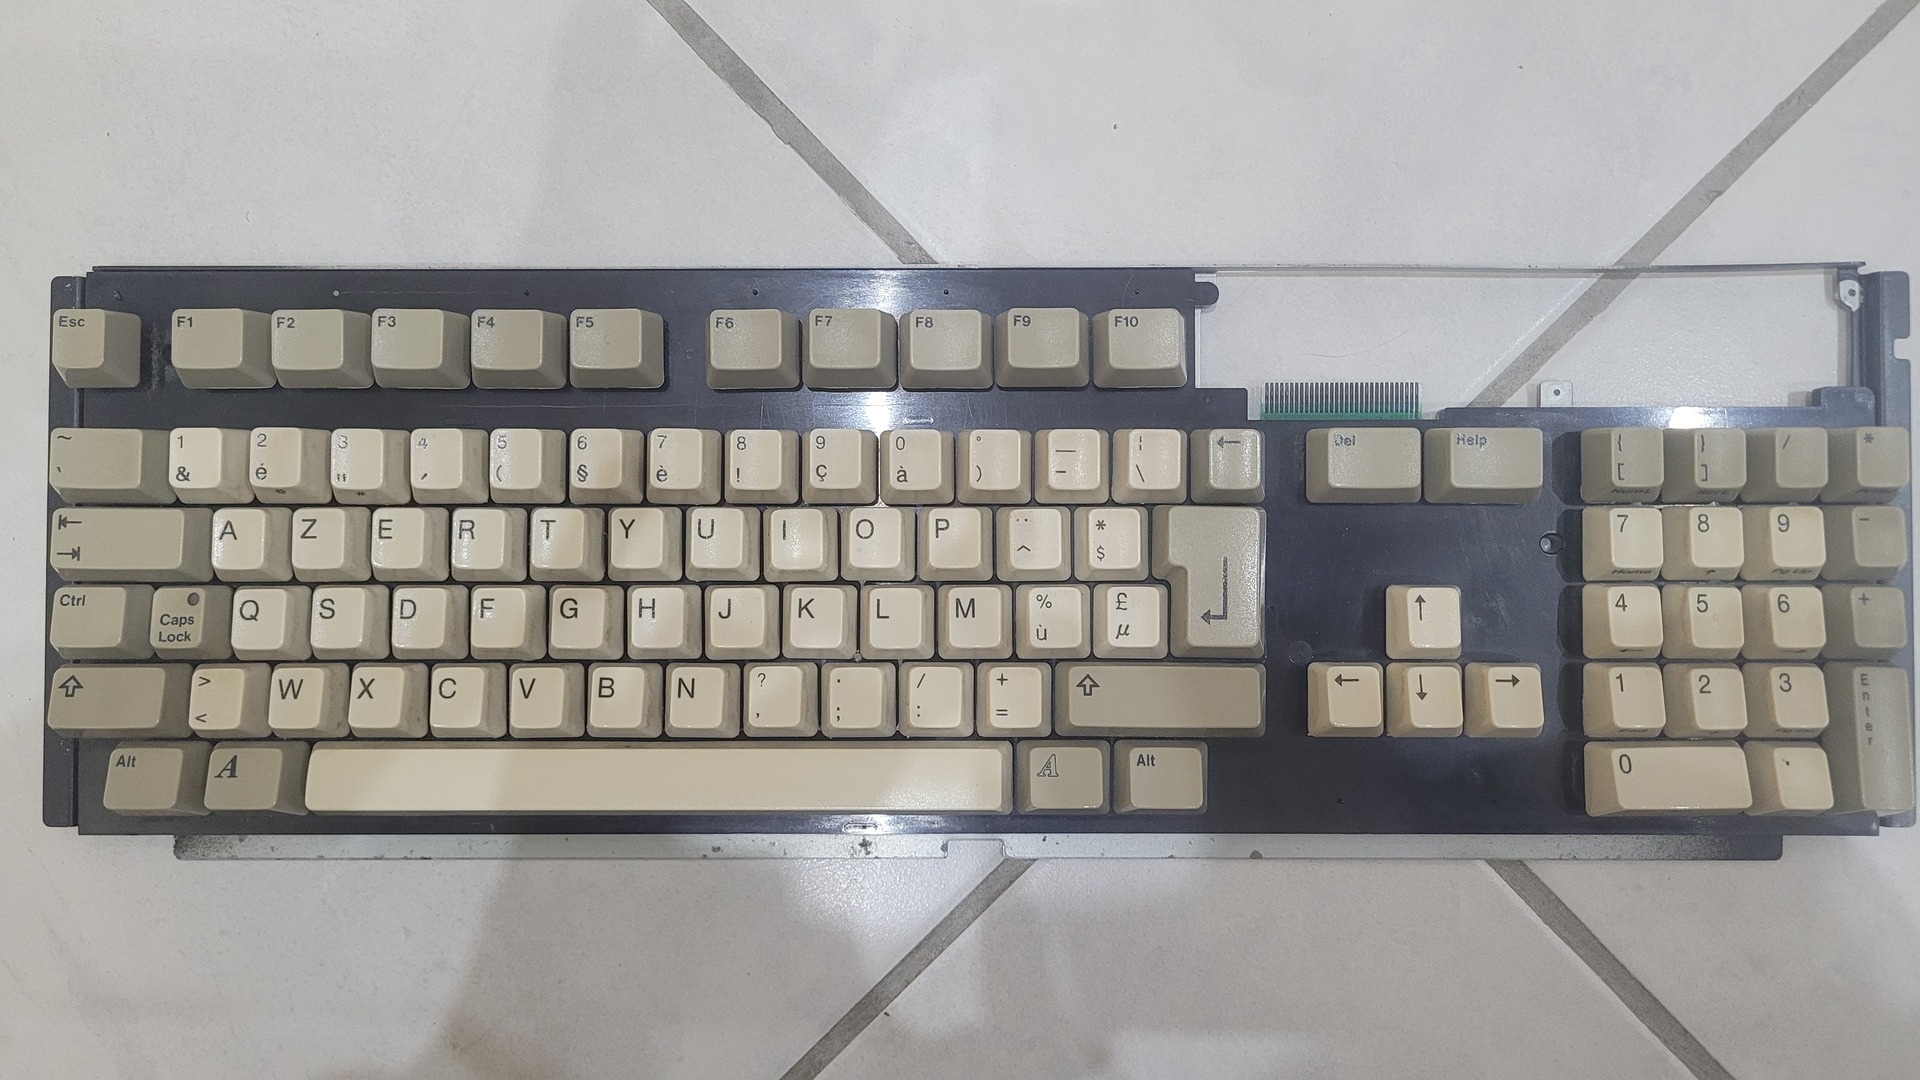
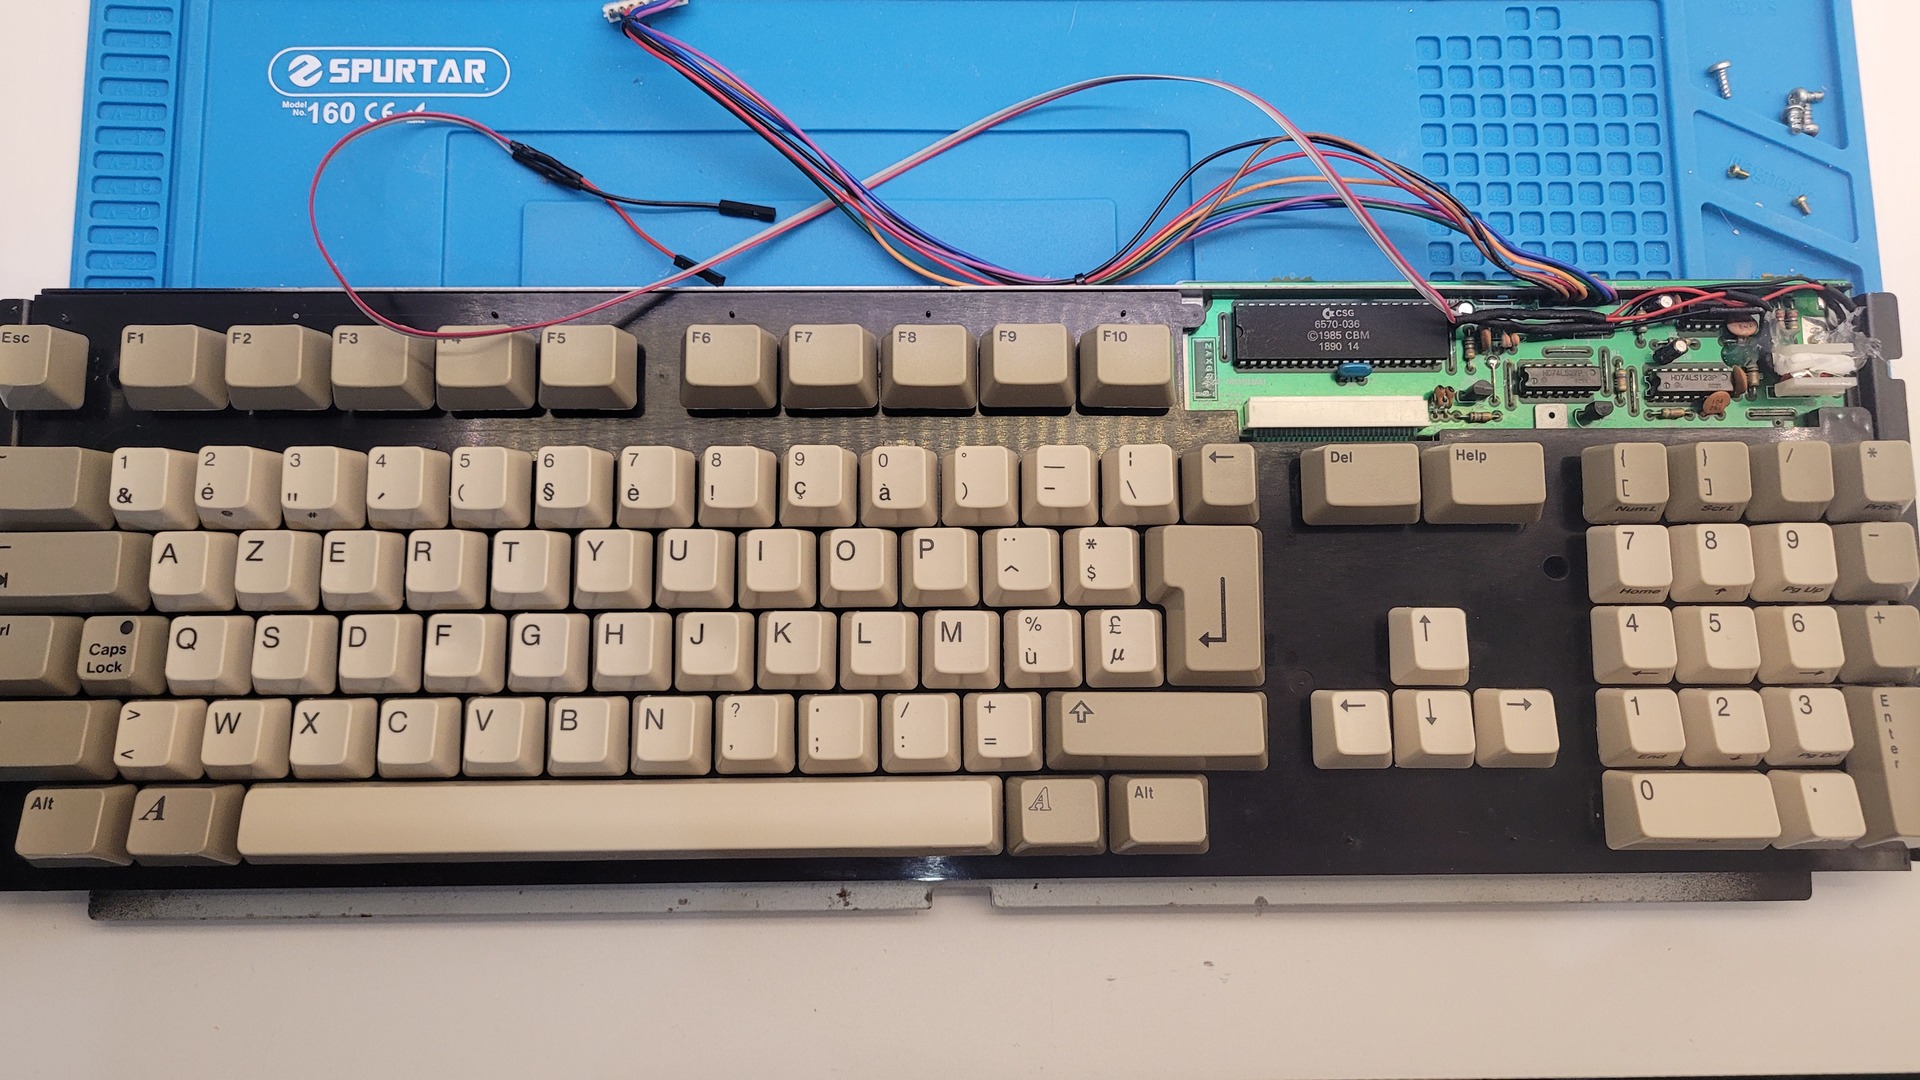
Keyboard
The keyboard was covered in dust and had a noticeable yellow tint. I removed all the keys to thoroughly clean each part and also subjected them to the Retrobright process.
Unfortunately, I didn’t take any photos of the cleaned keyboard on its own, but the results should be visible in the overall photos of the restored A500.

The mouse
The mouse wasn’t working properly and showed several issues:
- The classic problem: dirty internal wheels.
- The spring on the white wheel, which ensures the ball touches the encoder wheels, was too loose, so the ball didn’t make proper contact.
- The right mouse button was dead or broken.
I replaced the right button with a new one — slightly more “clicky,” but it didn’t require any extra pressure to use.

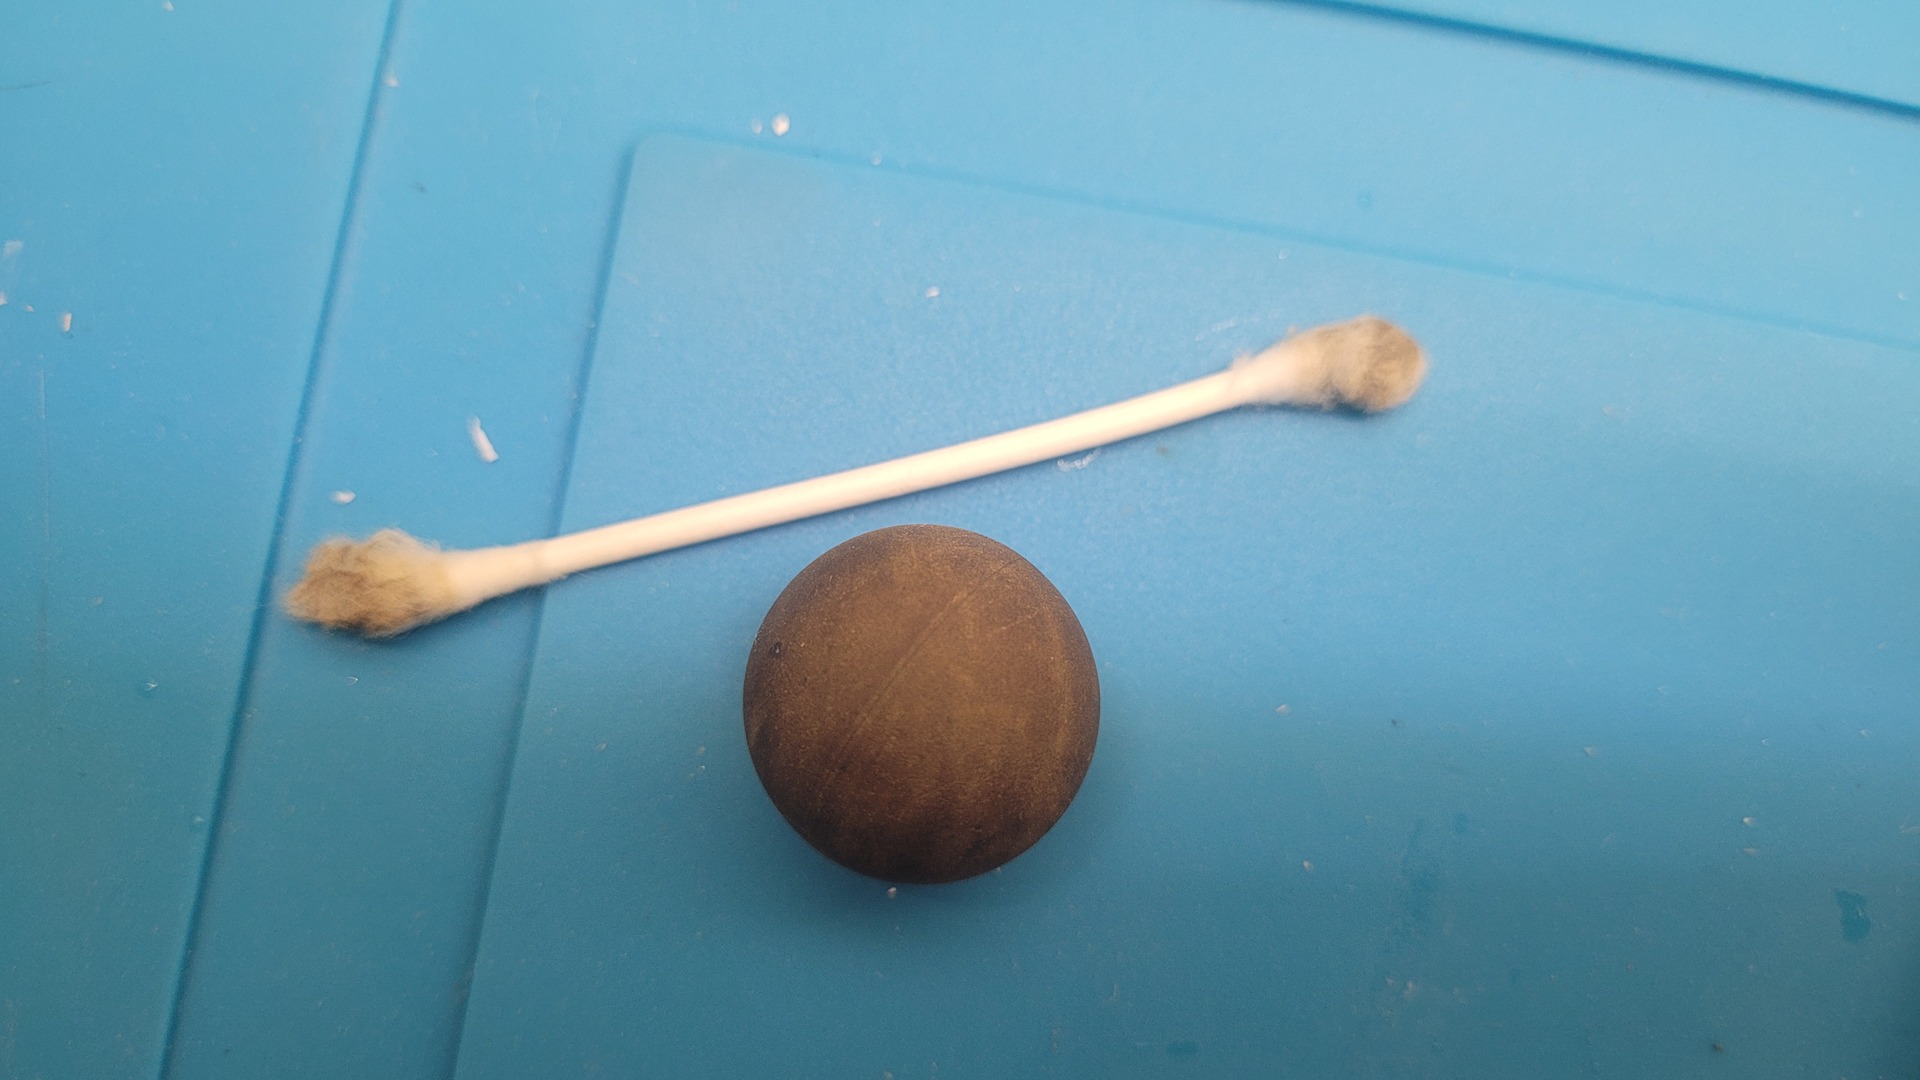
Next, I cleaned all internal parts using alcohol and some Q-Tips, and I retensioned the spring by gently pulling both sides at the same time.
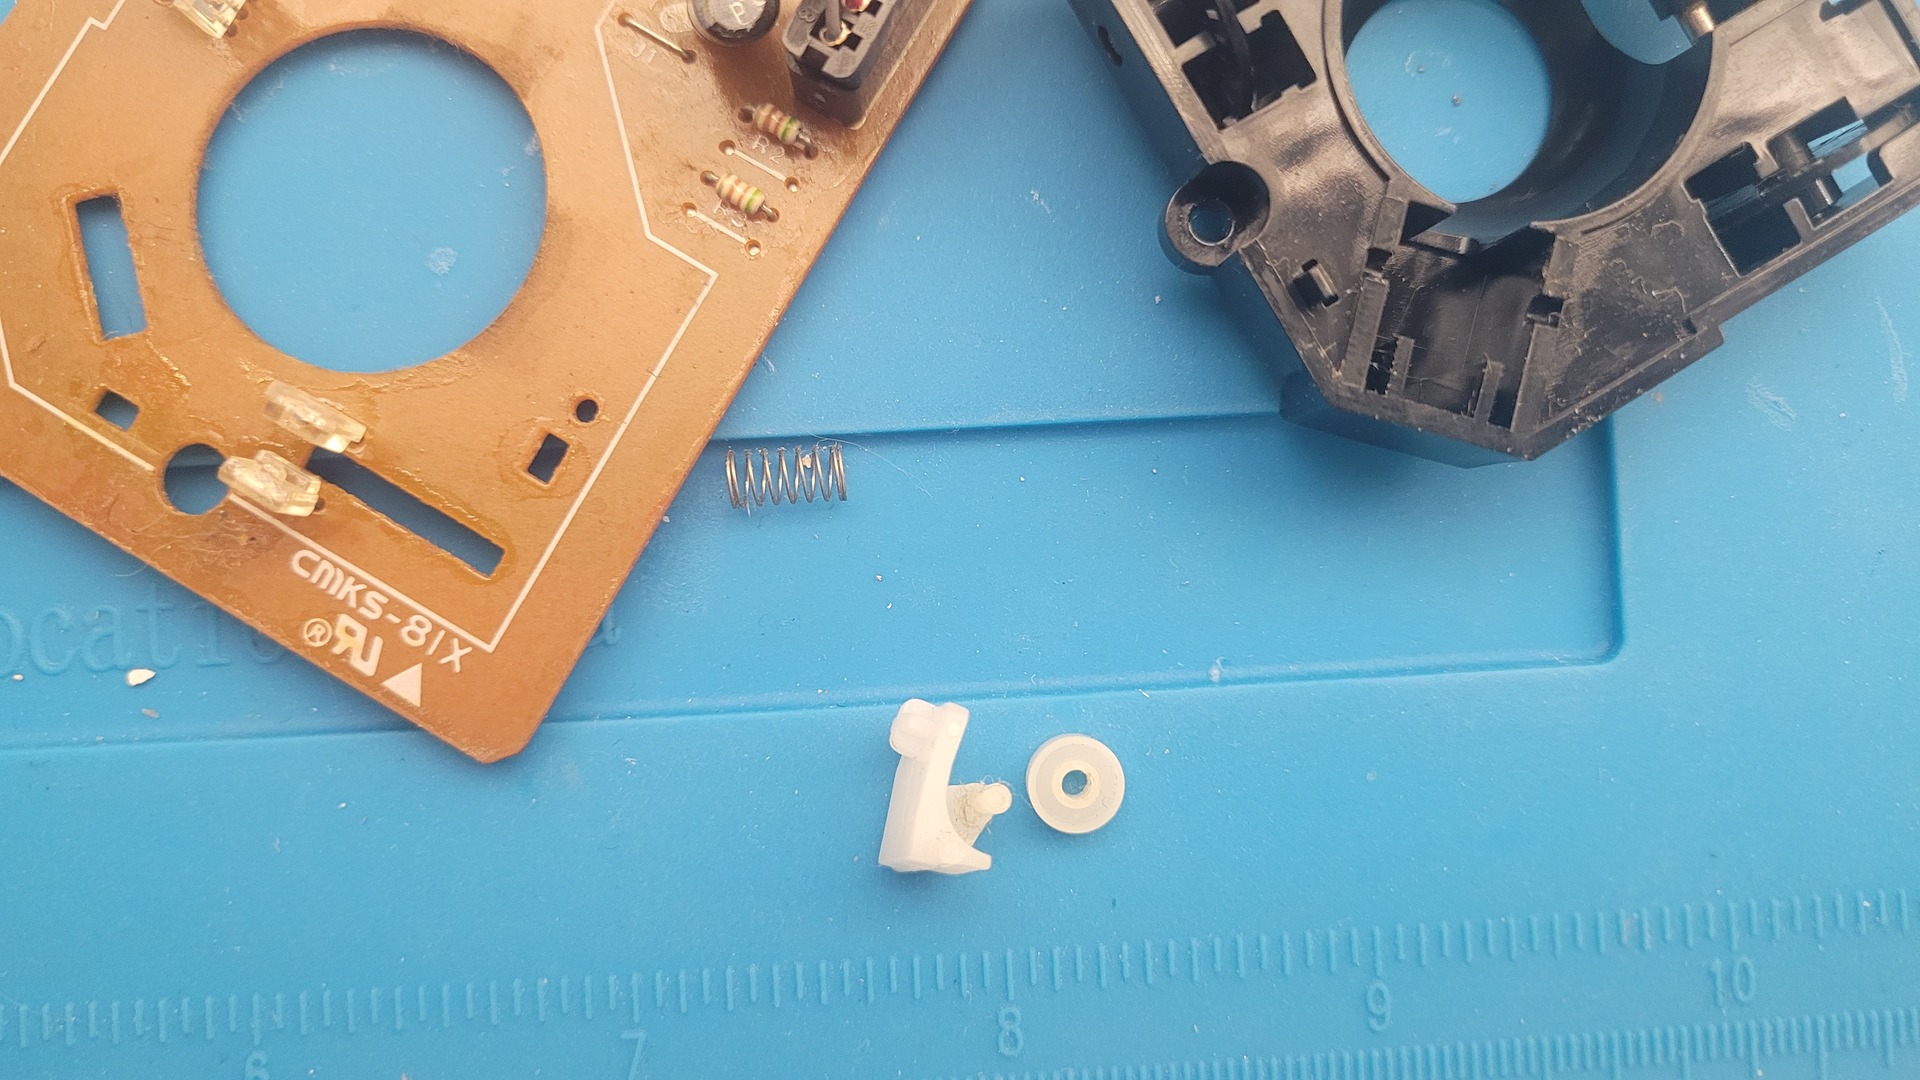
The final result: a cleaner interior and a fully functional, “like new” mouse.

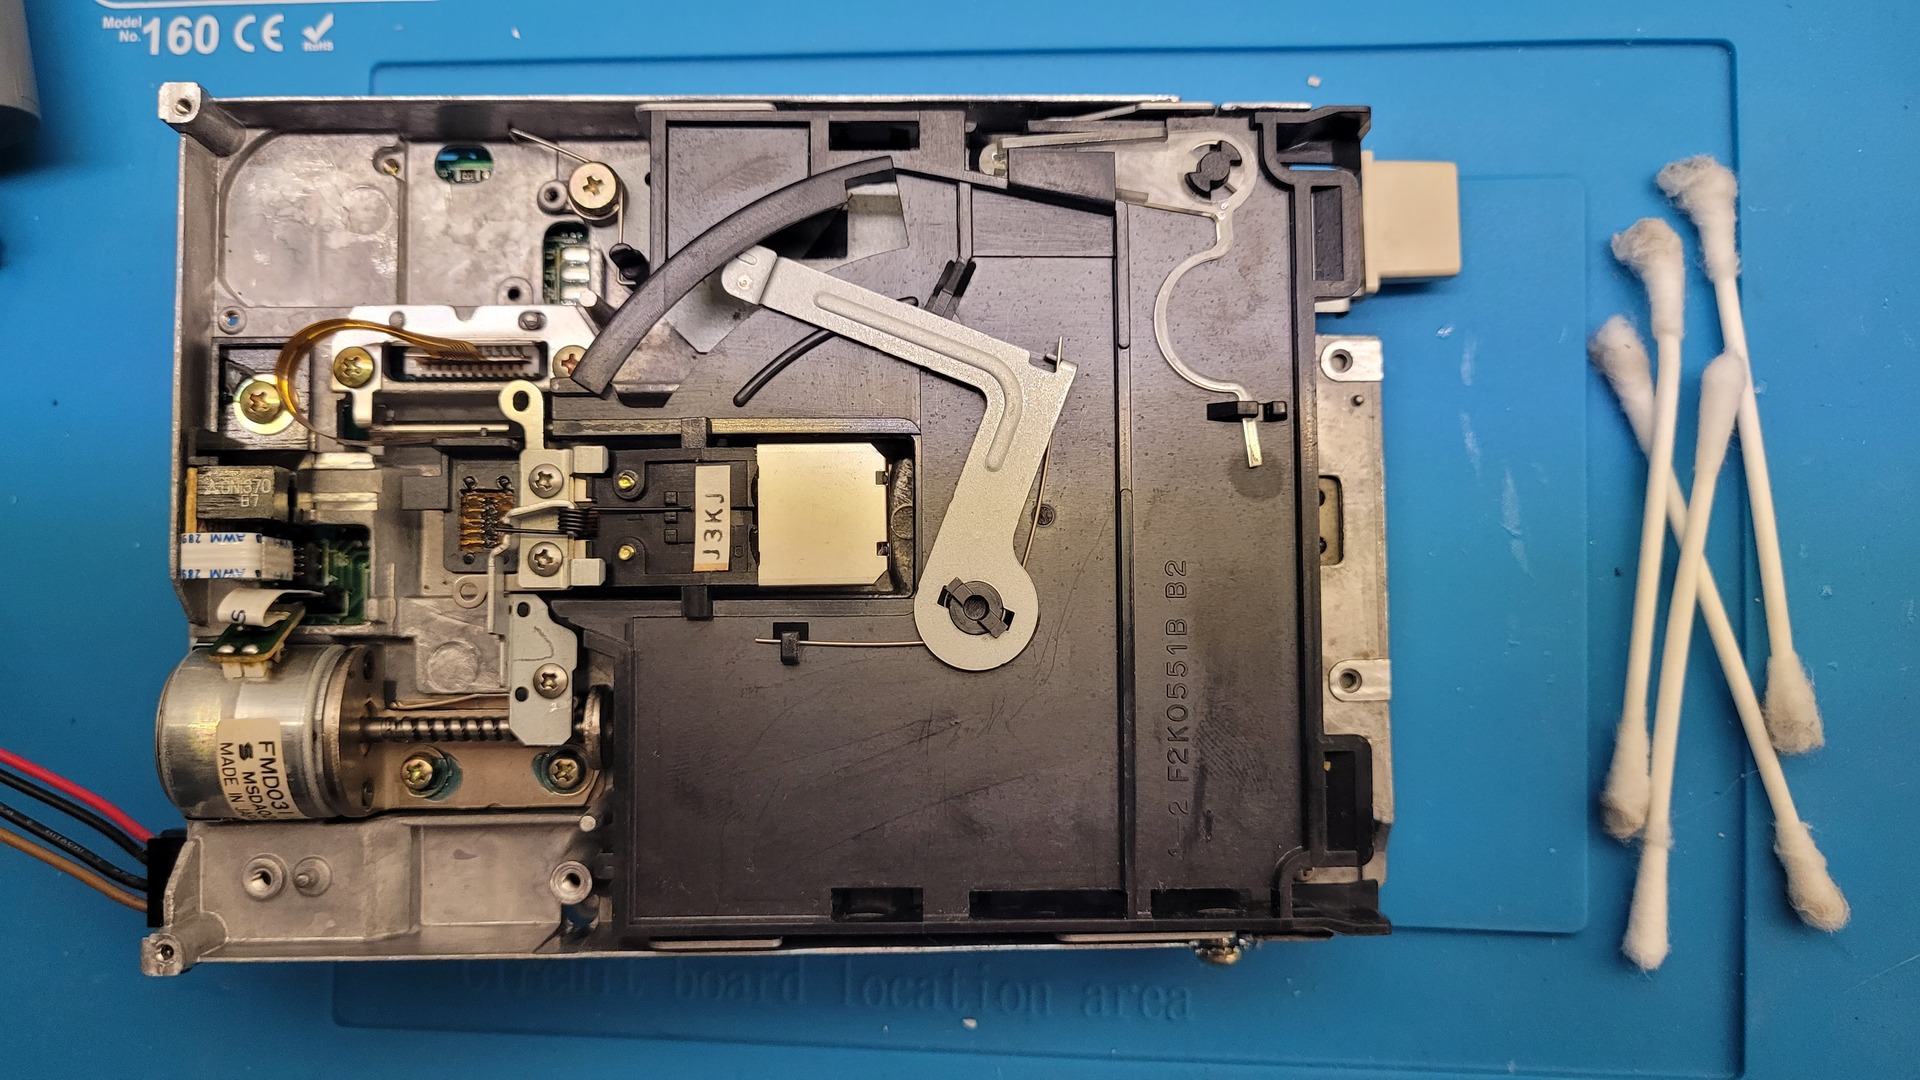
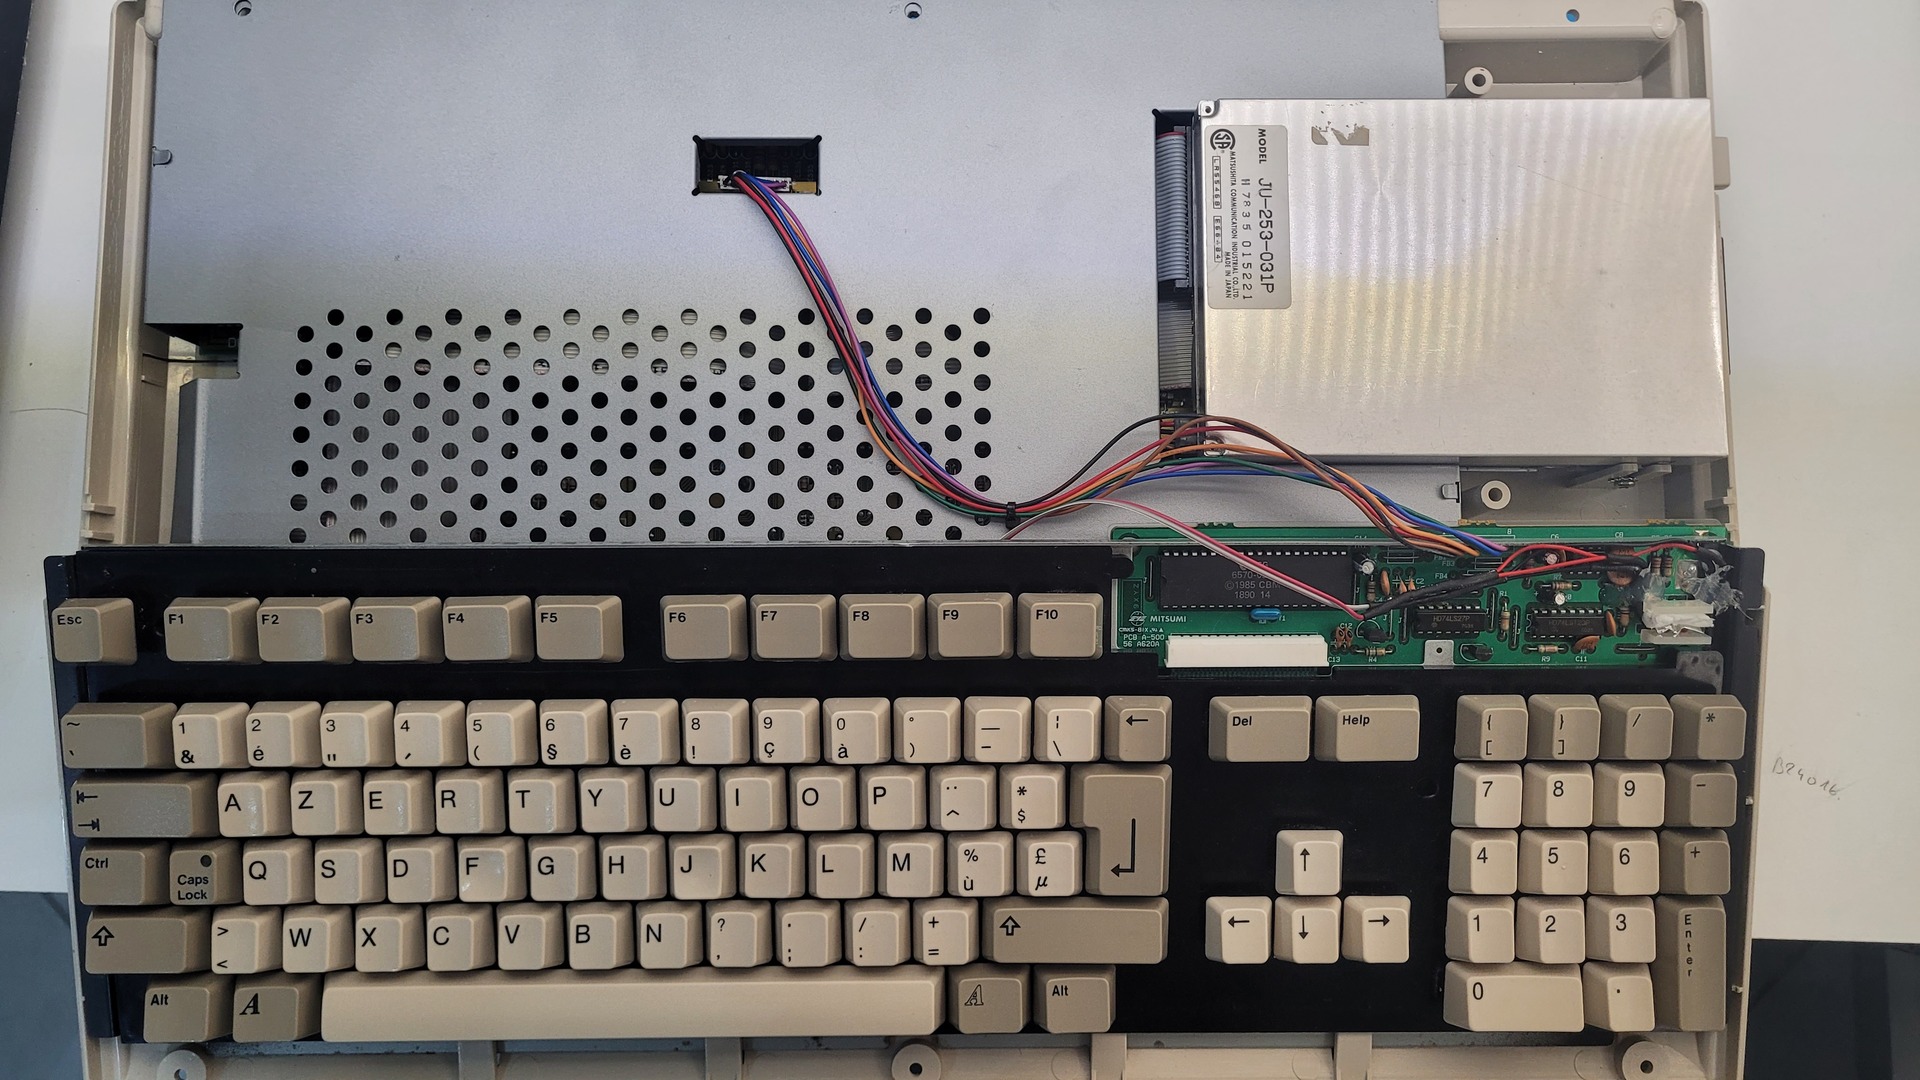
Floppy drive
The floppy drive in my Amiga 500 is a Matsushita JU-253-031P, recognizable by its plain black top cover over the mechanism. While it gives a clean look, it also makes dust removal more challenging compared to other drives.
I carefully used Q-Tips to remove as much dust as possible, paying special attention to the read/write heads, which are still easily accessible and crucial for reliable disk reading.
Additionally, I had to resolder the wires on the small floppy detector button, which had been causing the “Please insert disk in drive” errors during reading.
Here’s a look at the drive during cleaning and after reassembly:

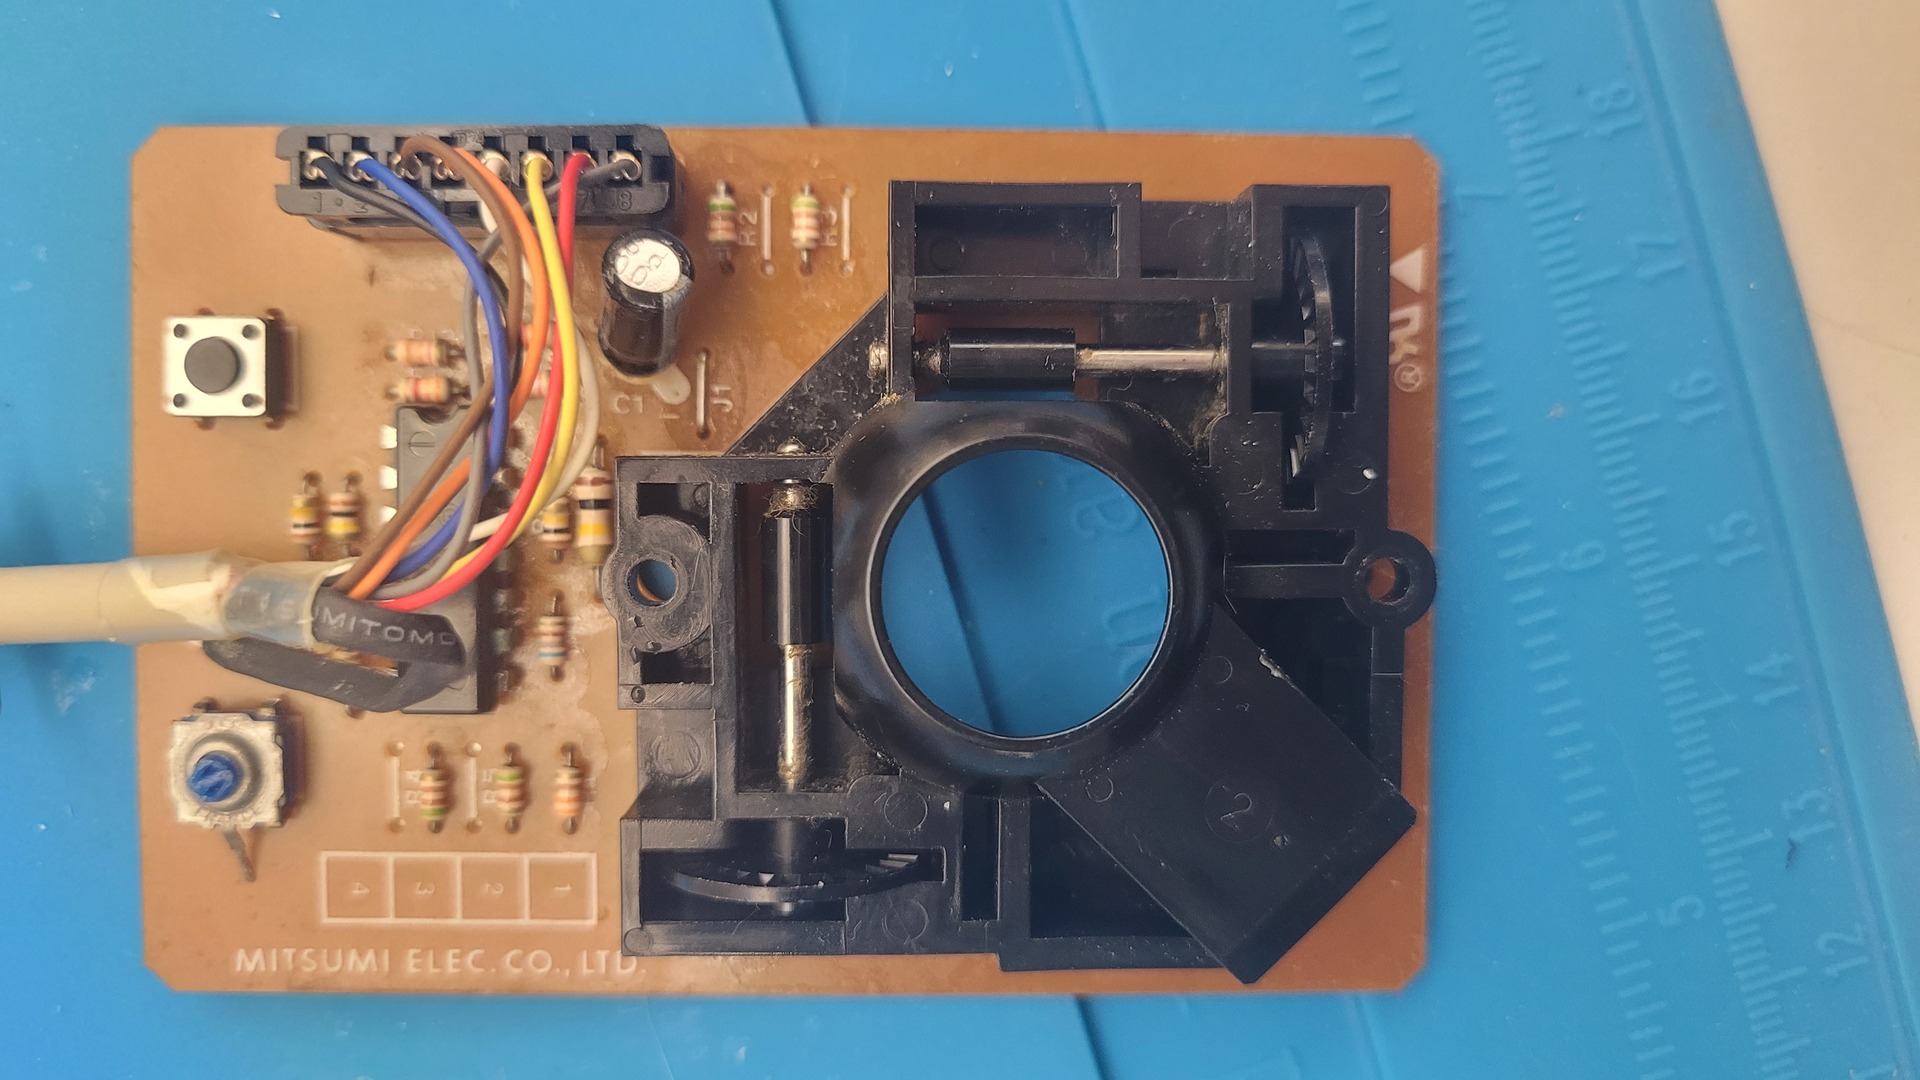
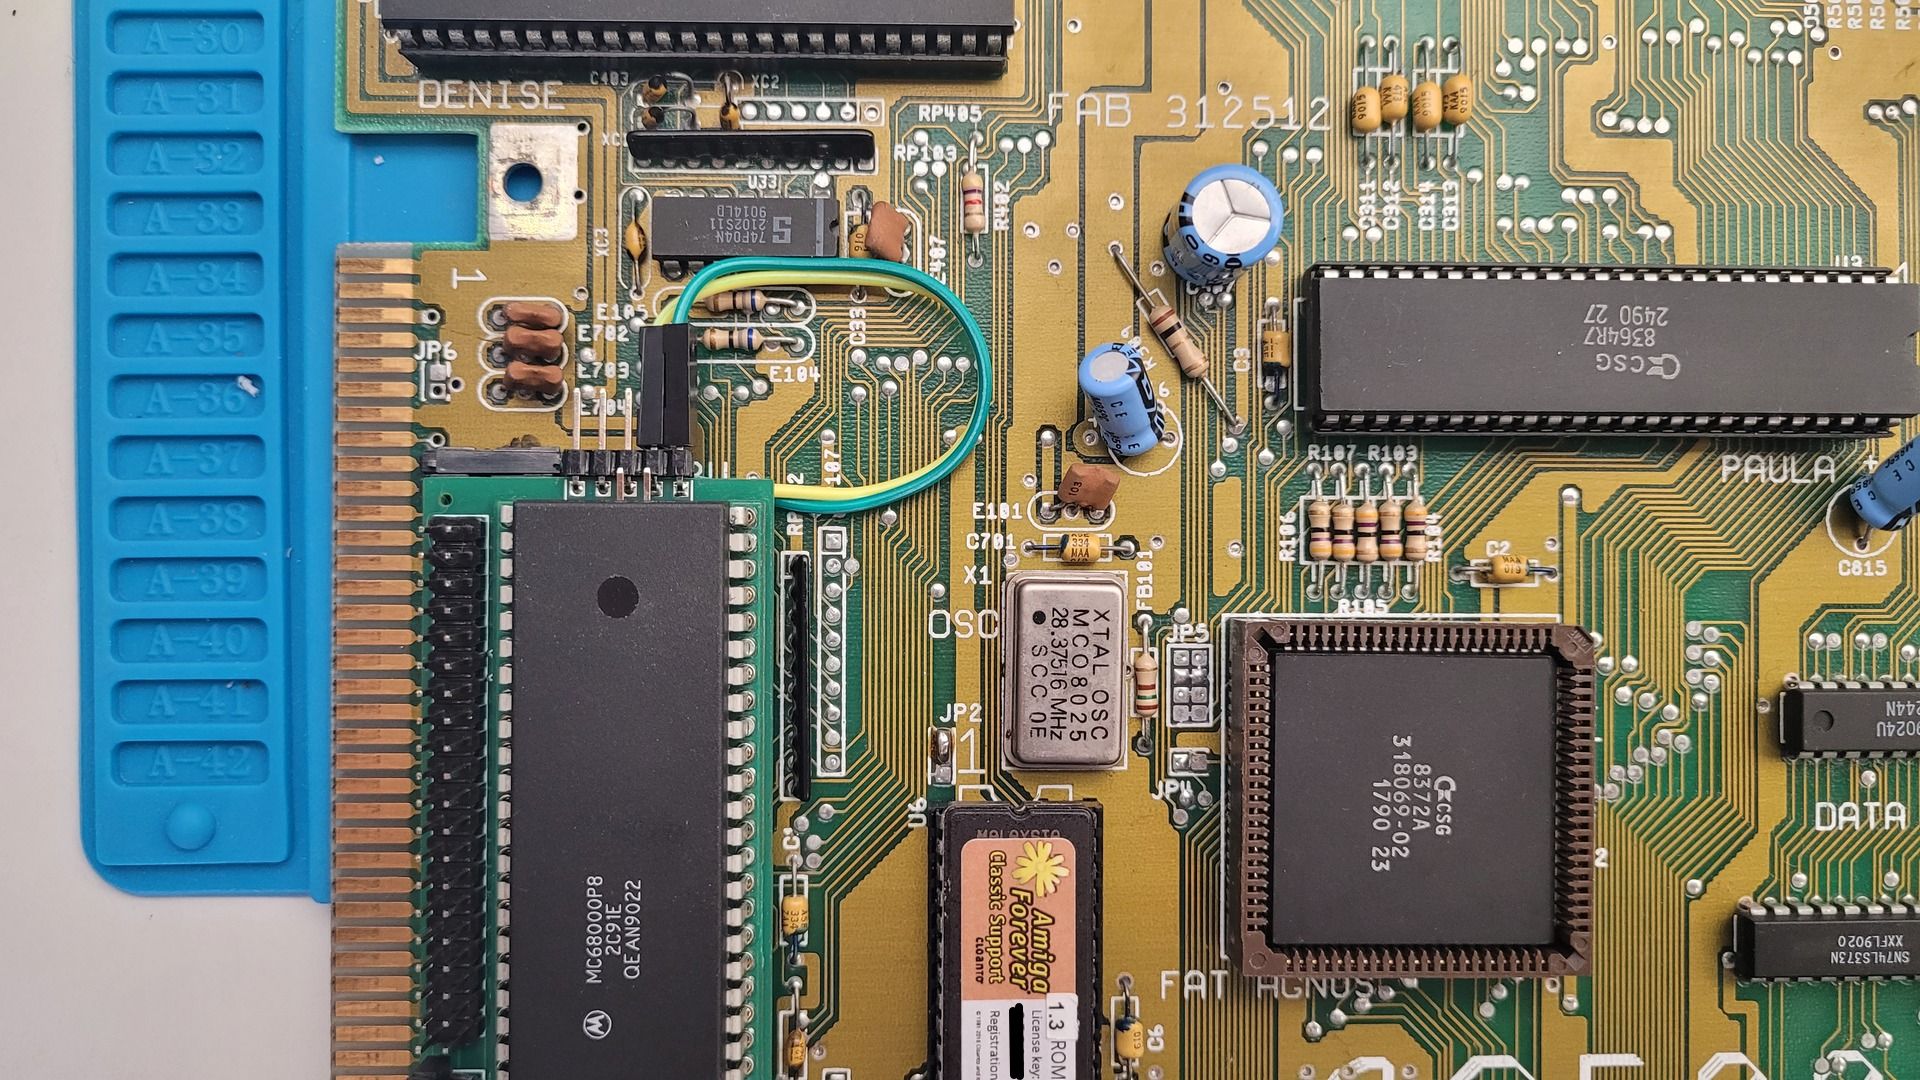
Motherboard & Memory card
The motherboard was in pretty good condition. I simply applied some FACOM Contact Spray, which helps remove dust, humidity, and oxidation. It’s said to also provide some protection for the circuits — well, it certainly can’t hurt!
I did the same for the memory expansion card. Additionally, I replaced the soldered battery with a battery holder, making the setup cleaner and allowing the battery to be easily swapped in the future.
Here’s a look at the motherboard and memory card after cleaning and the battery upgrade:

Extentions
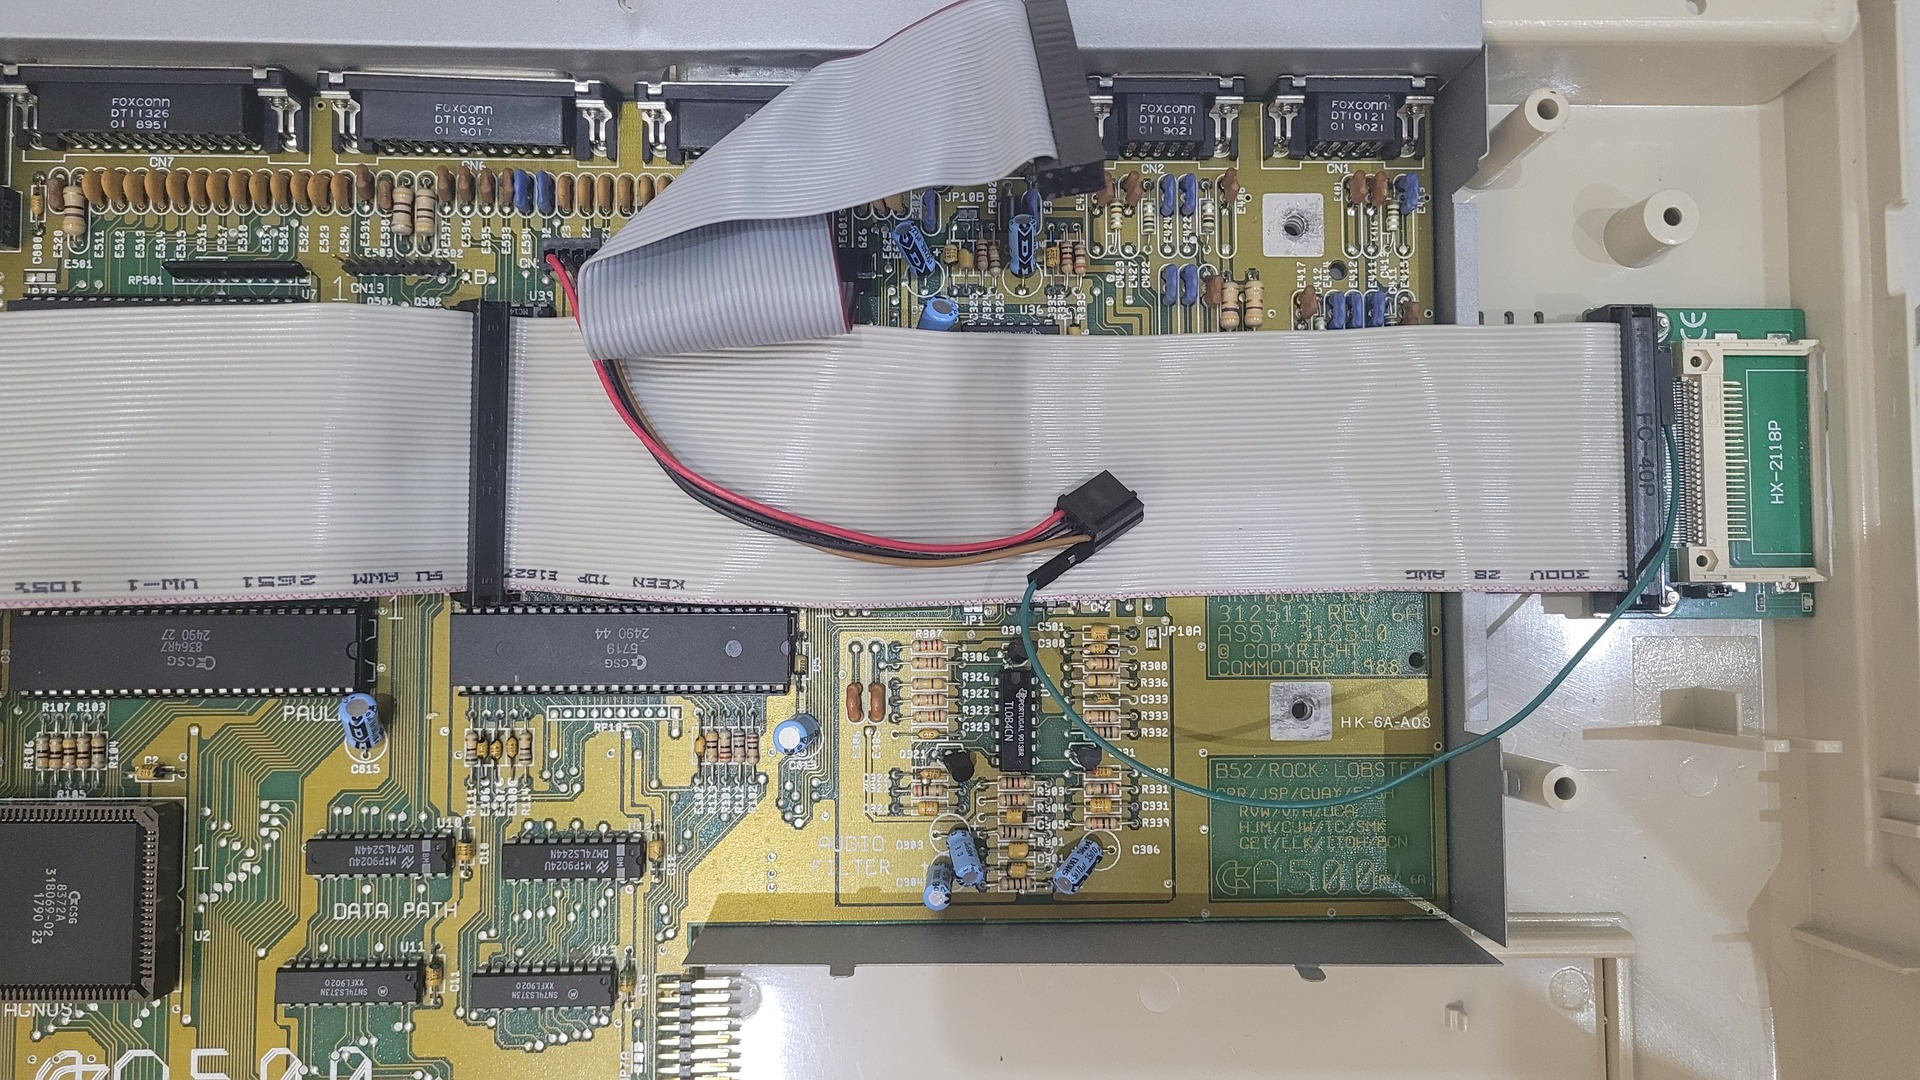
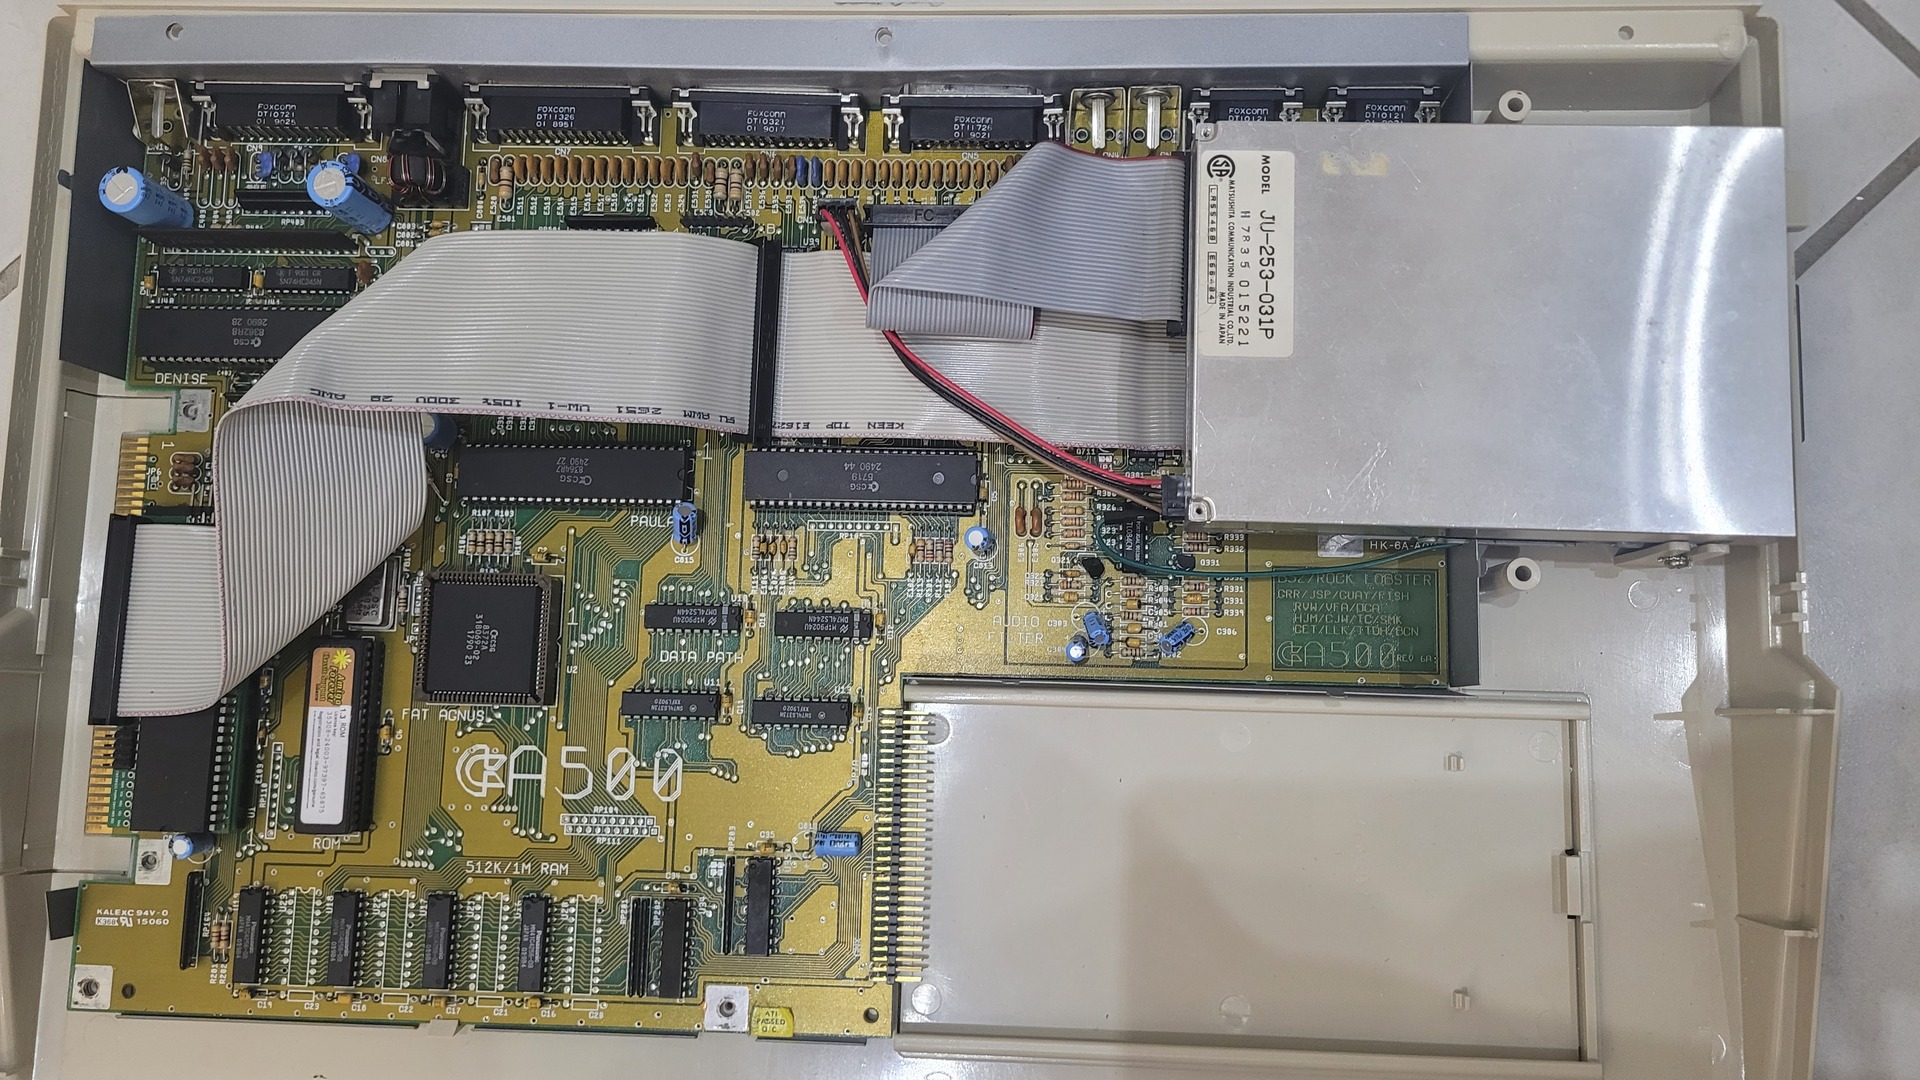
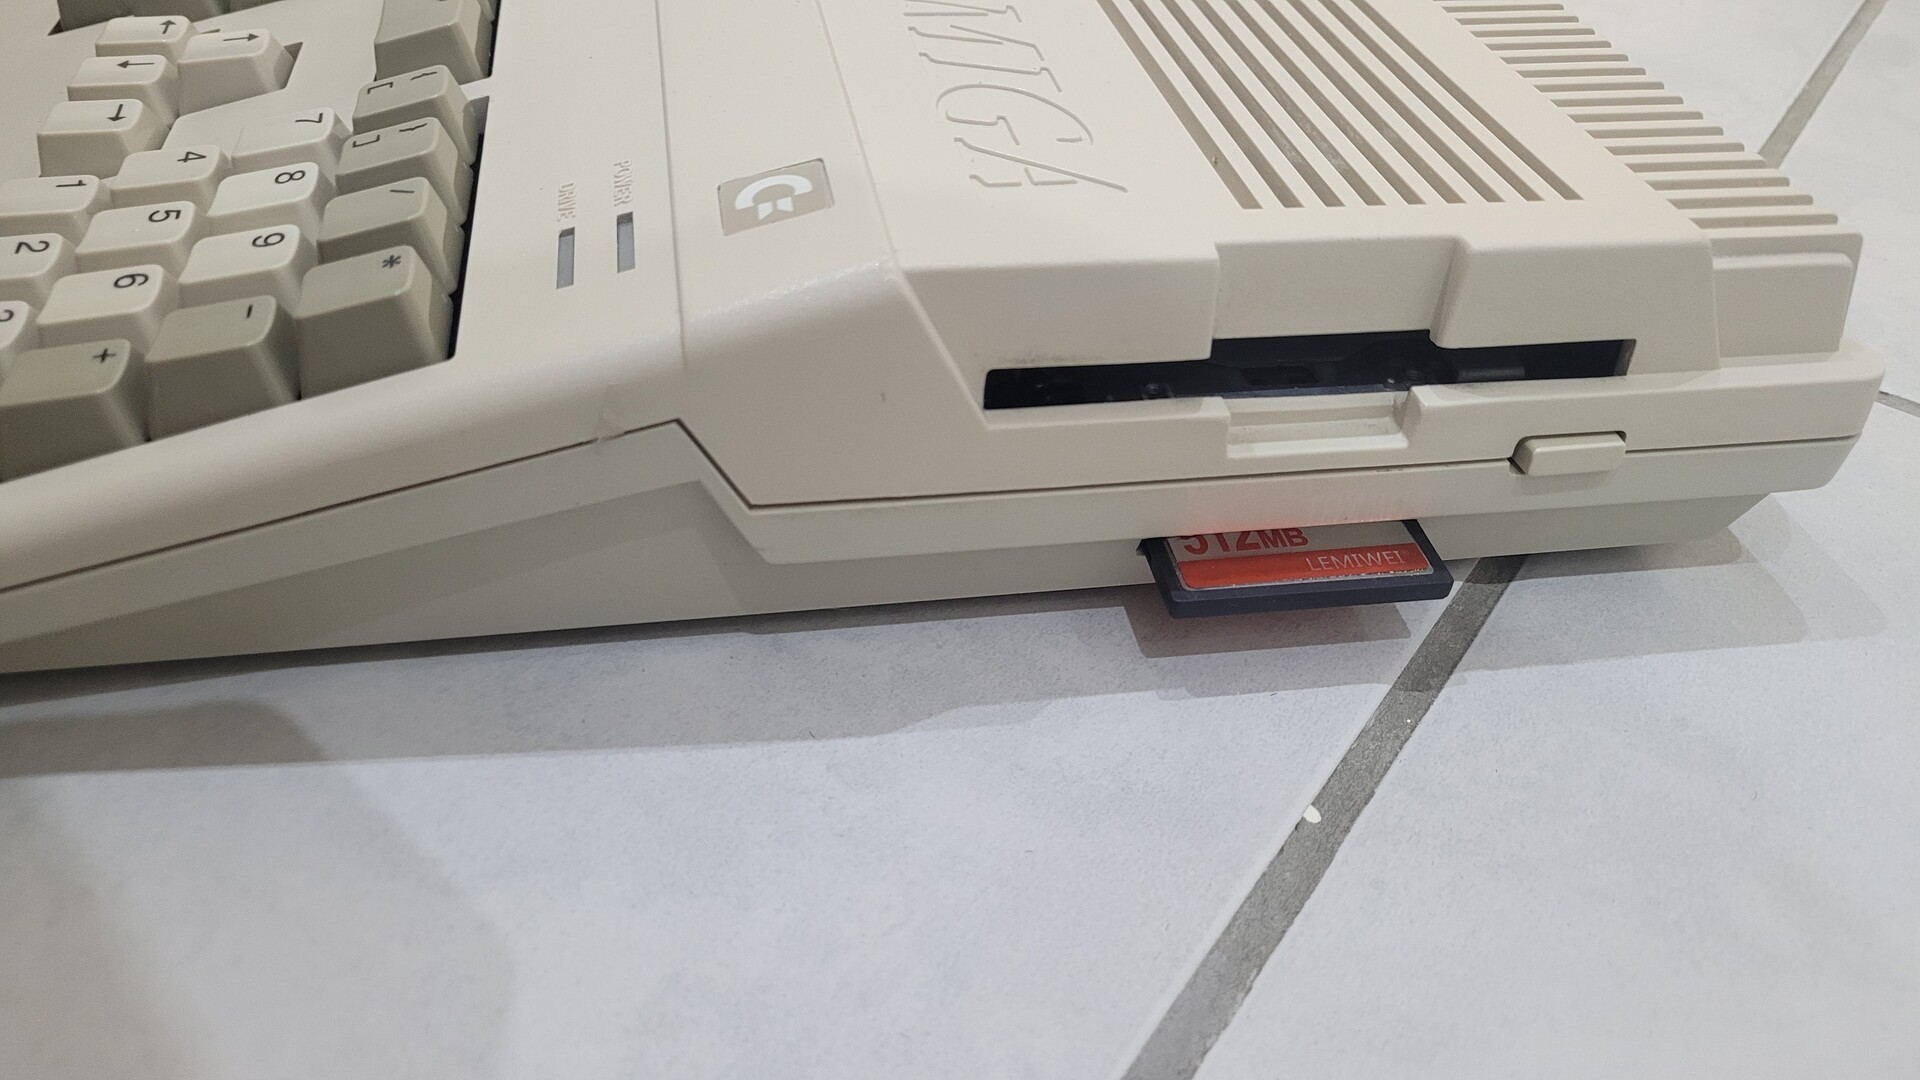
I installed the IDE68k + GottaGoFastram combo along with the patched Kickstart ROM that allows booting directly from an IDE device. I also picked up a 512 MB CompactFlash card, which provides more than enough space — considering that back in the mid-80s, even 20 or 40 MB felt enormous.
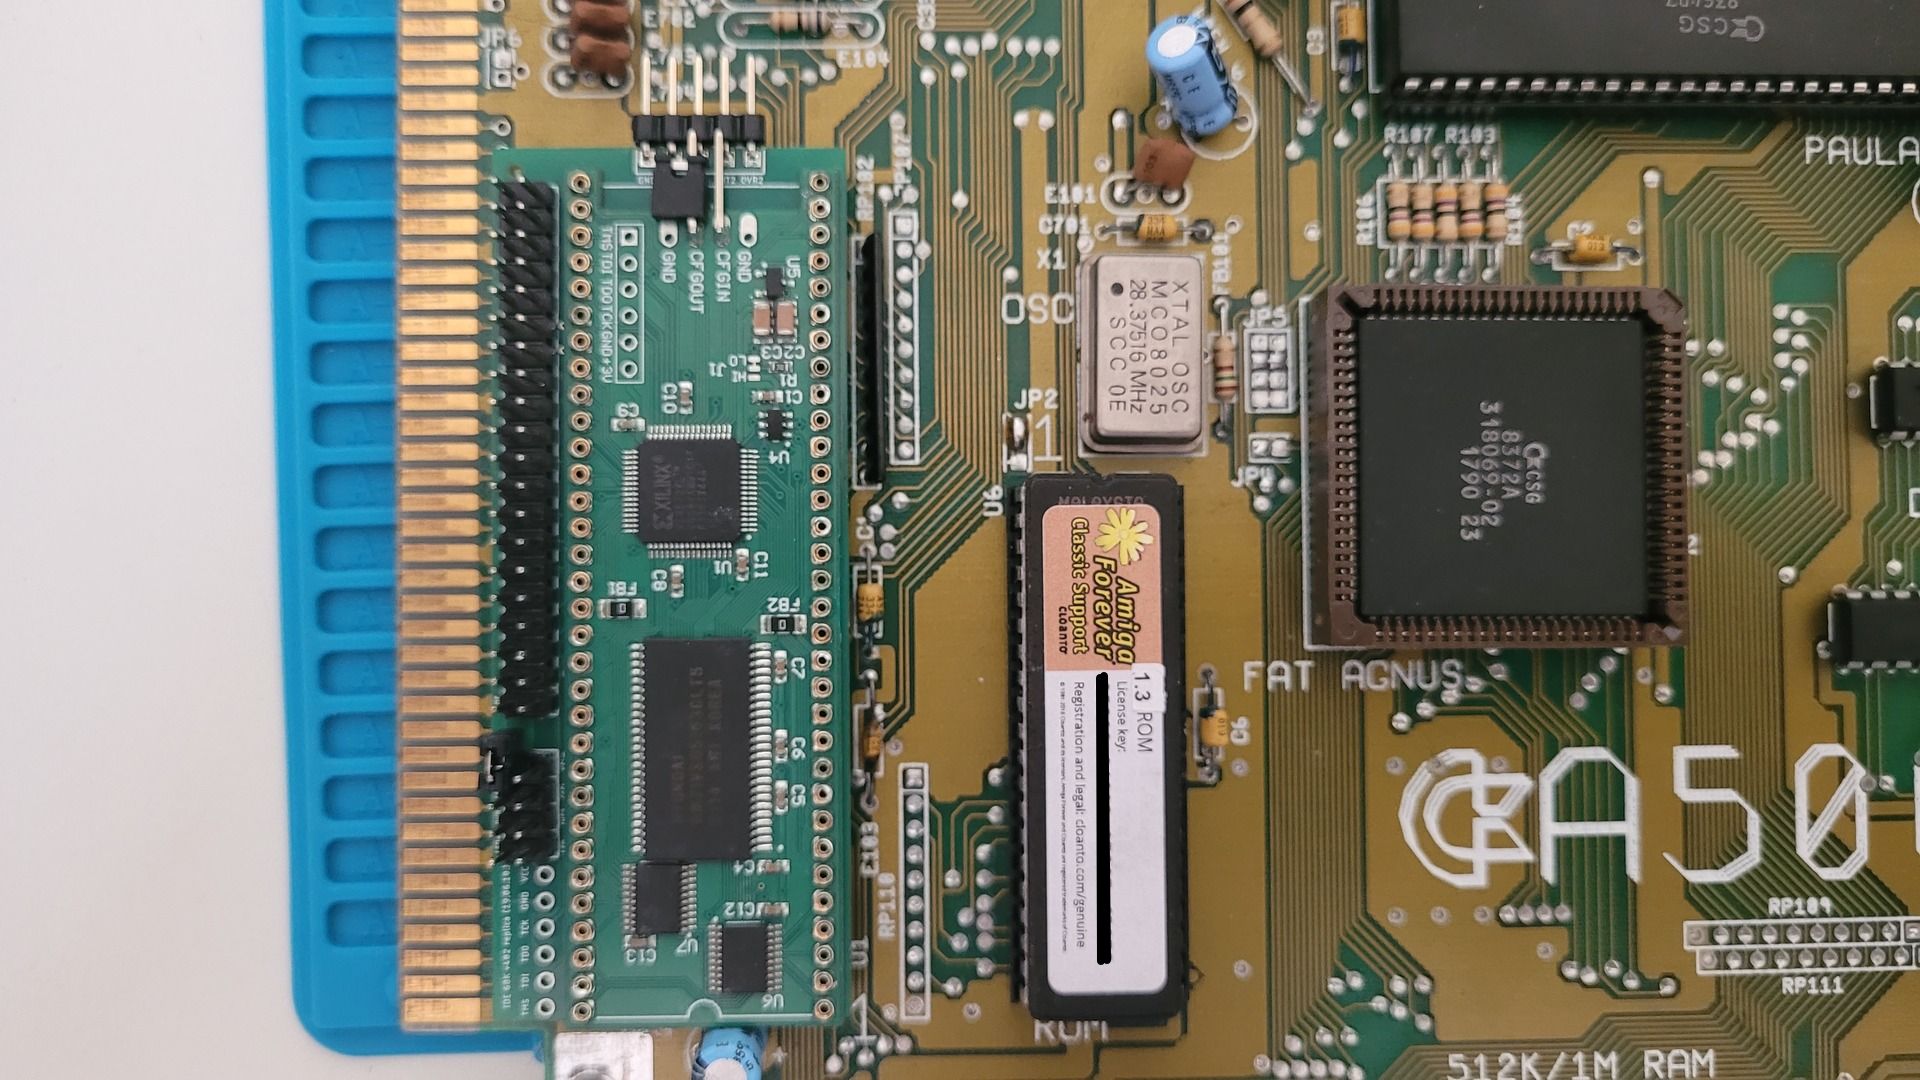
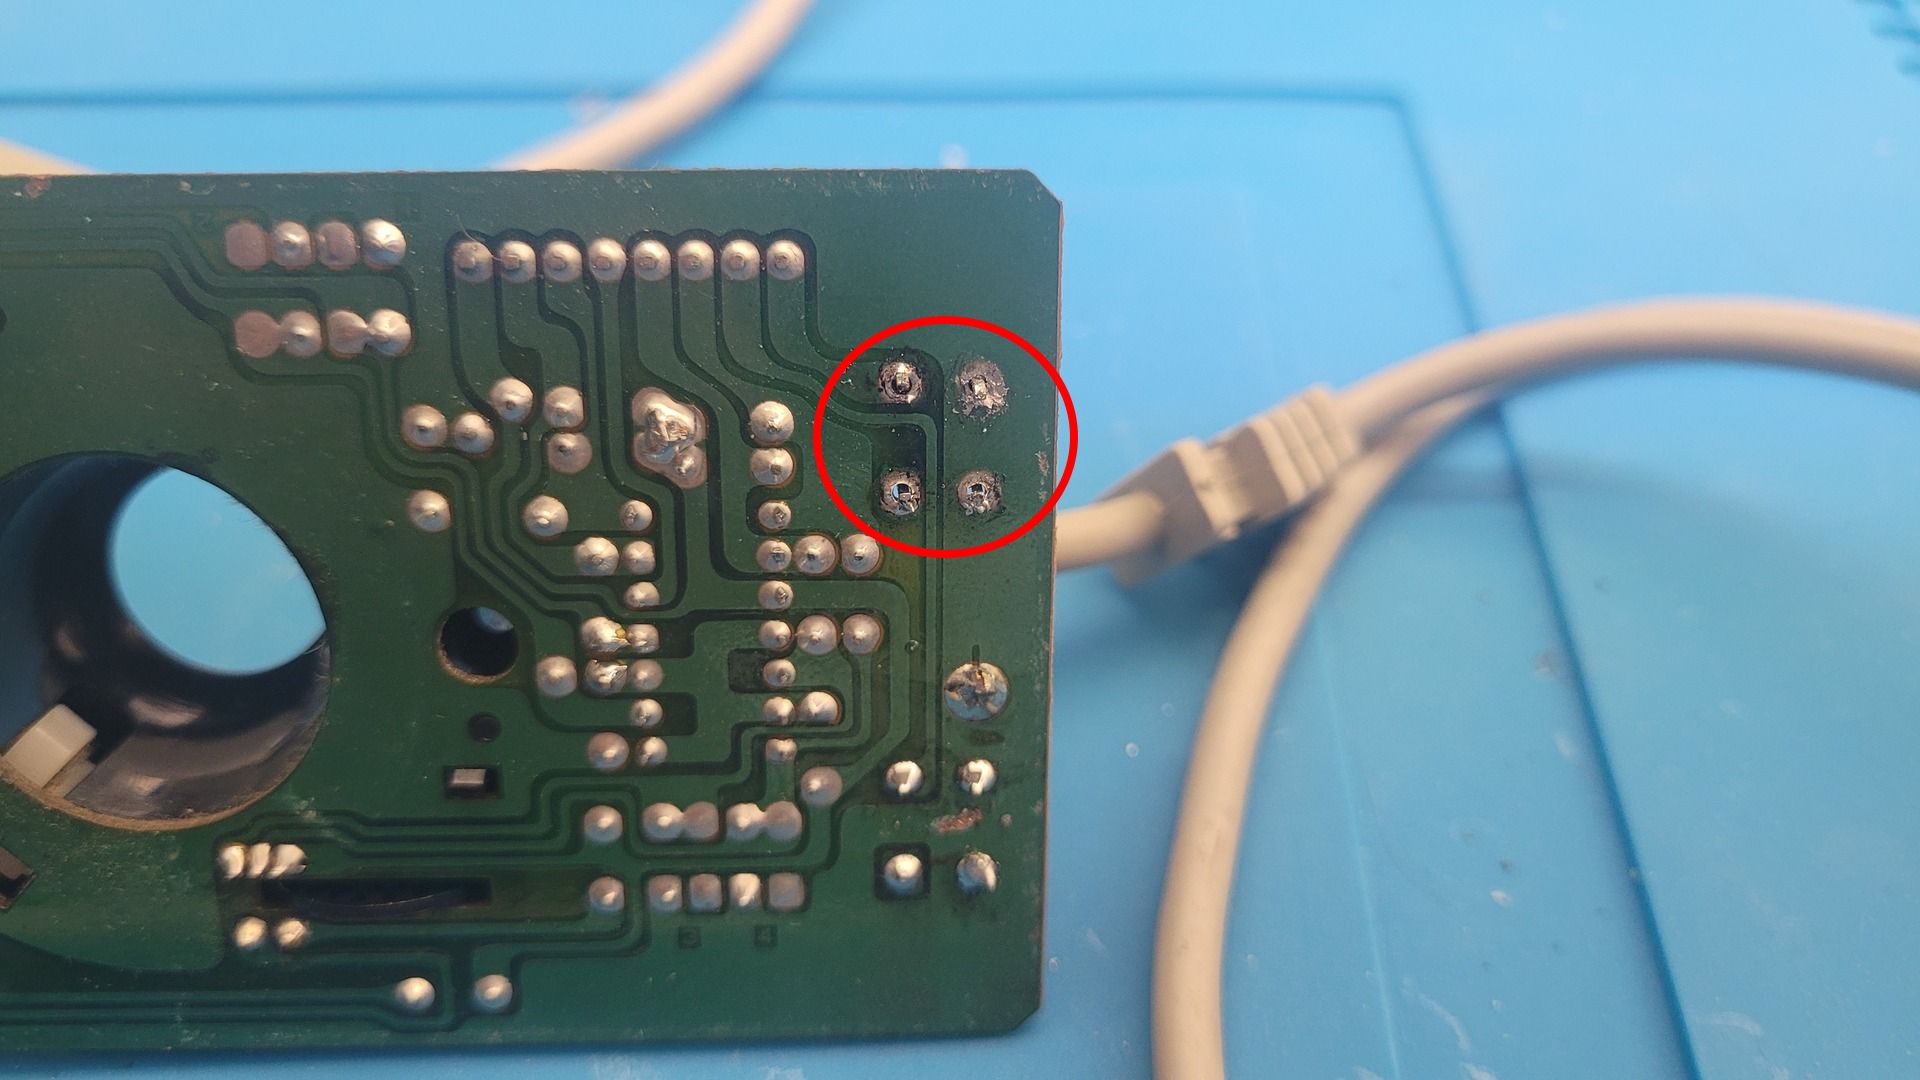
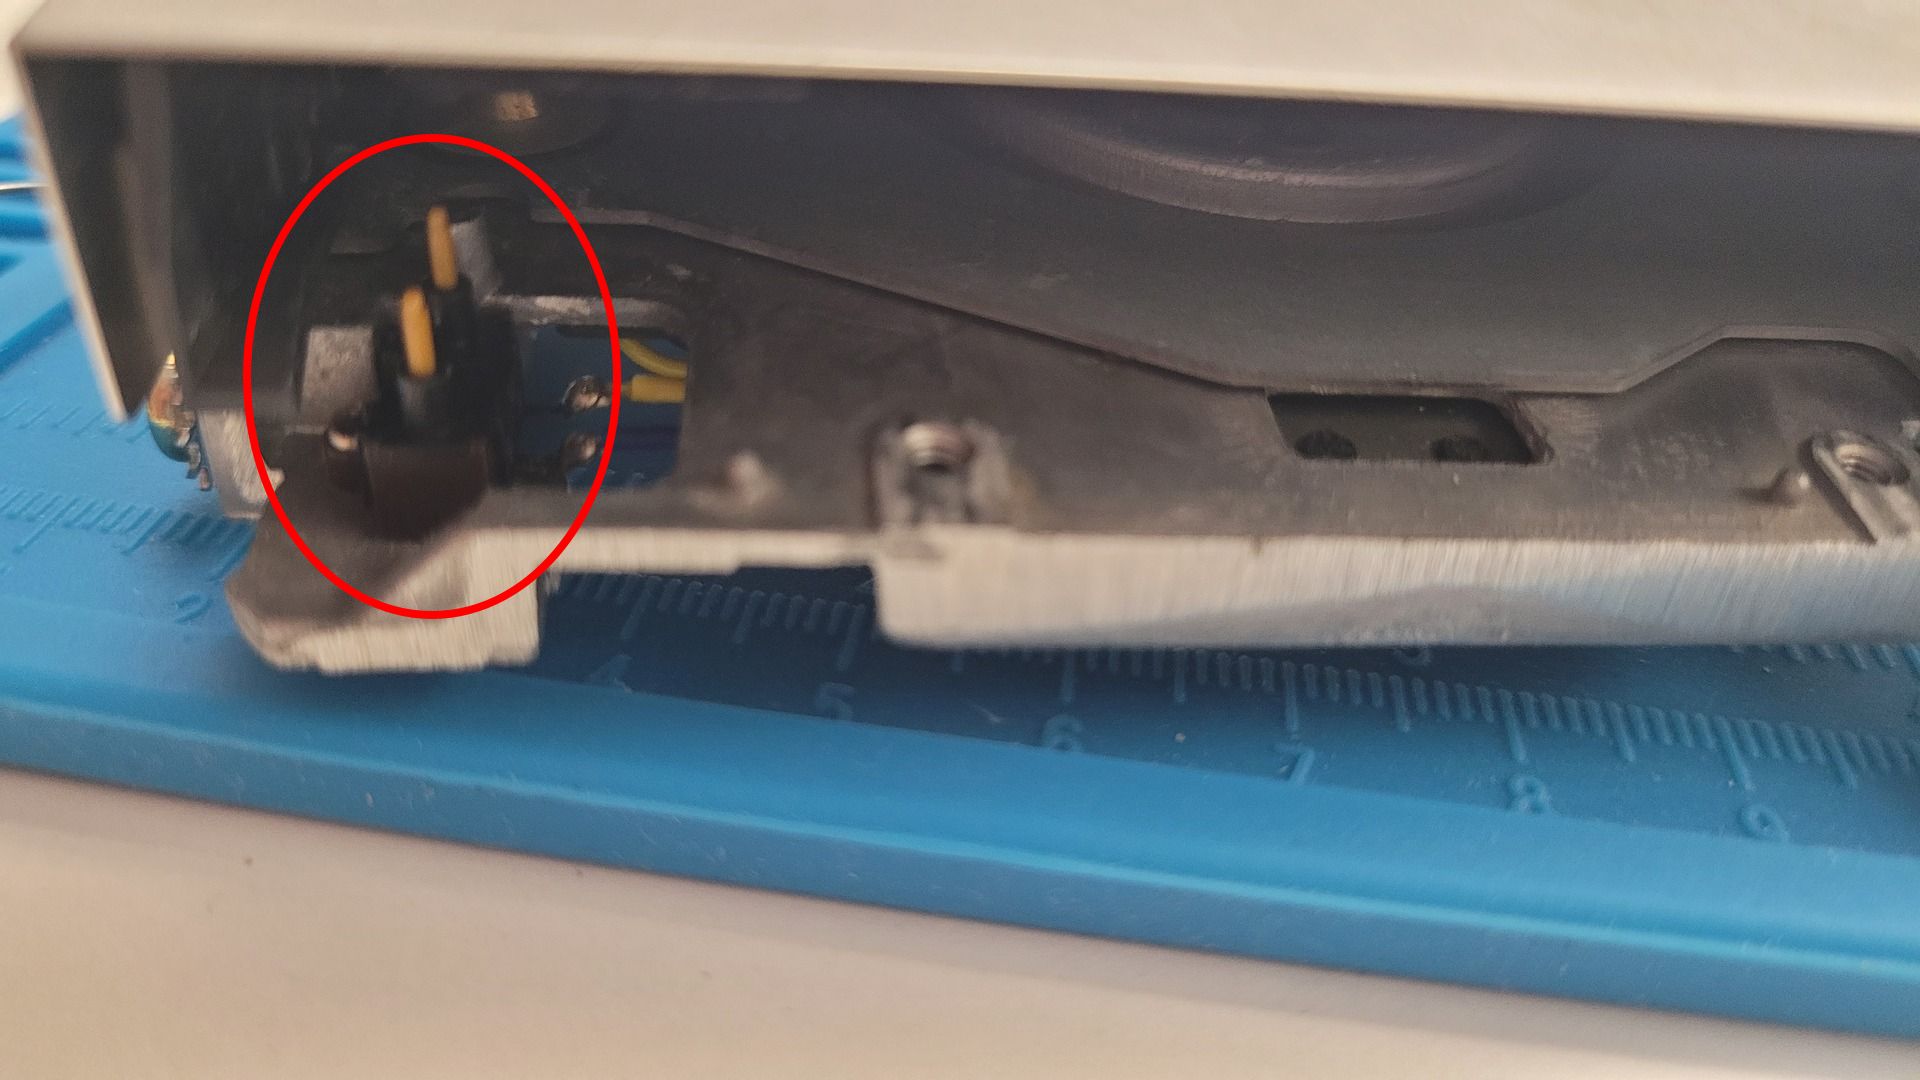
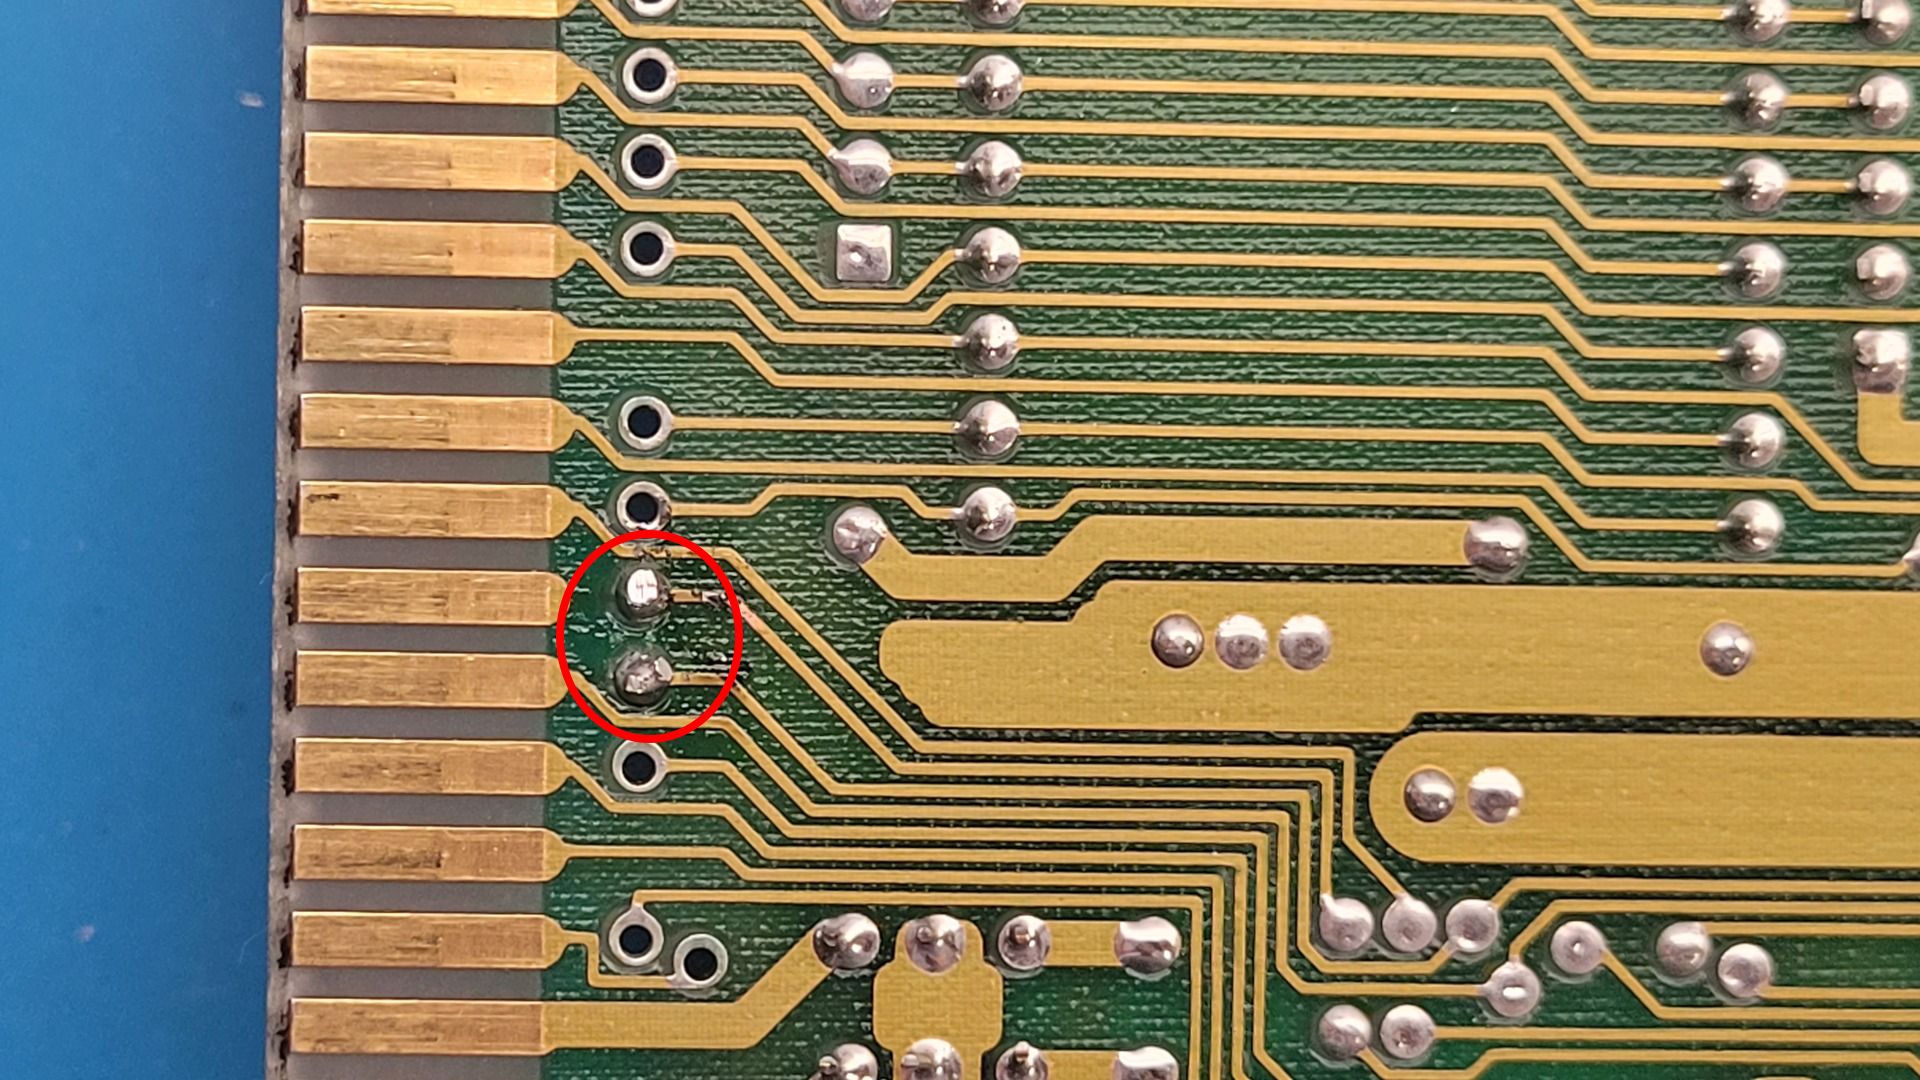
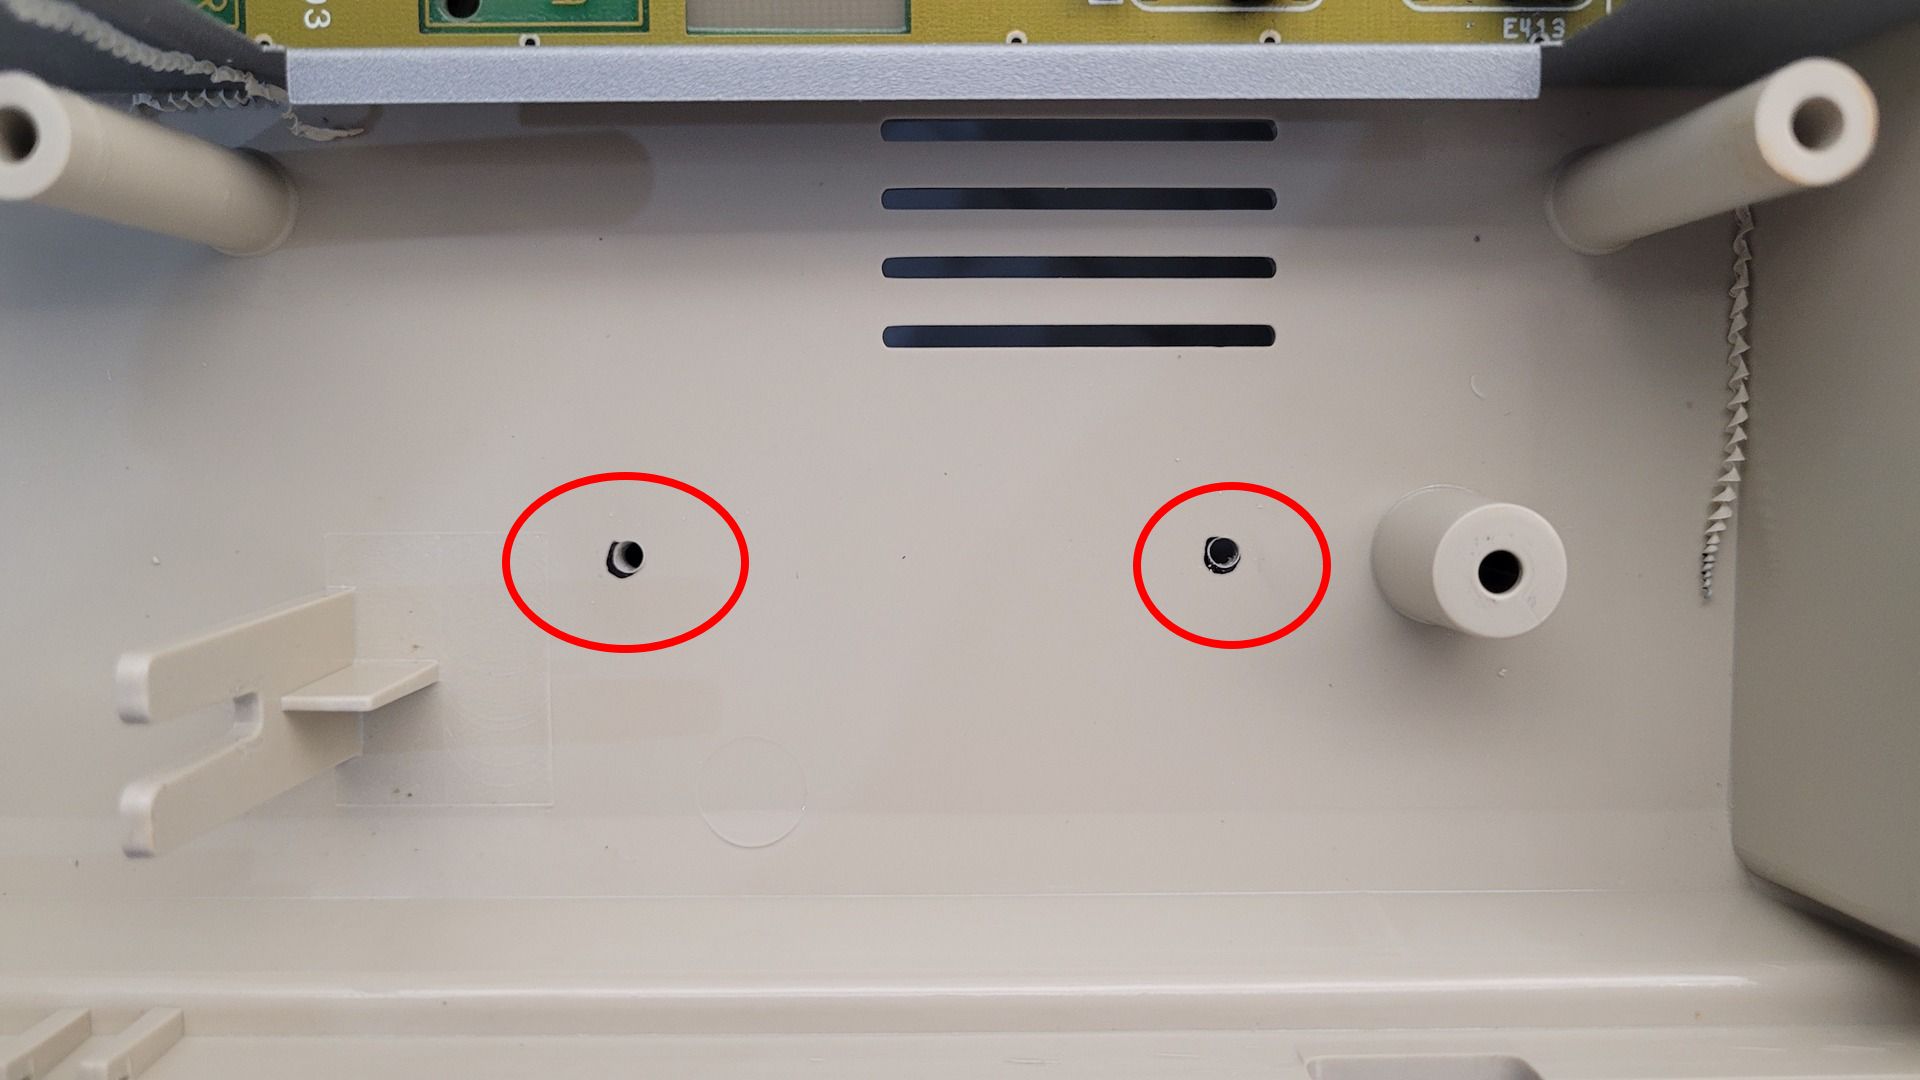
Booting from the IDE interface requires two signals: /INT2 and /OVR.
Both signals are actually available on the Zorro II 86-pin connector next to the 68000 CPU (see: mklboards.fi).
Here are the tests I ran before finalizing the modification:
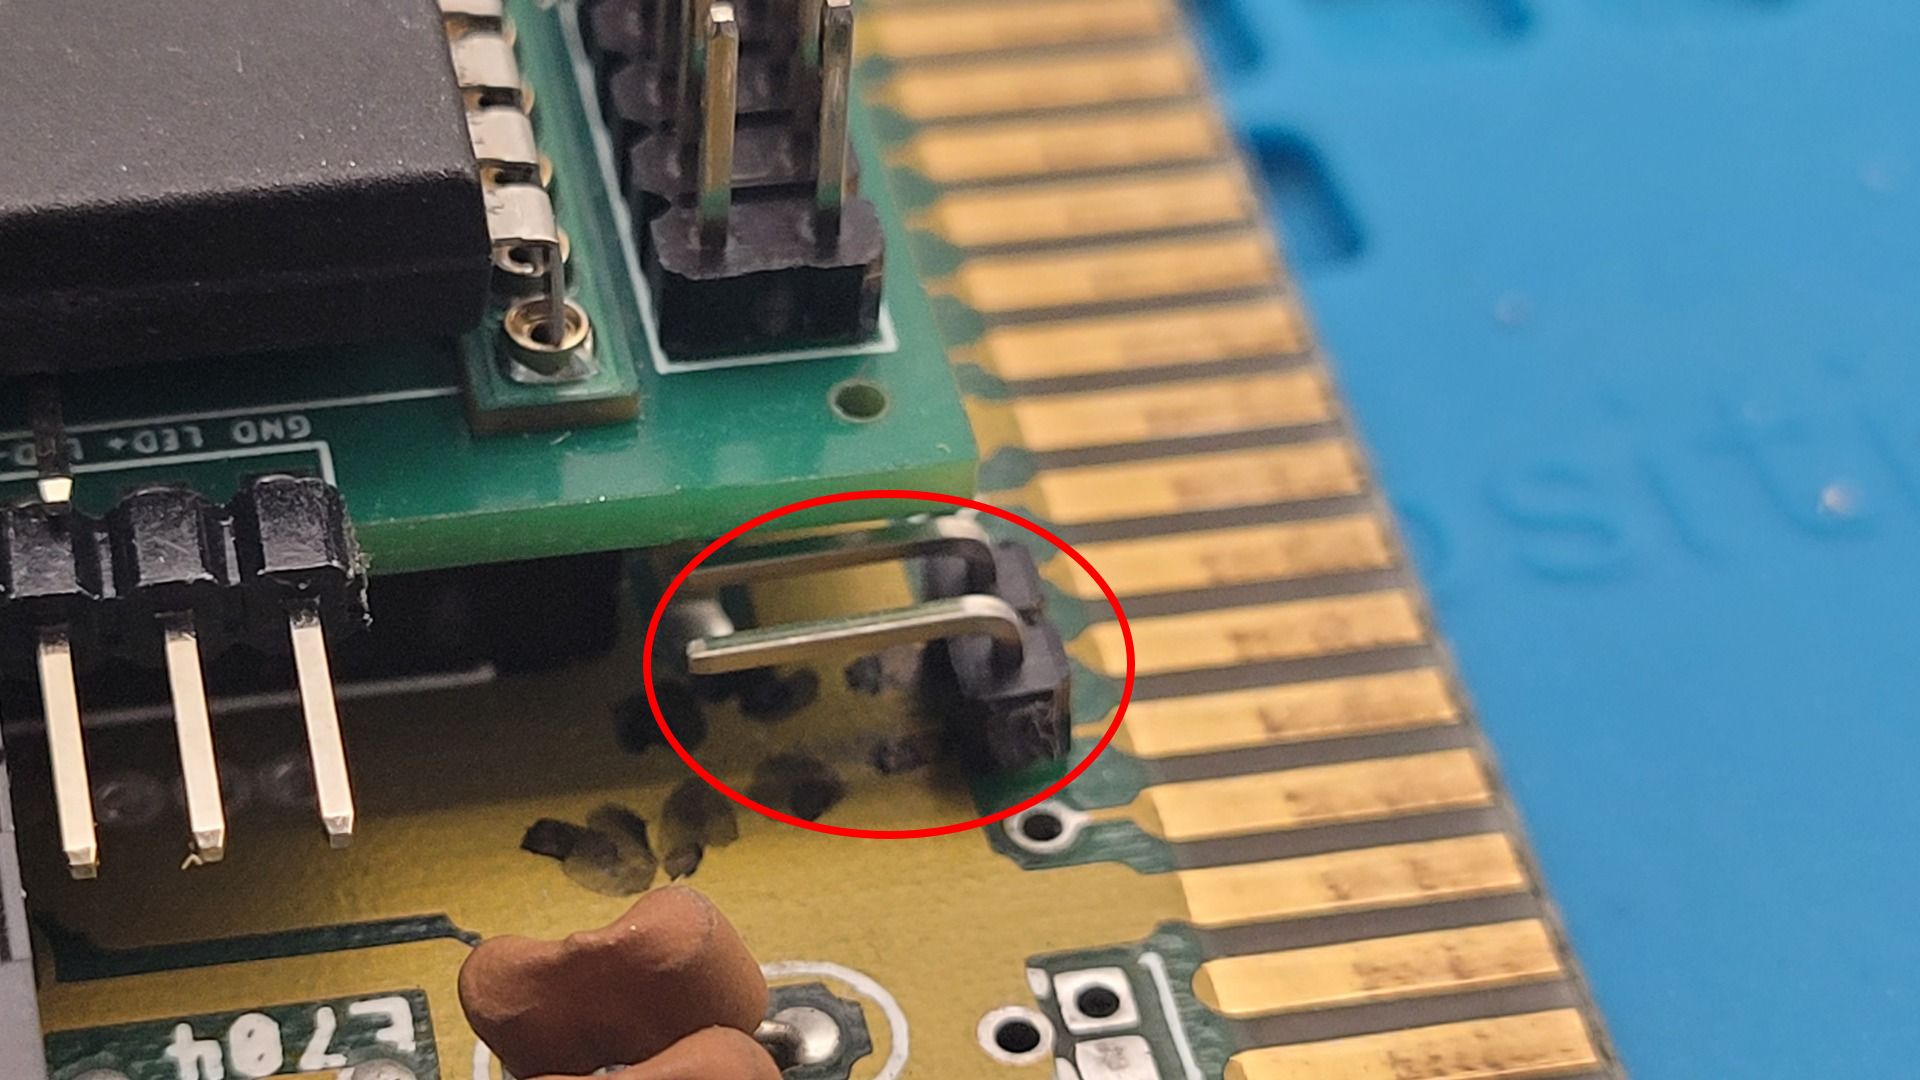
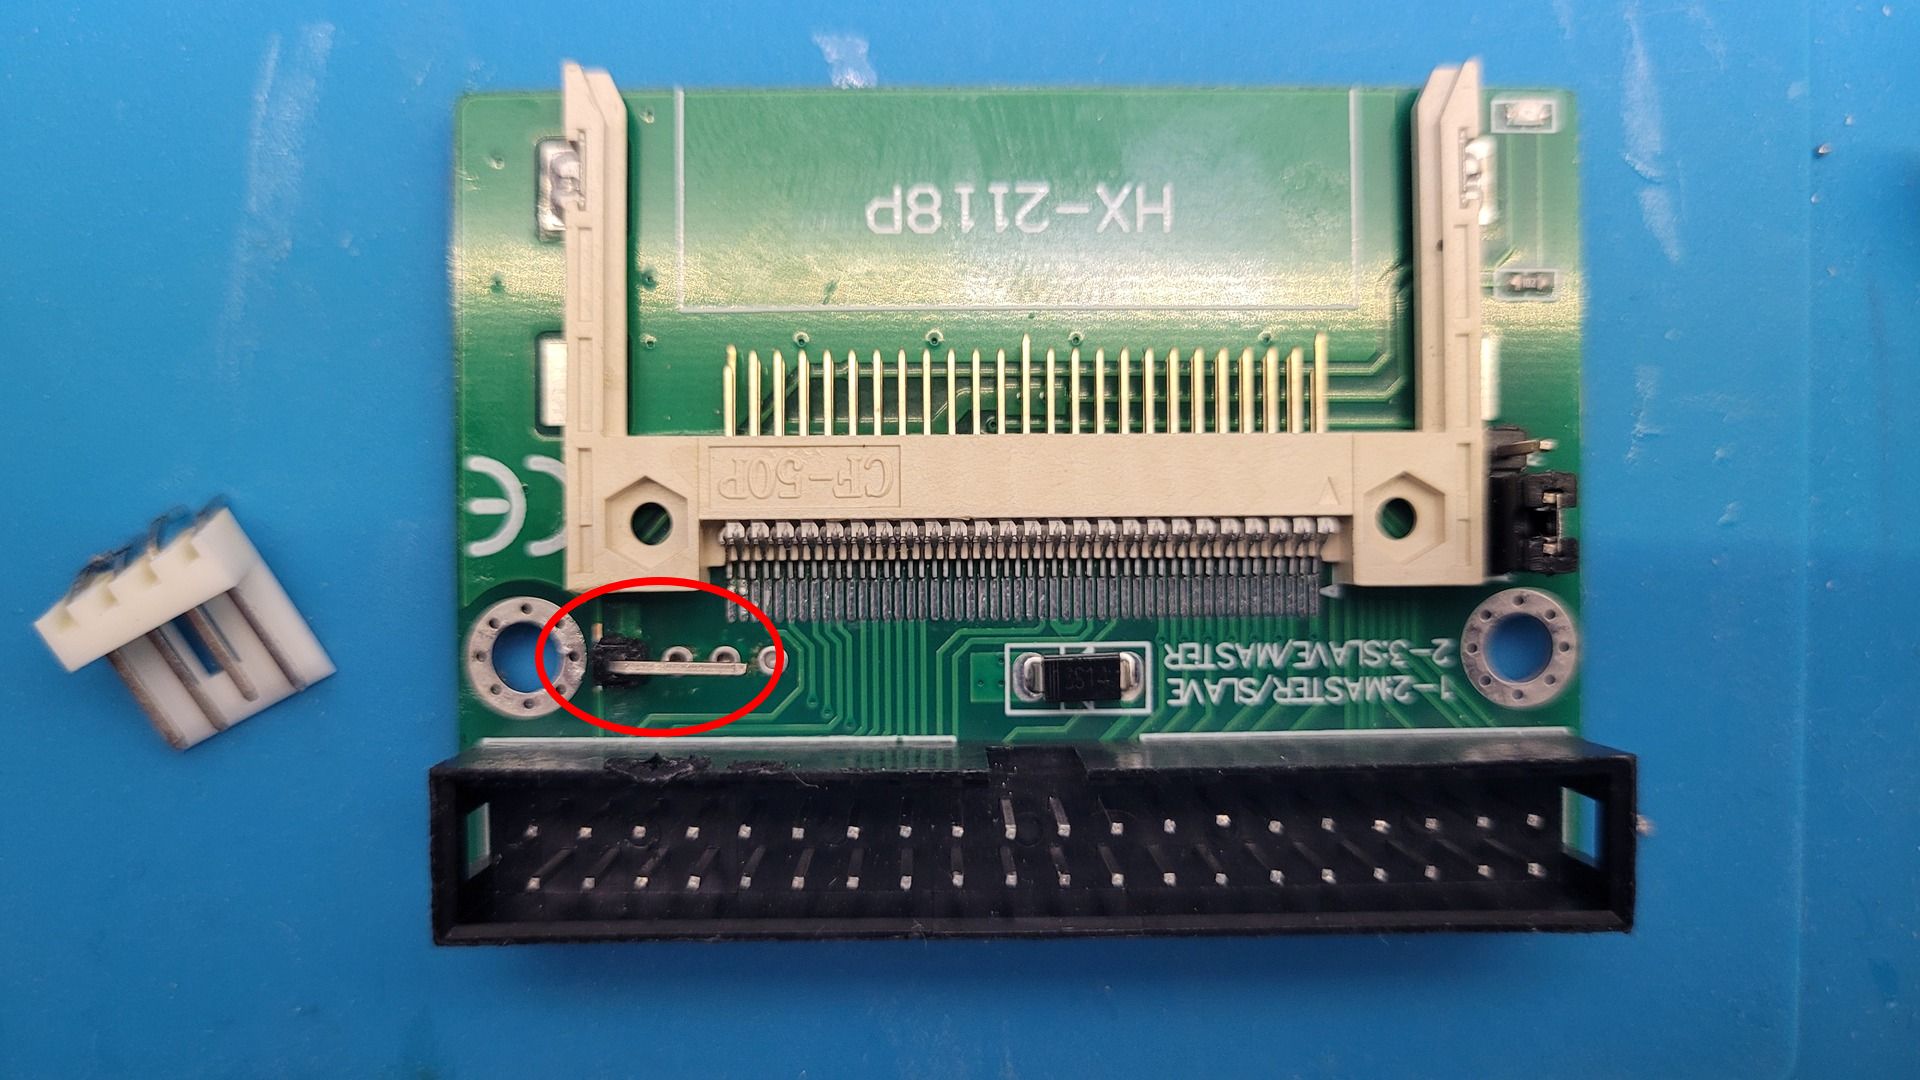
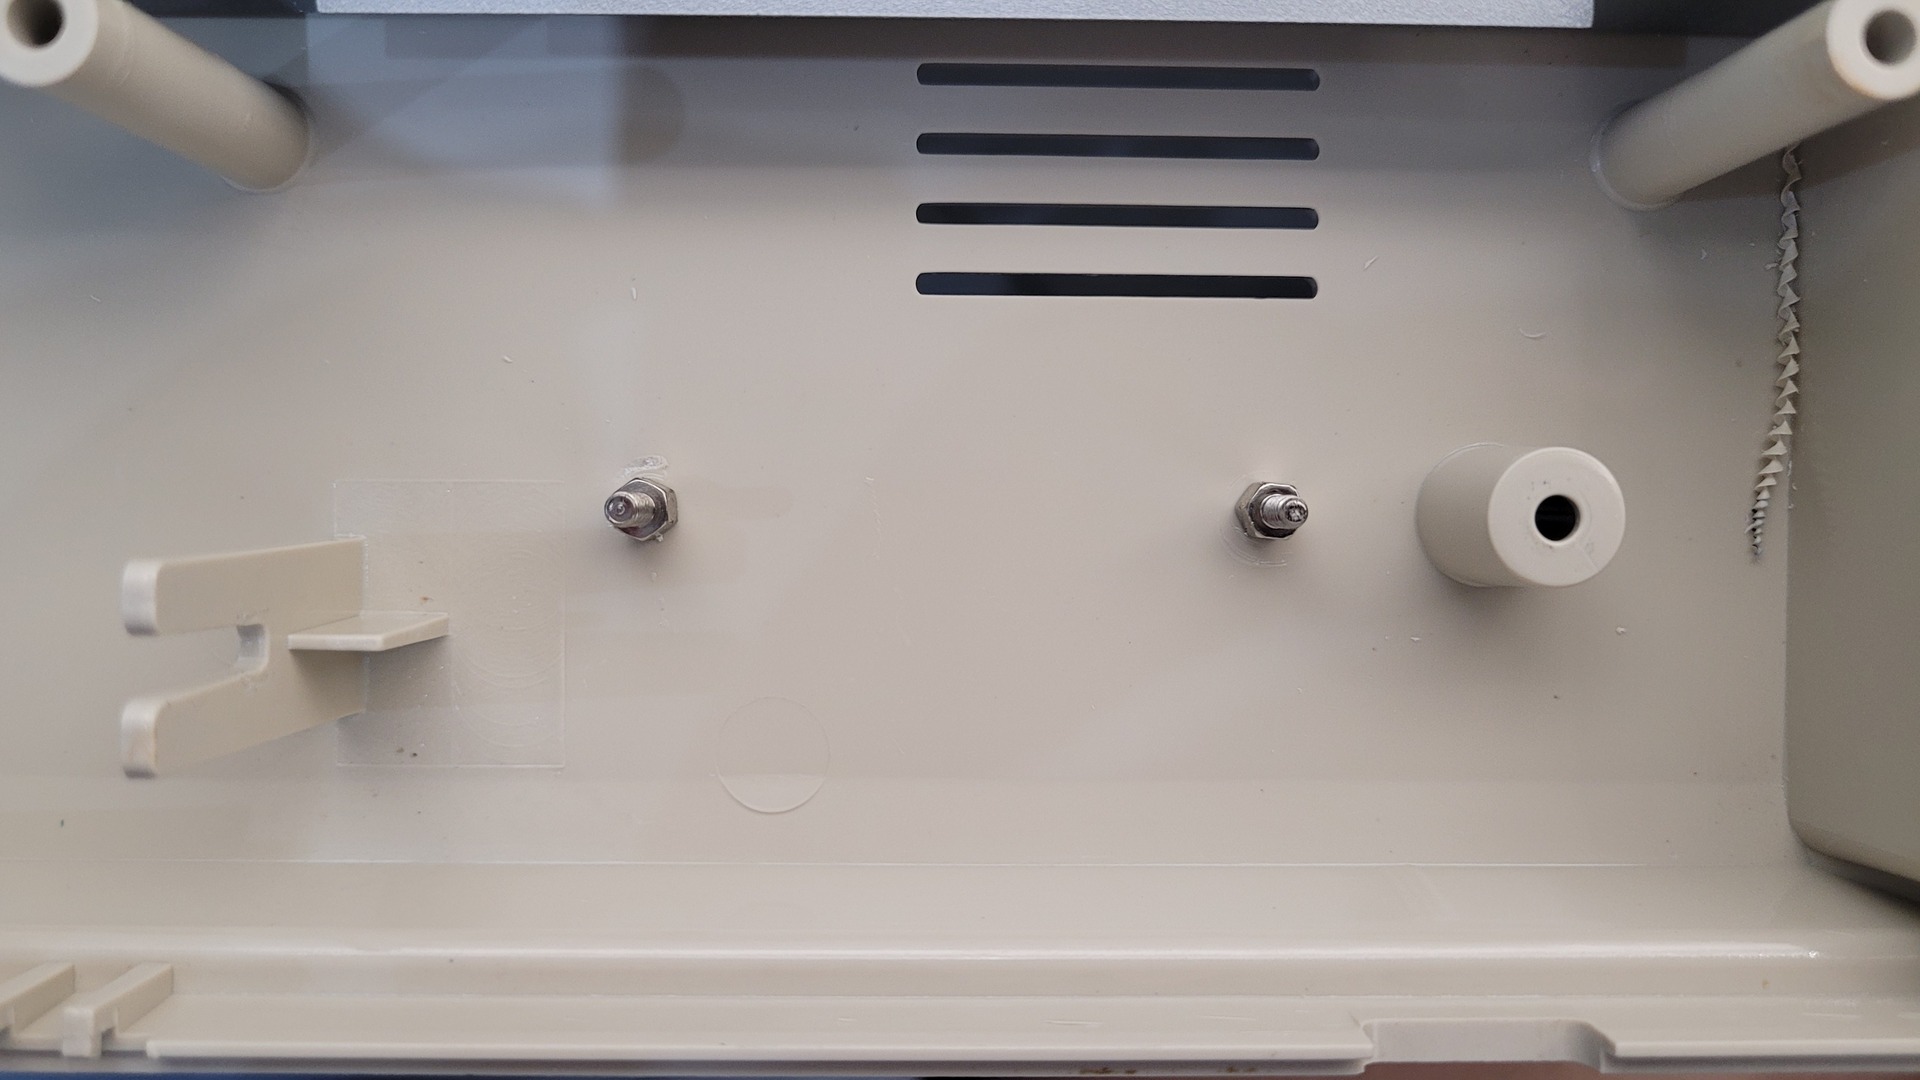
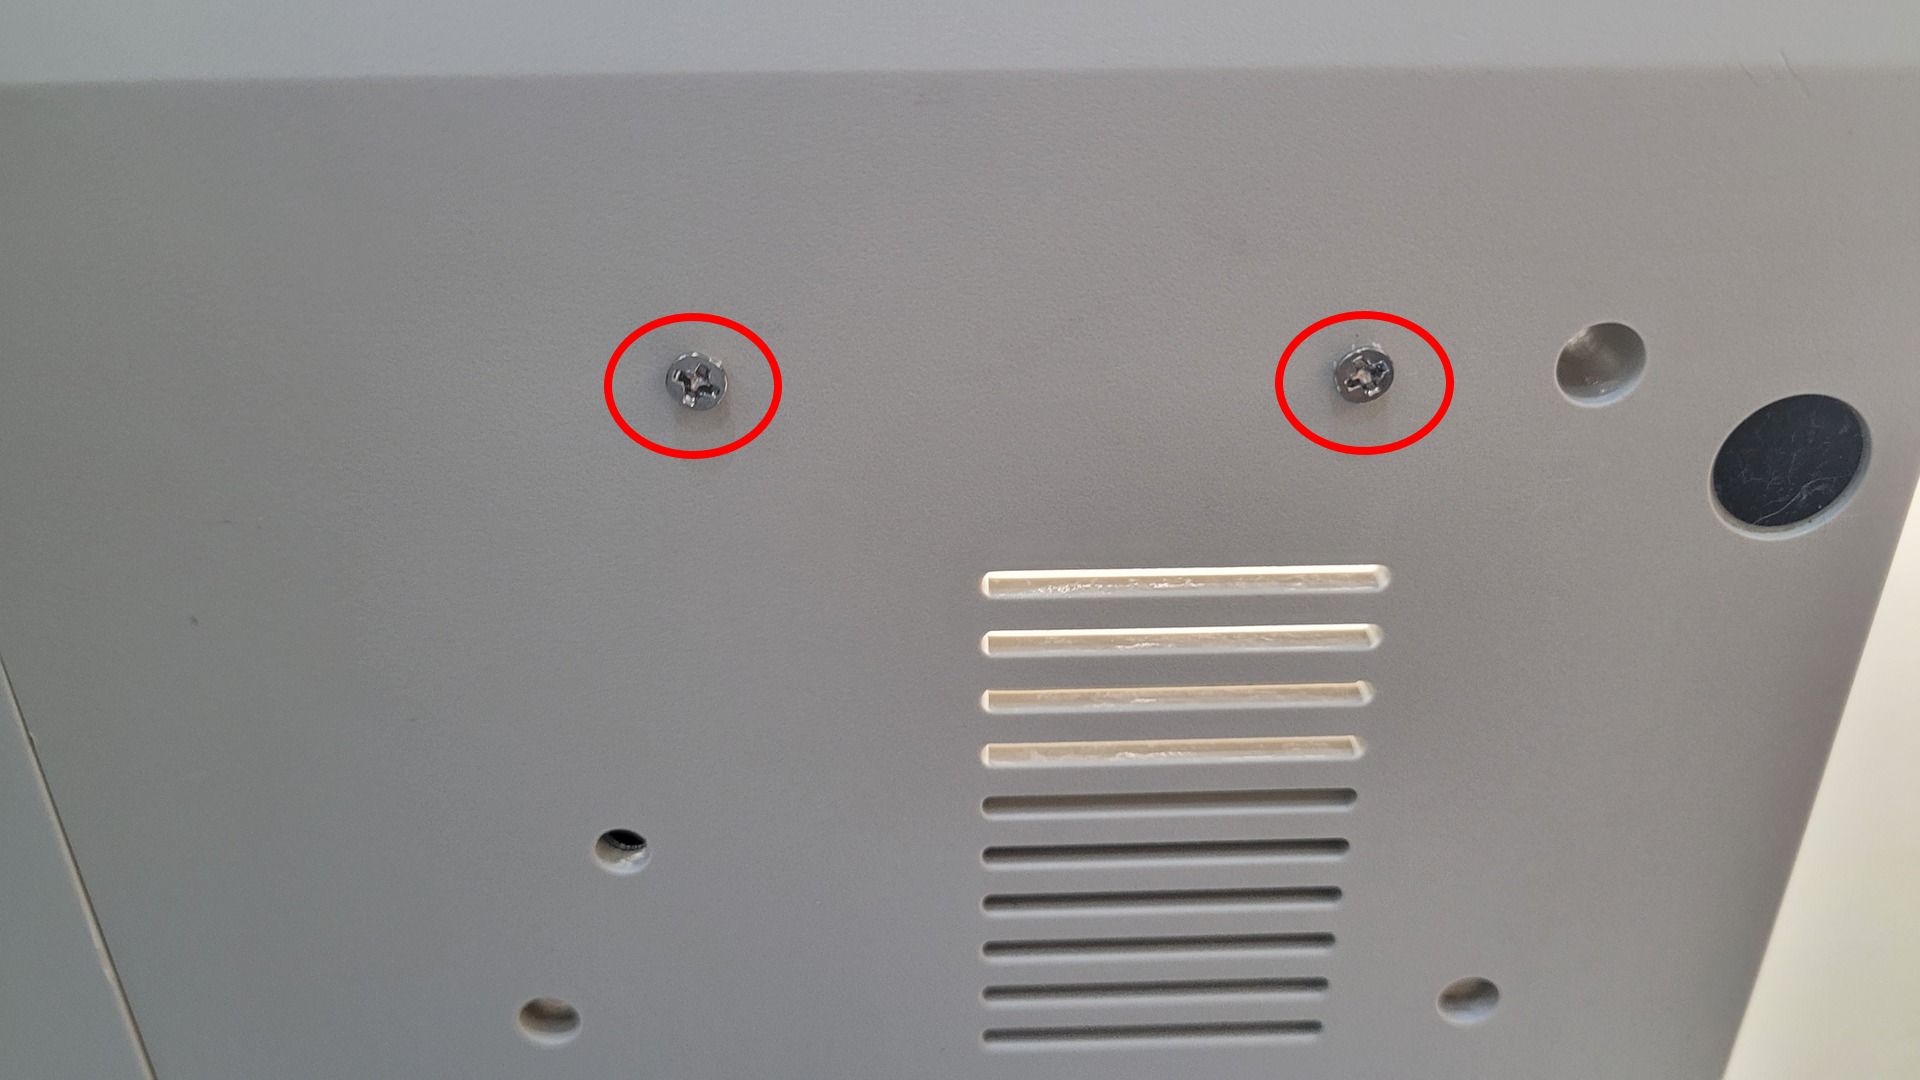
At first, the CF wasn’t powering up. Pin 20 of the IDE connector should provide +5 V for powering CF cards, but I measured 0 V.
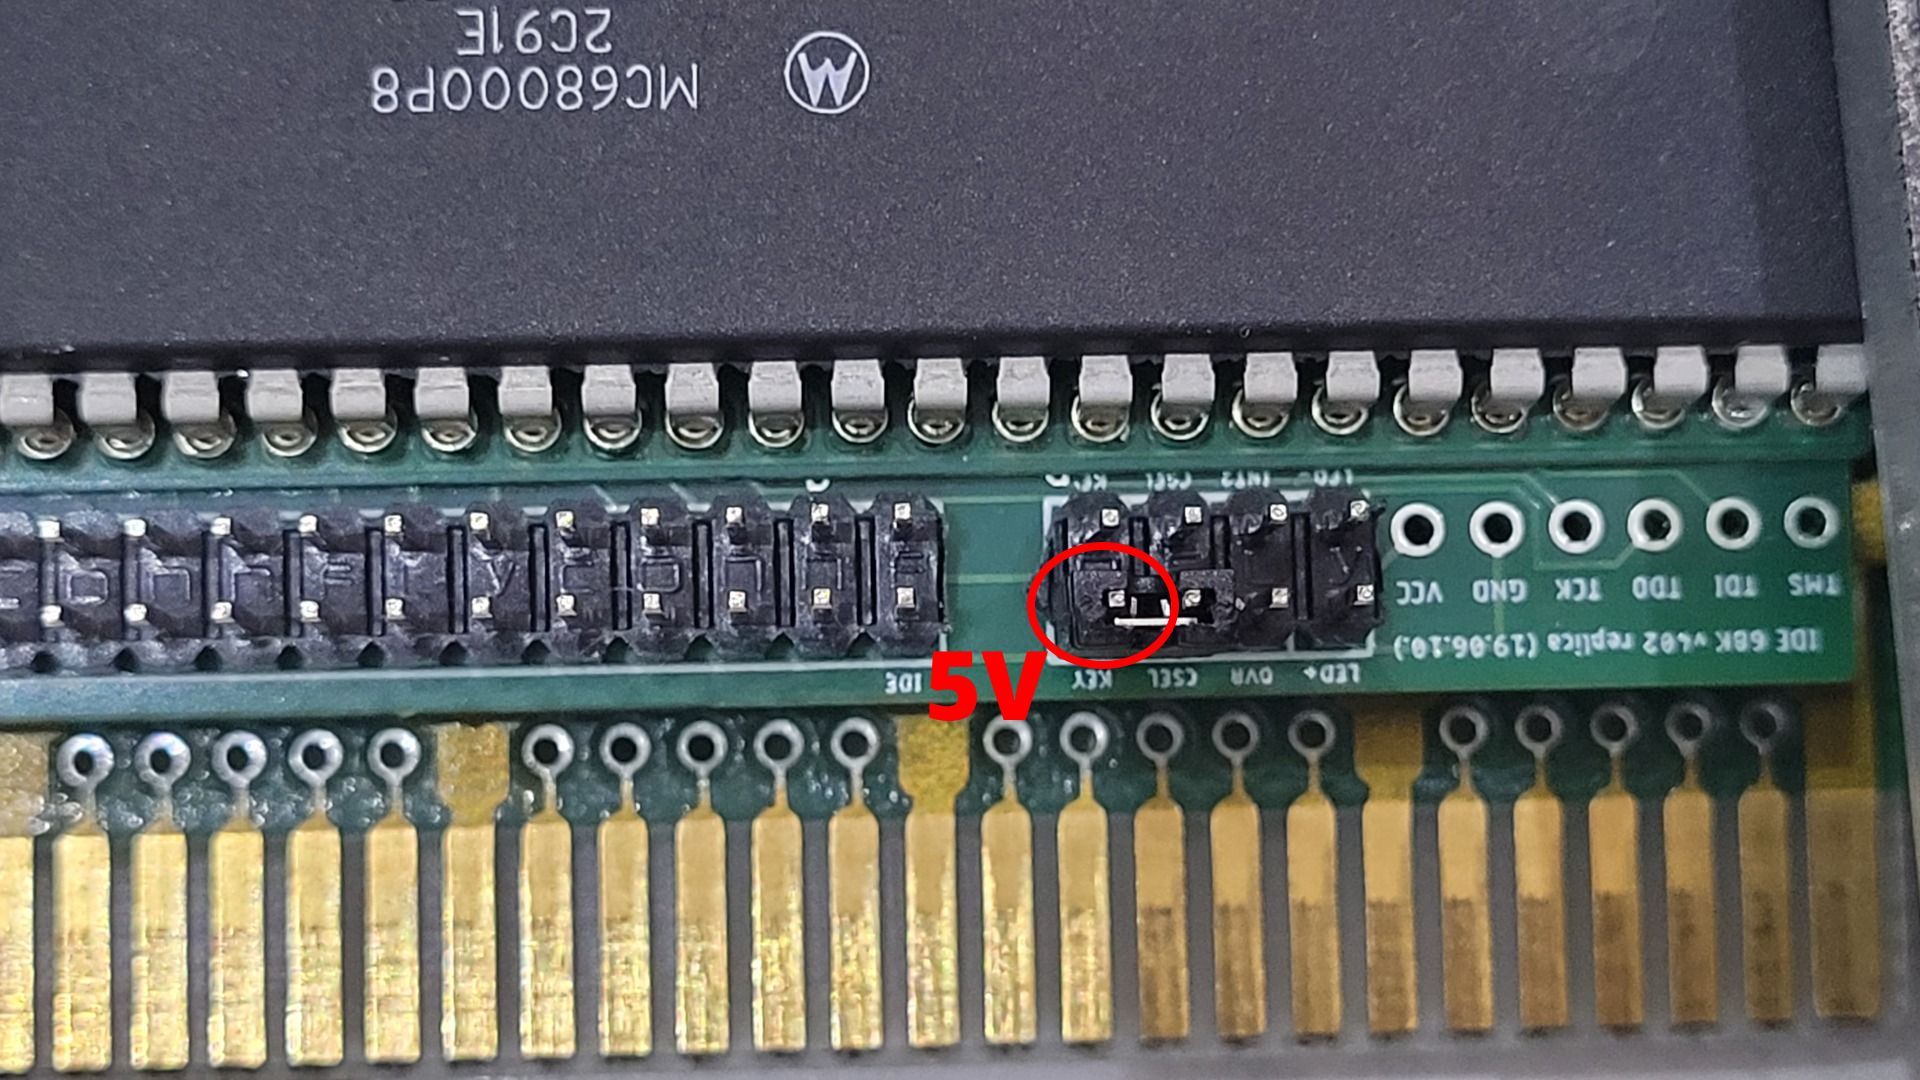

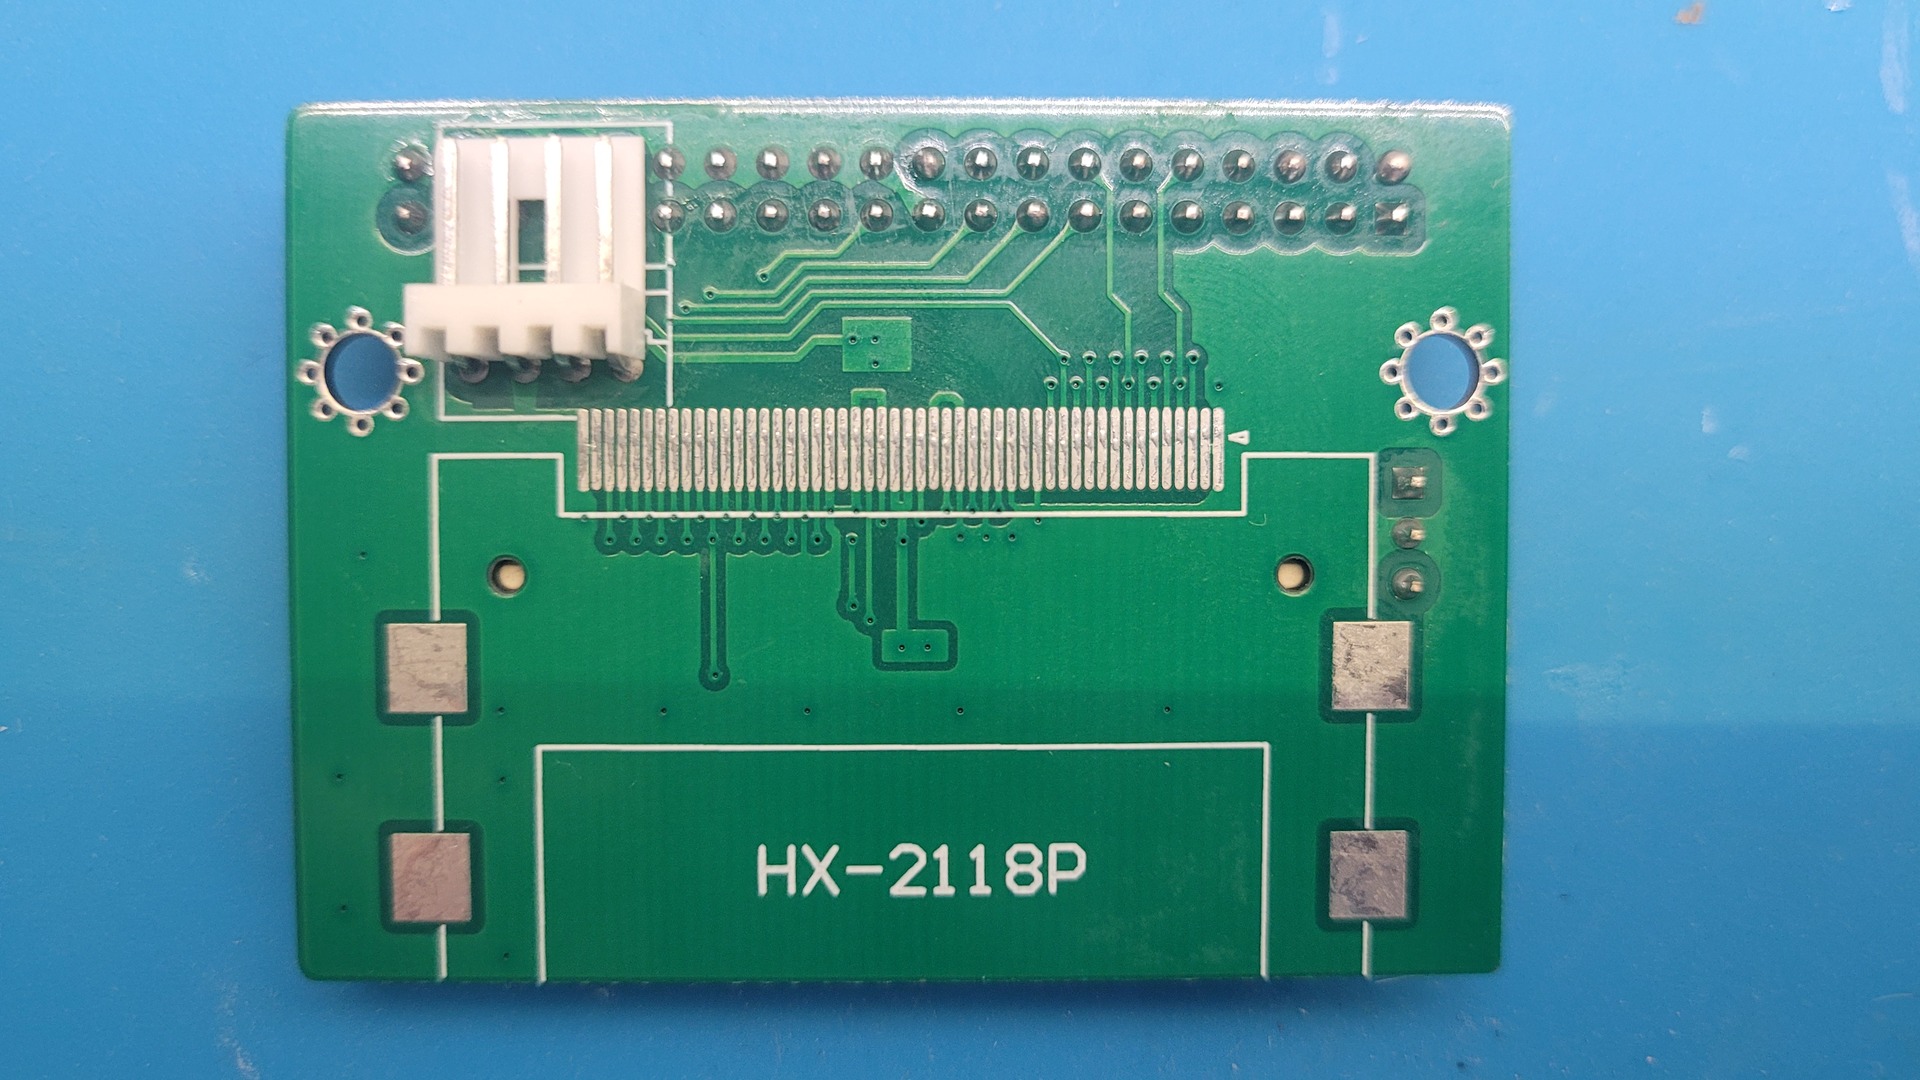
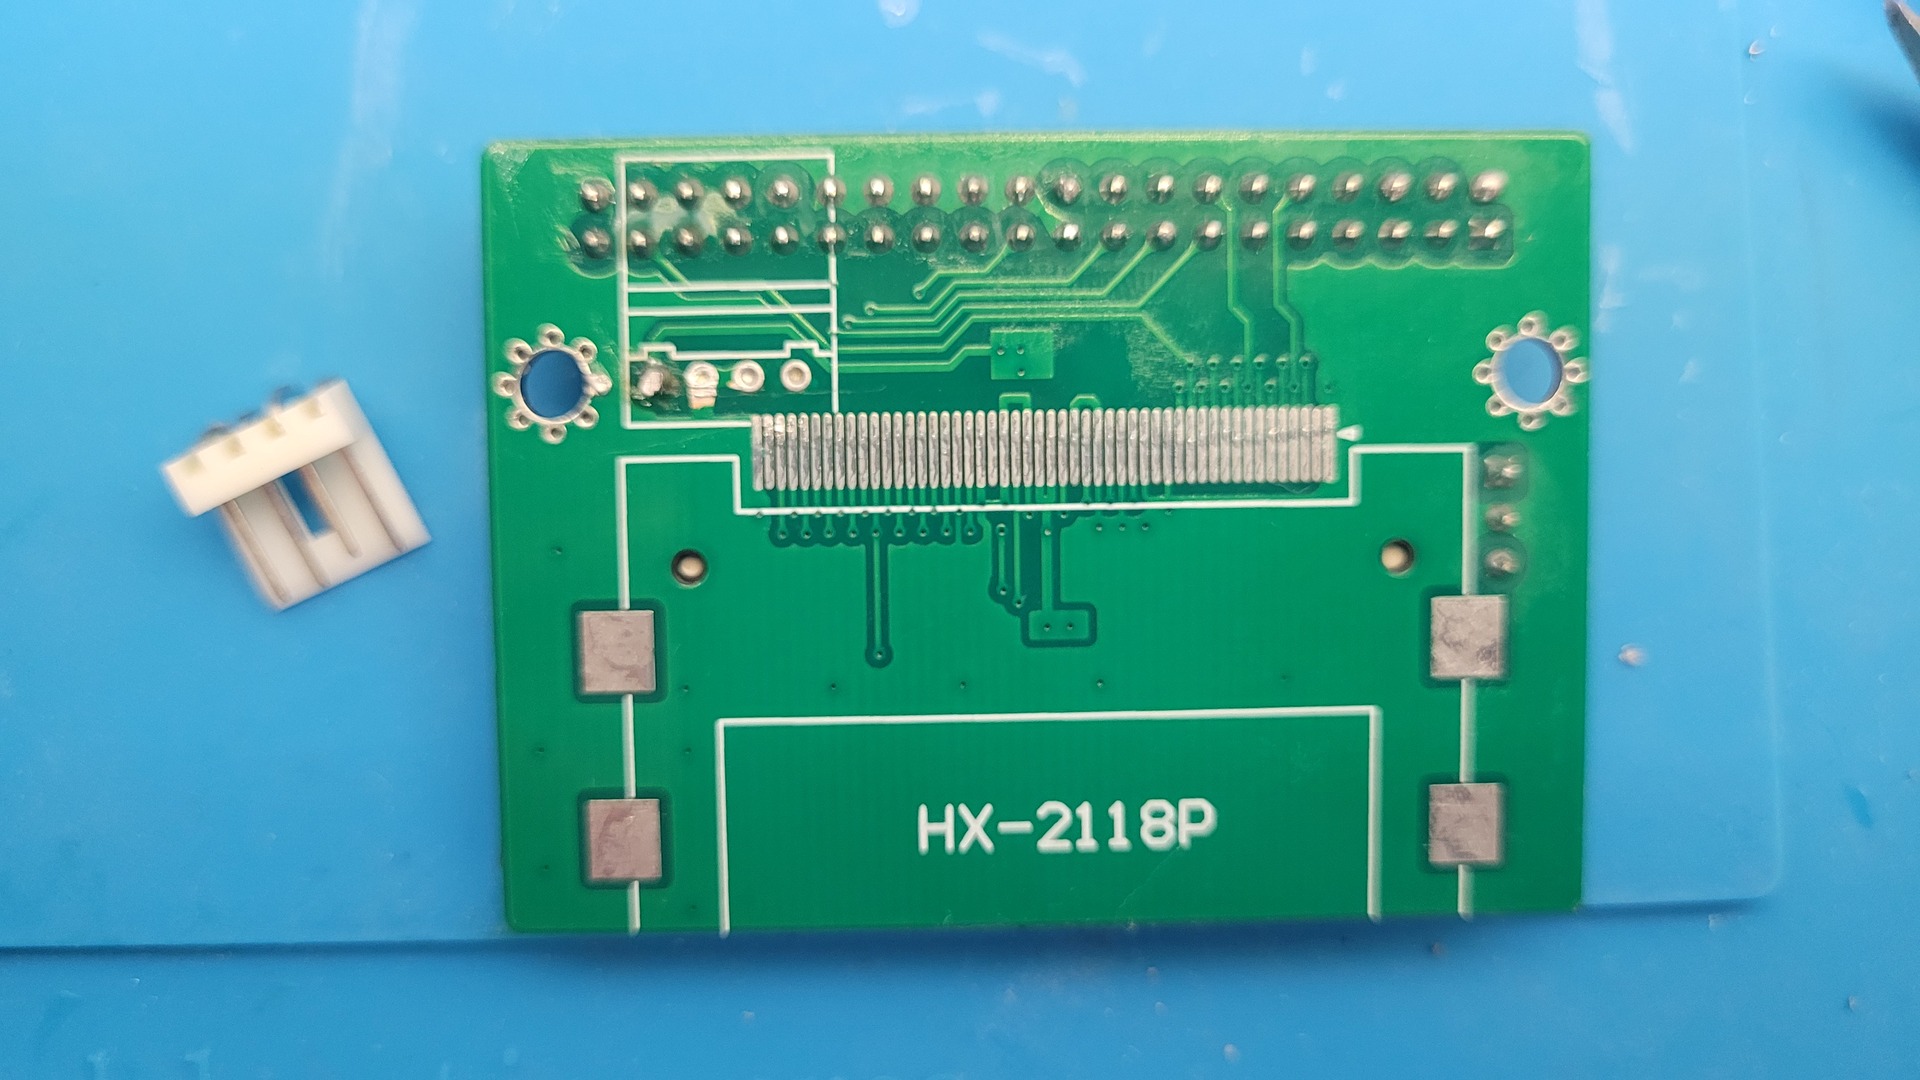
To simplify things, I modified the CF adapter, removing the bottom power connector and adding only the single required +5 V pin on top.
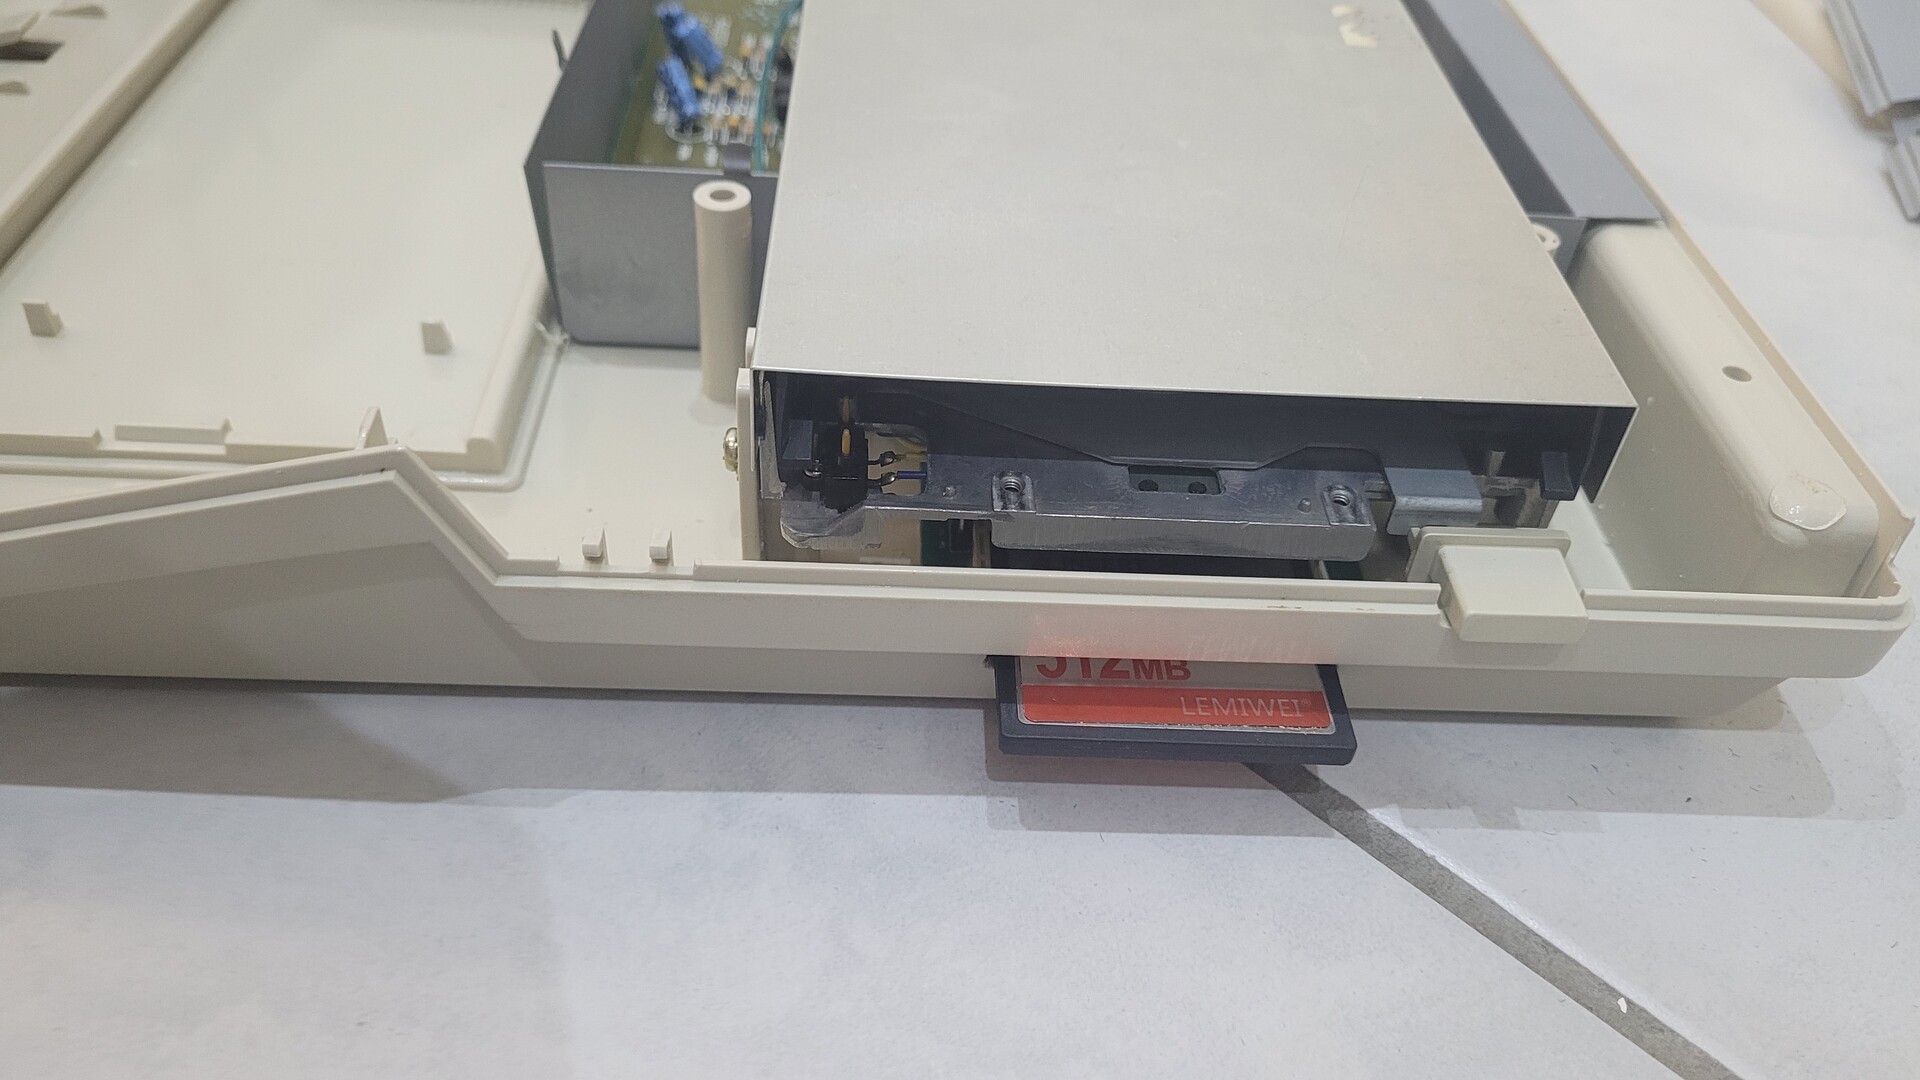
I slightly modified the A500 case to fit the CF card reader under the floppy drive, making card swaps extremely convenient without reopening the machine each time.
Then I placed the Cf card reader to calibrate the hole needed for the compaq flash to be inserted. It first made some small holes with a drill and I finished the job with a dremel.
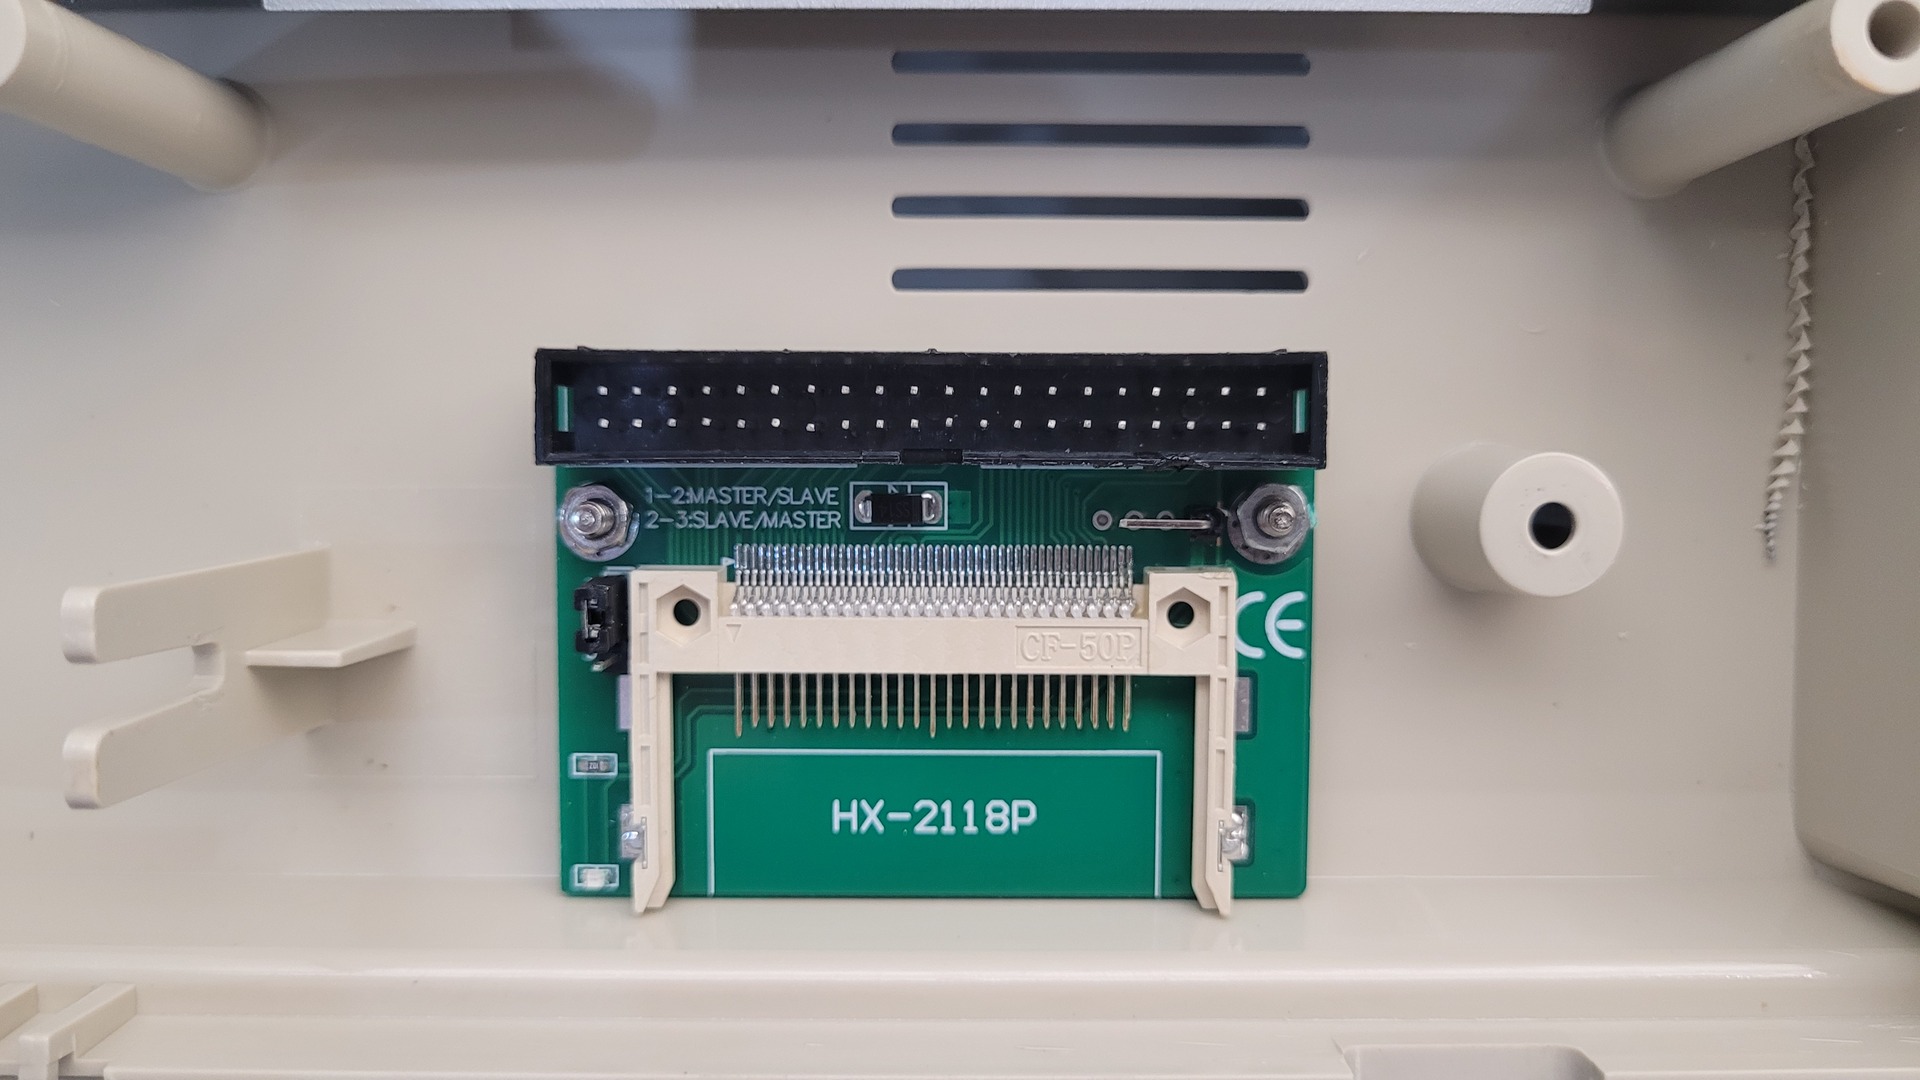
Because of the new placement, I needed a longer ribbon cable between the CF adapter and the IDE controller.
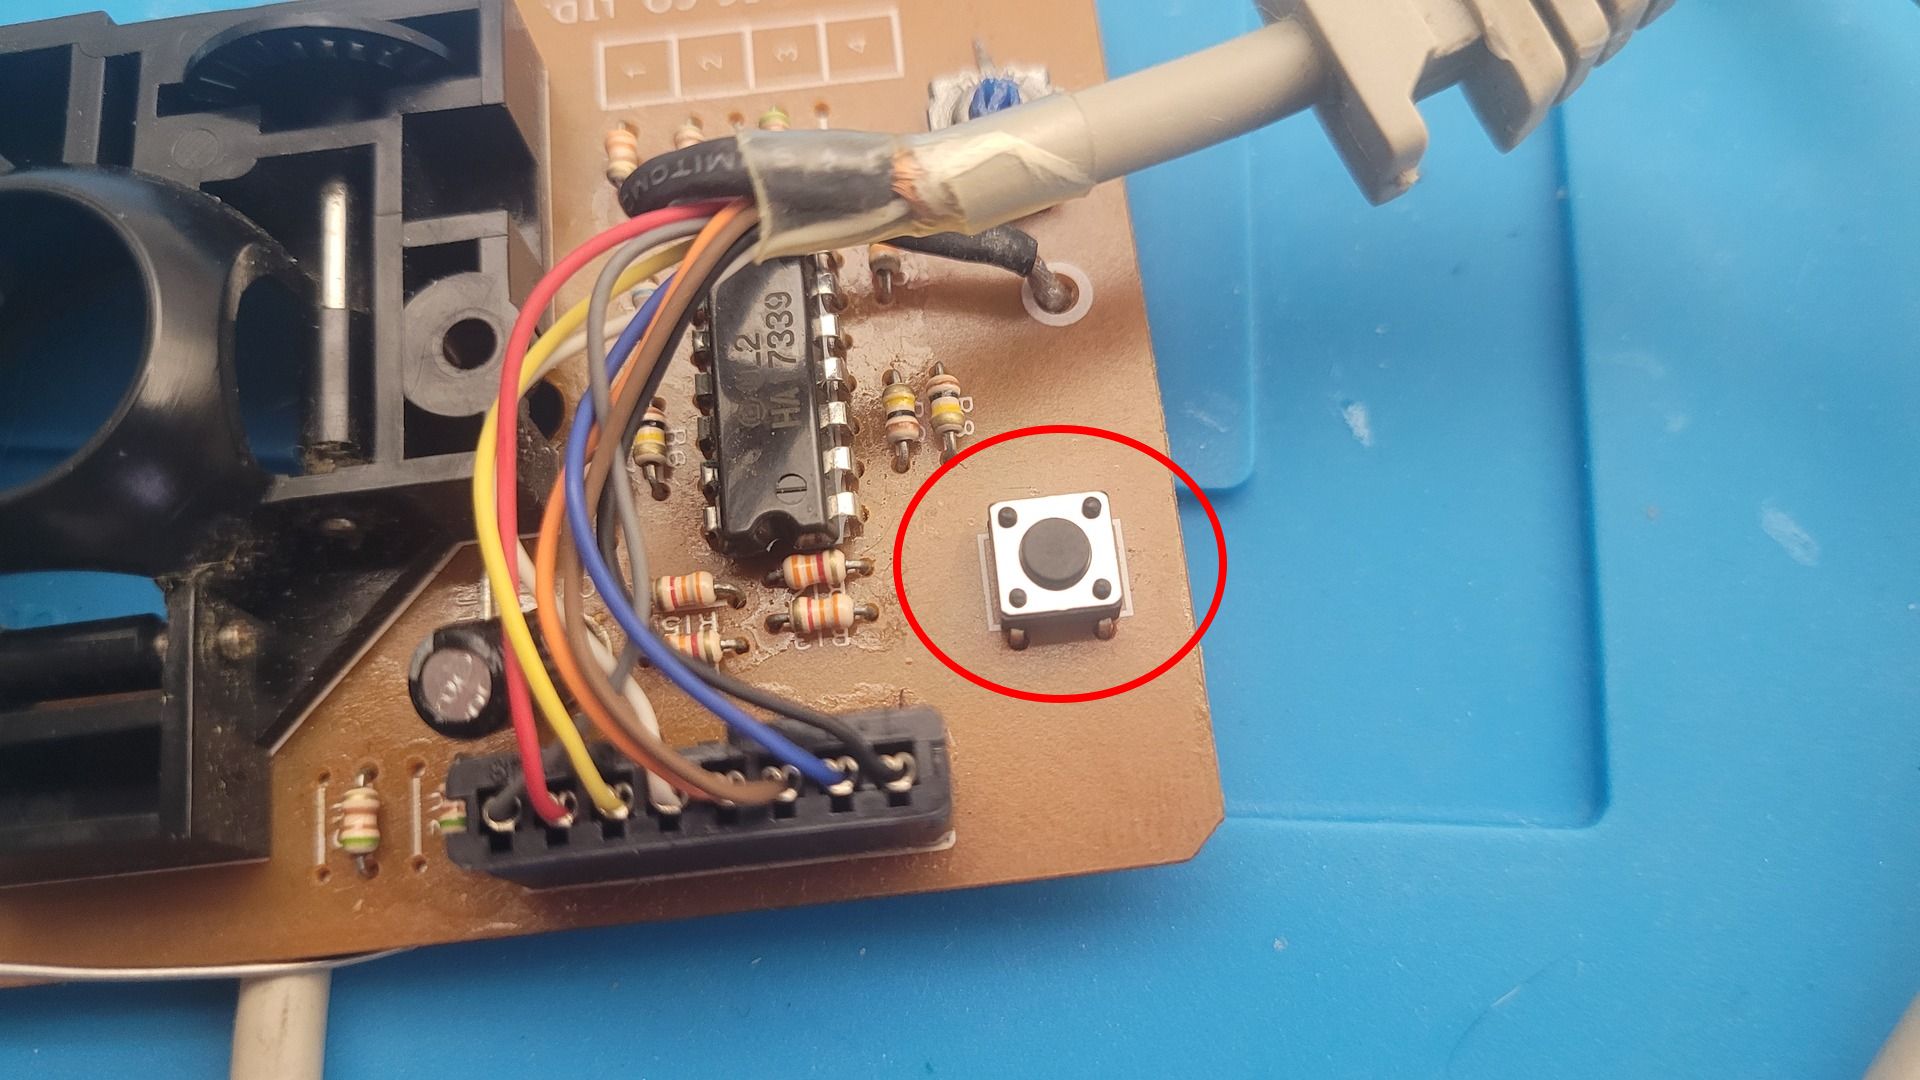
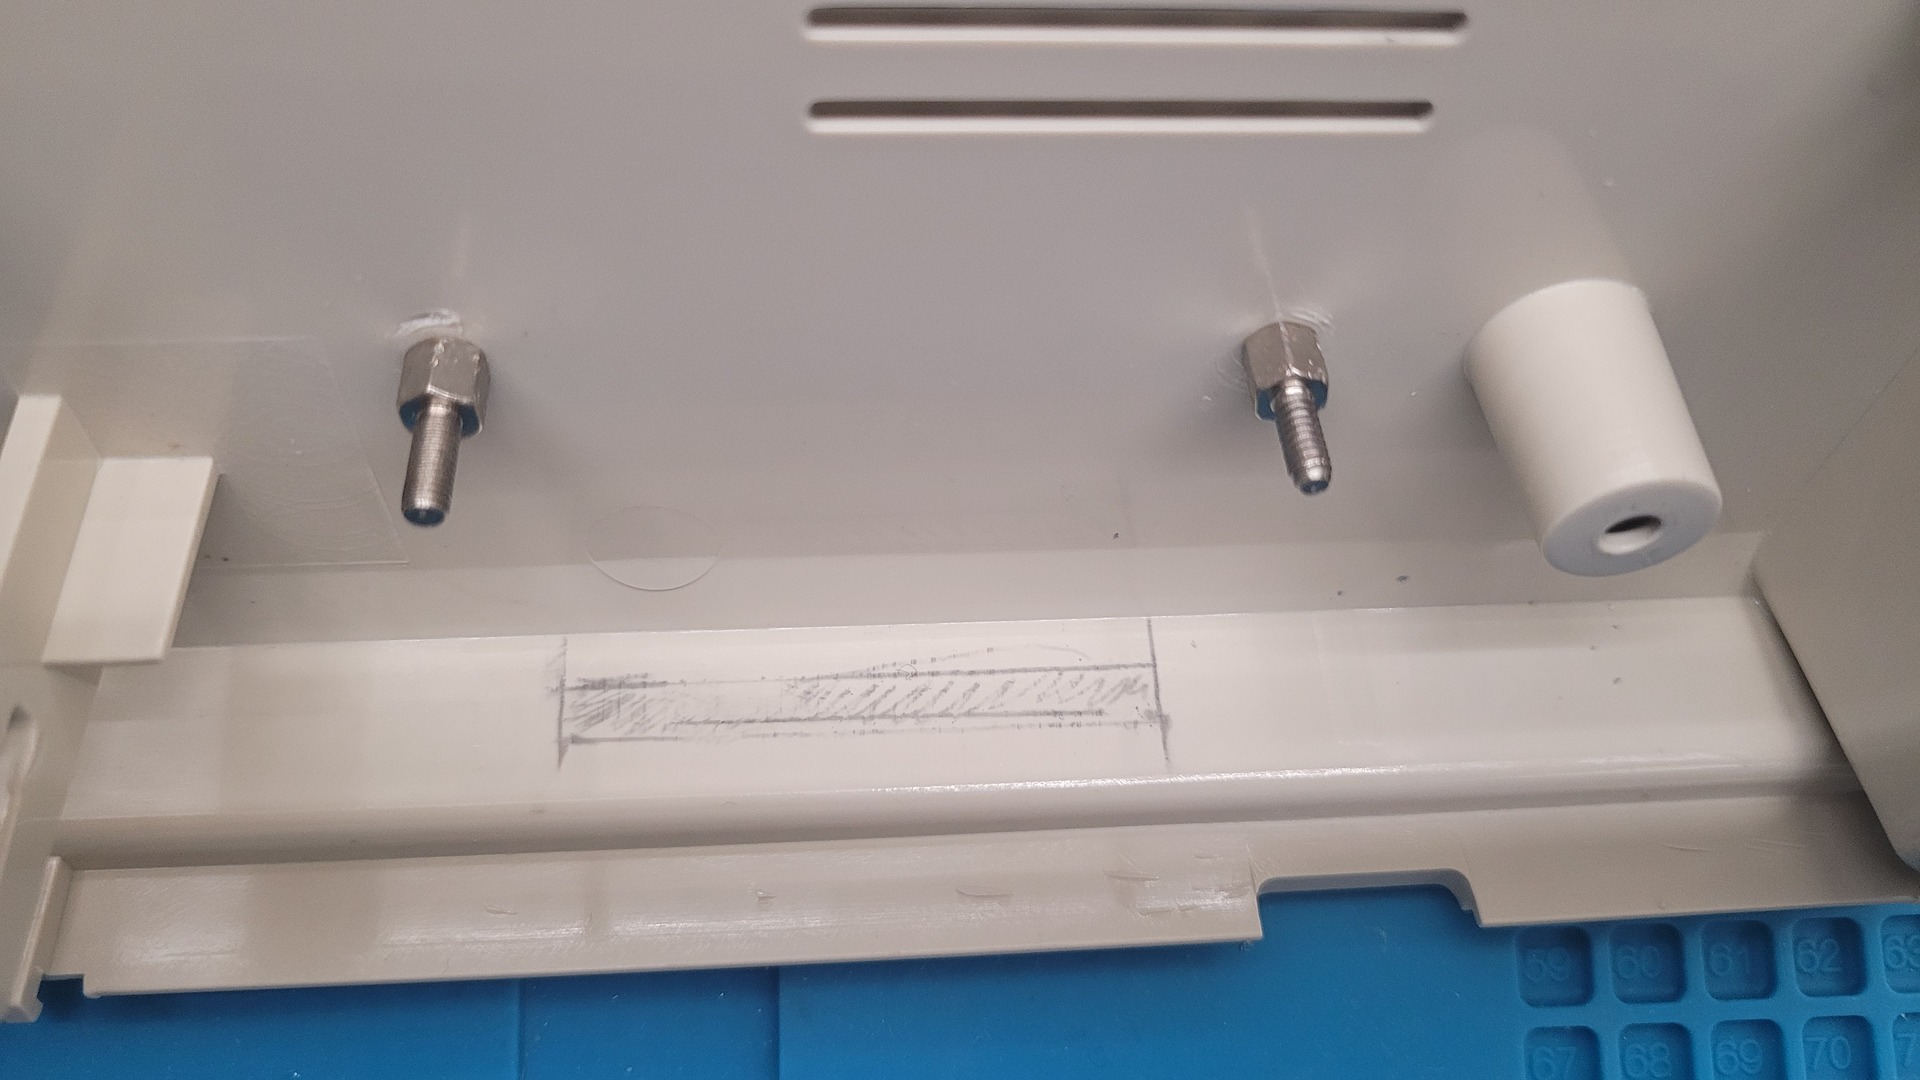
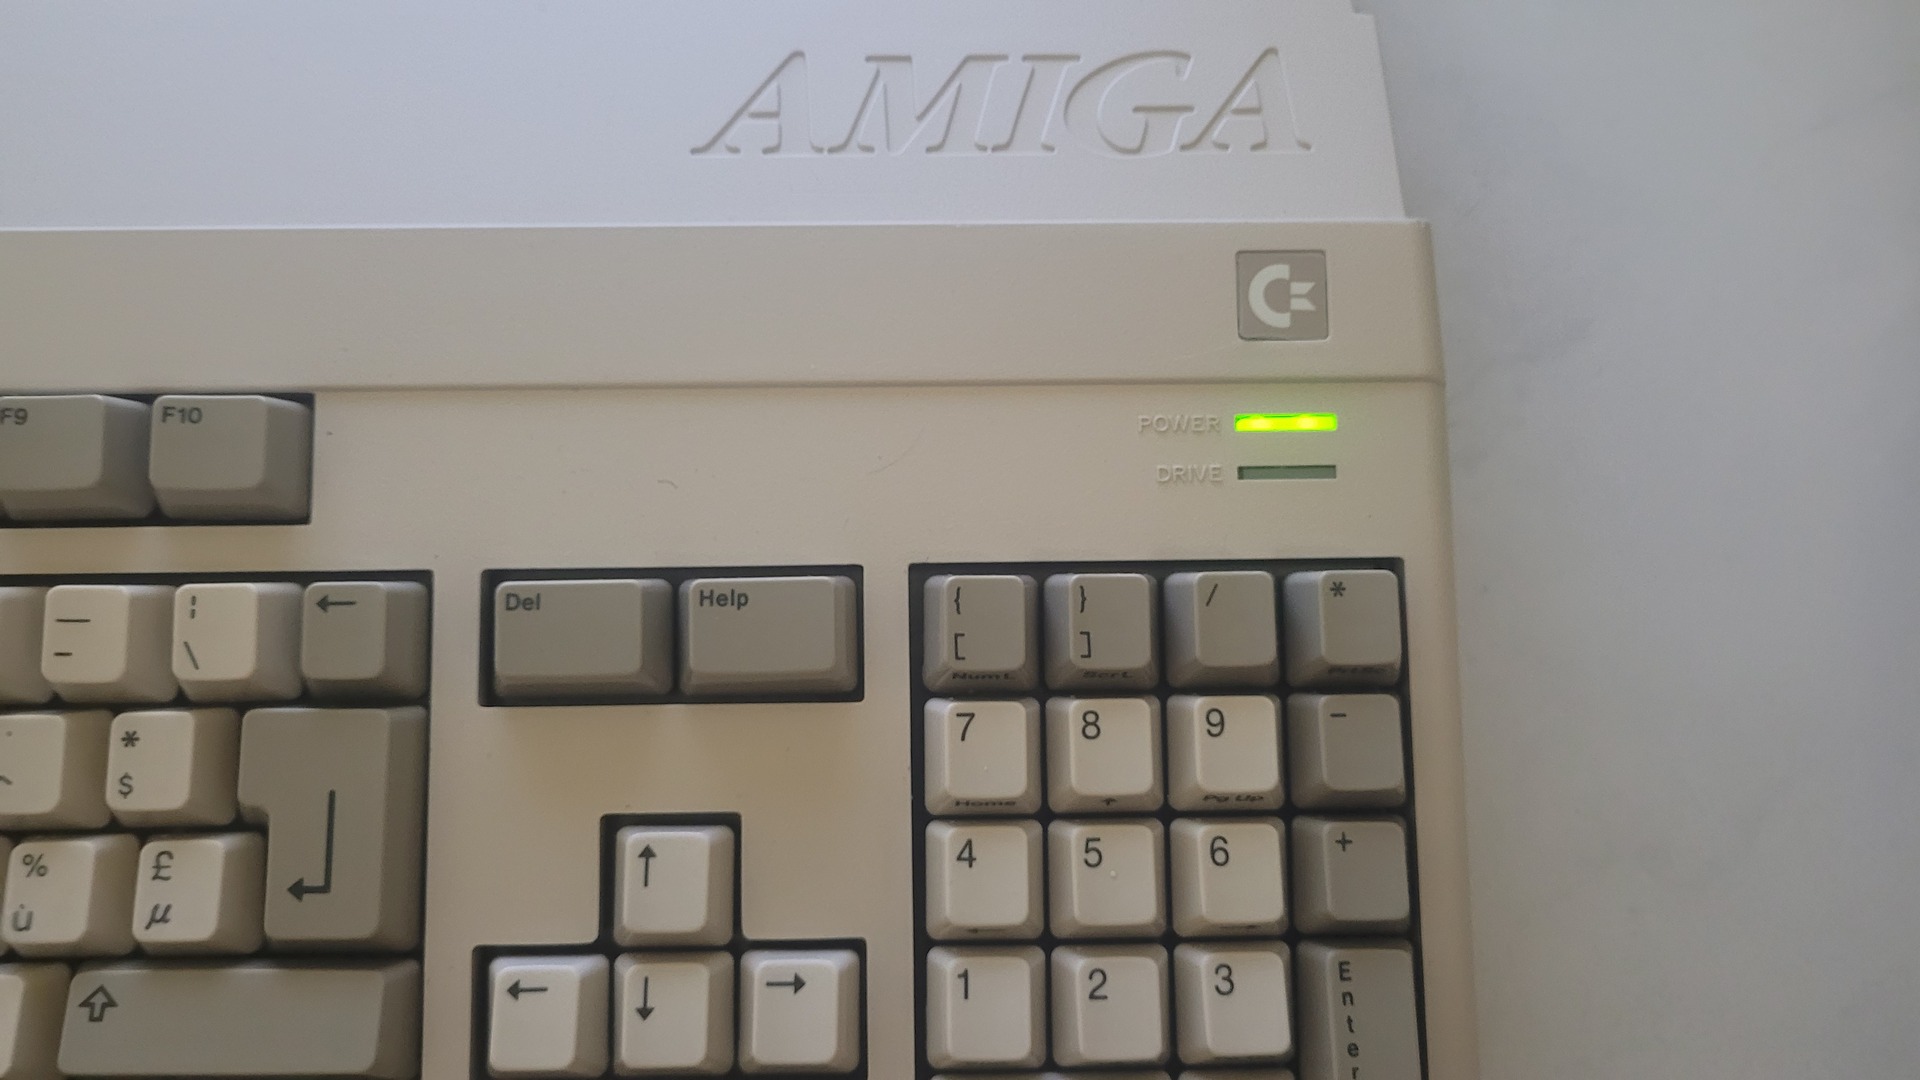
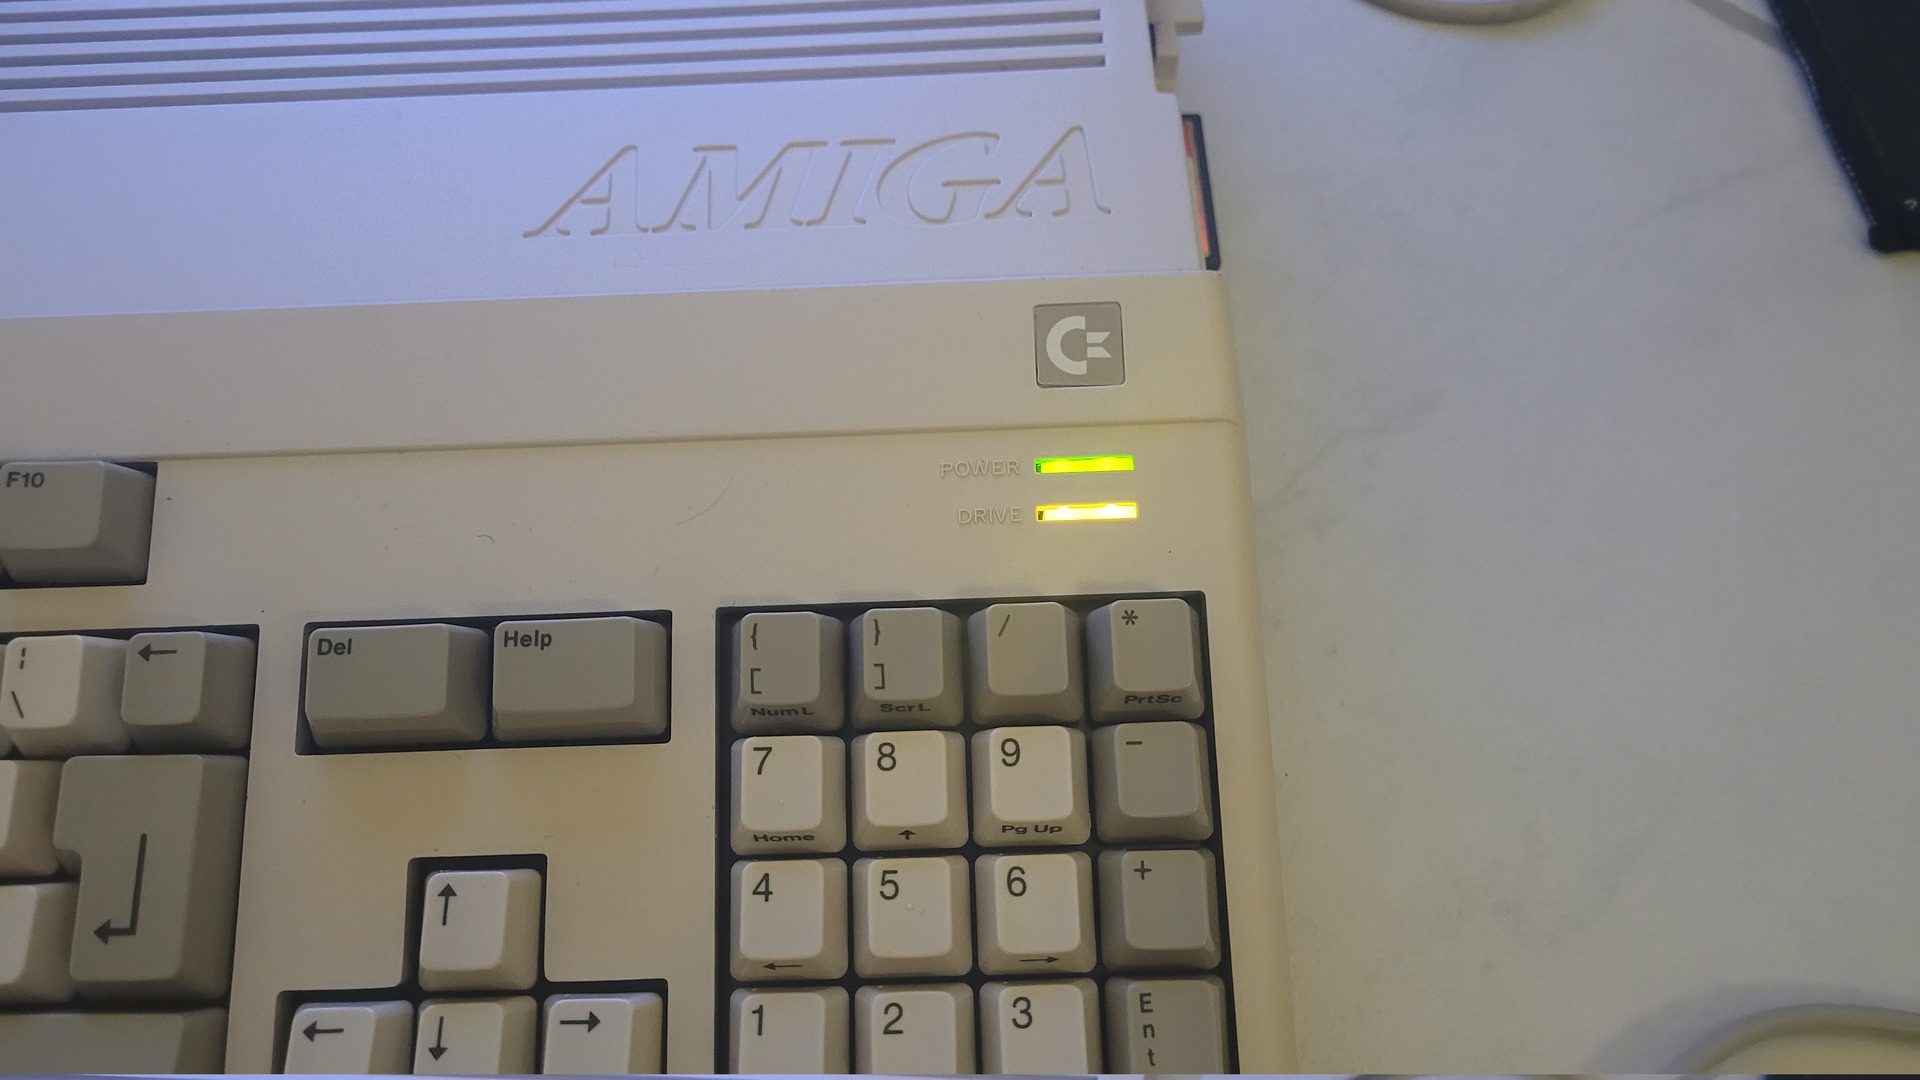
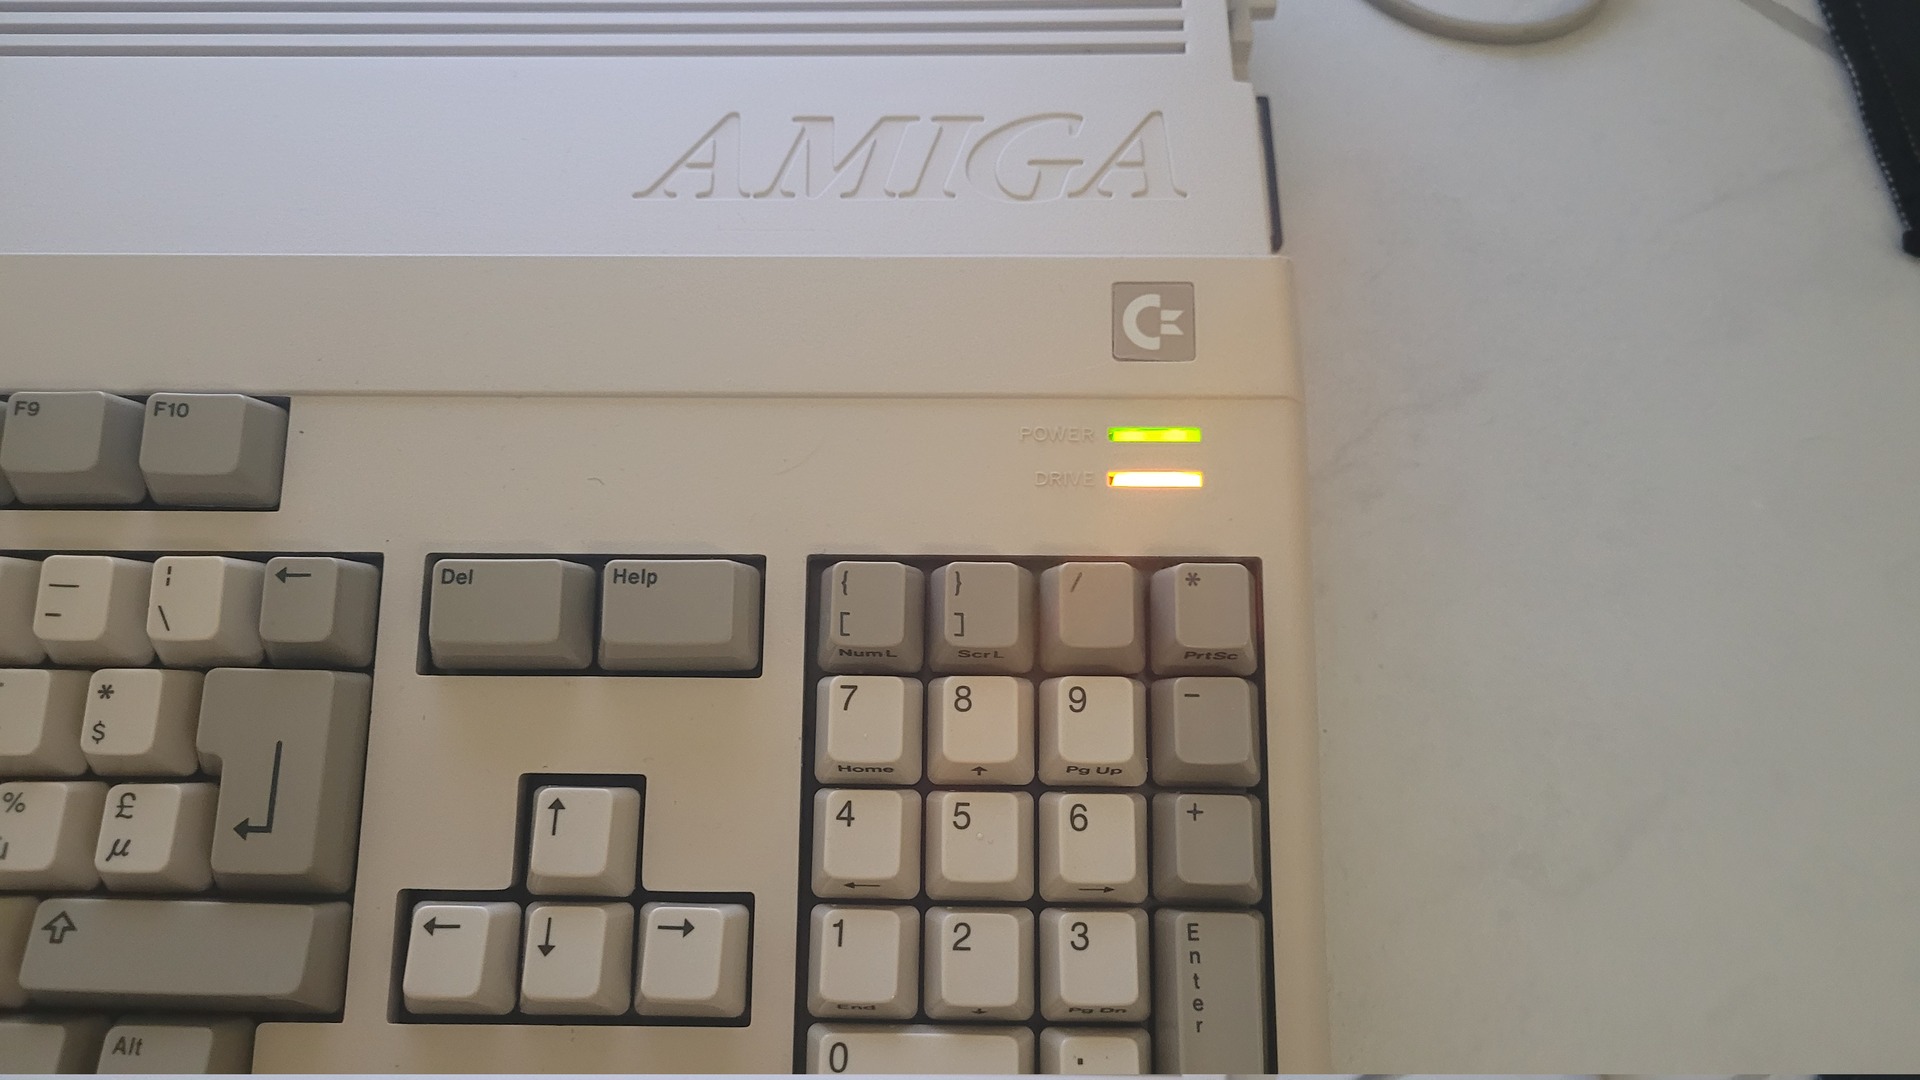
Finaly I added a red led to monitor IDE drive activity in addition to the floppy drive. In fact I used two 3mm leds glued between the two original ones of the Amiga 500. the mod is fully reversible. I used some aluminium adhesive to both isolate power led from the red light and better diffuse the red light on the original drive led. As you can see, there is one resistor for both leds.
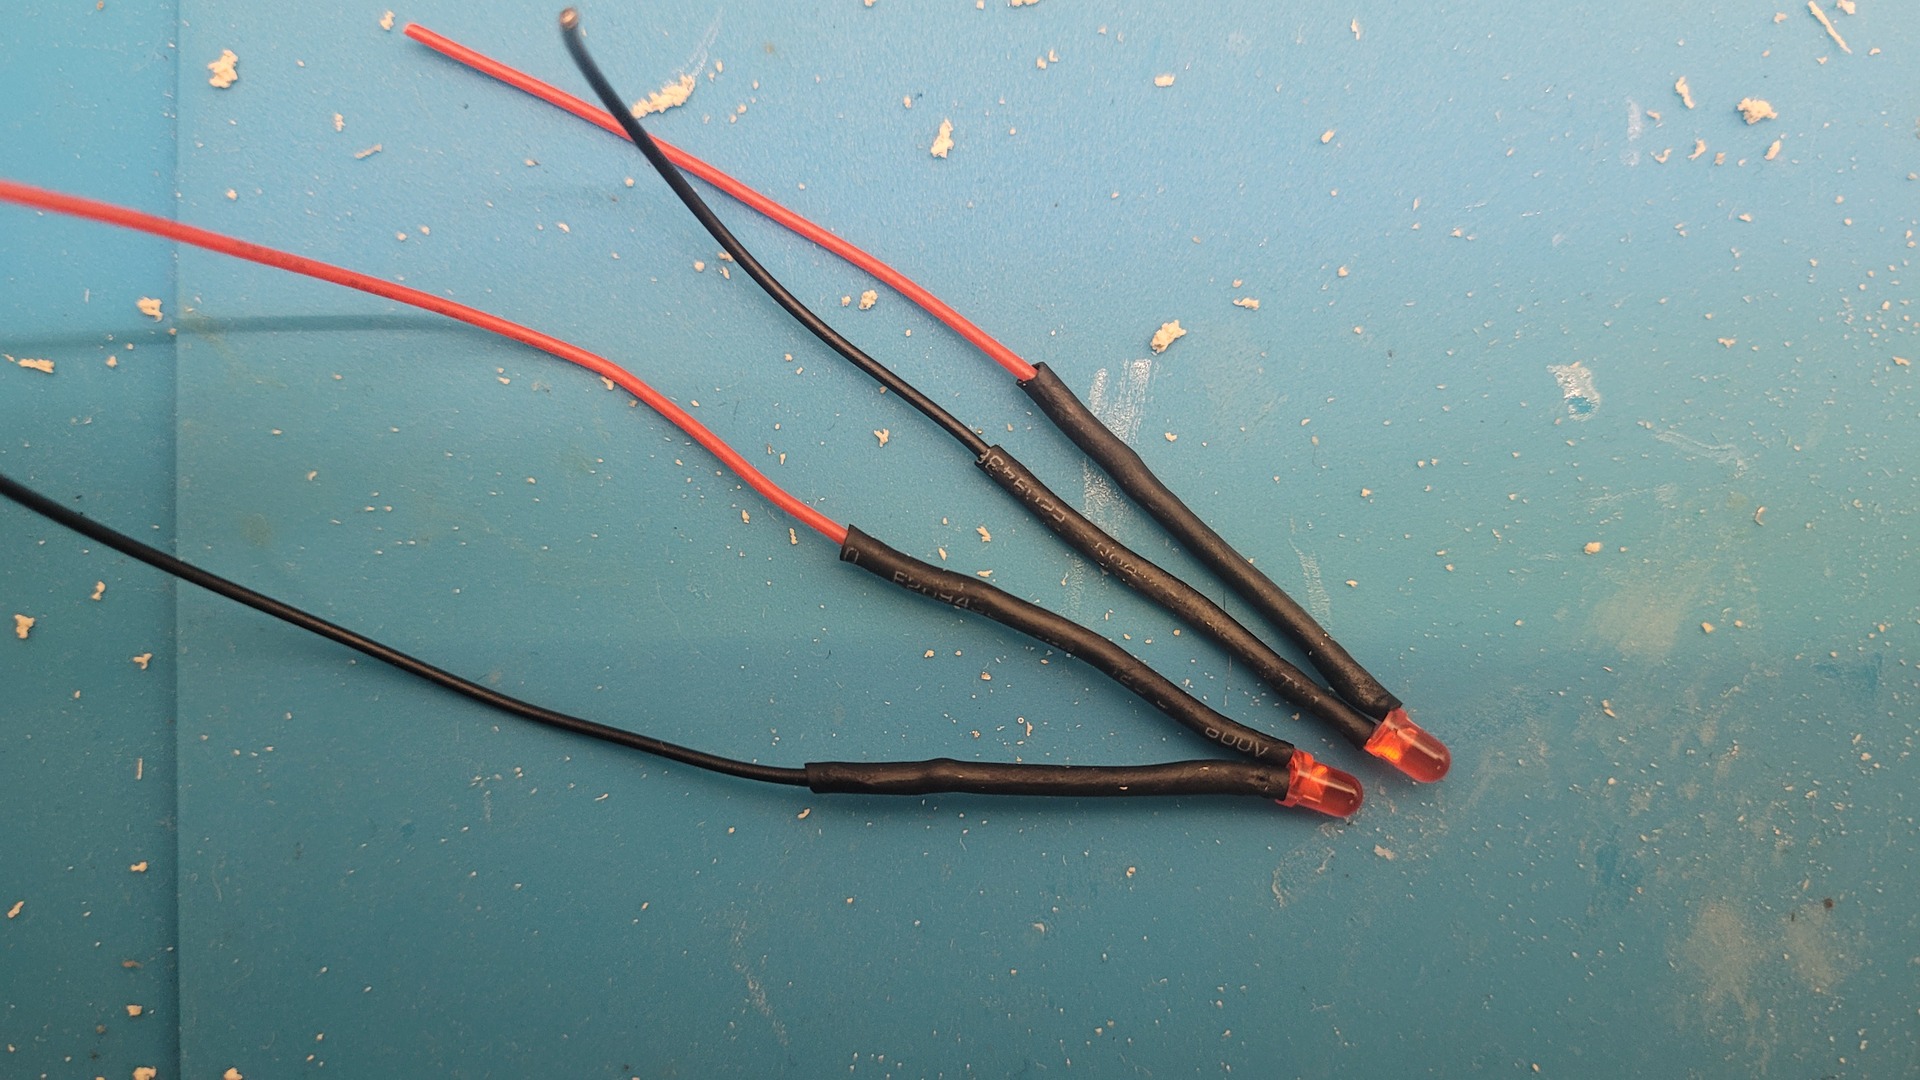
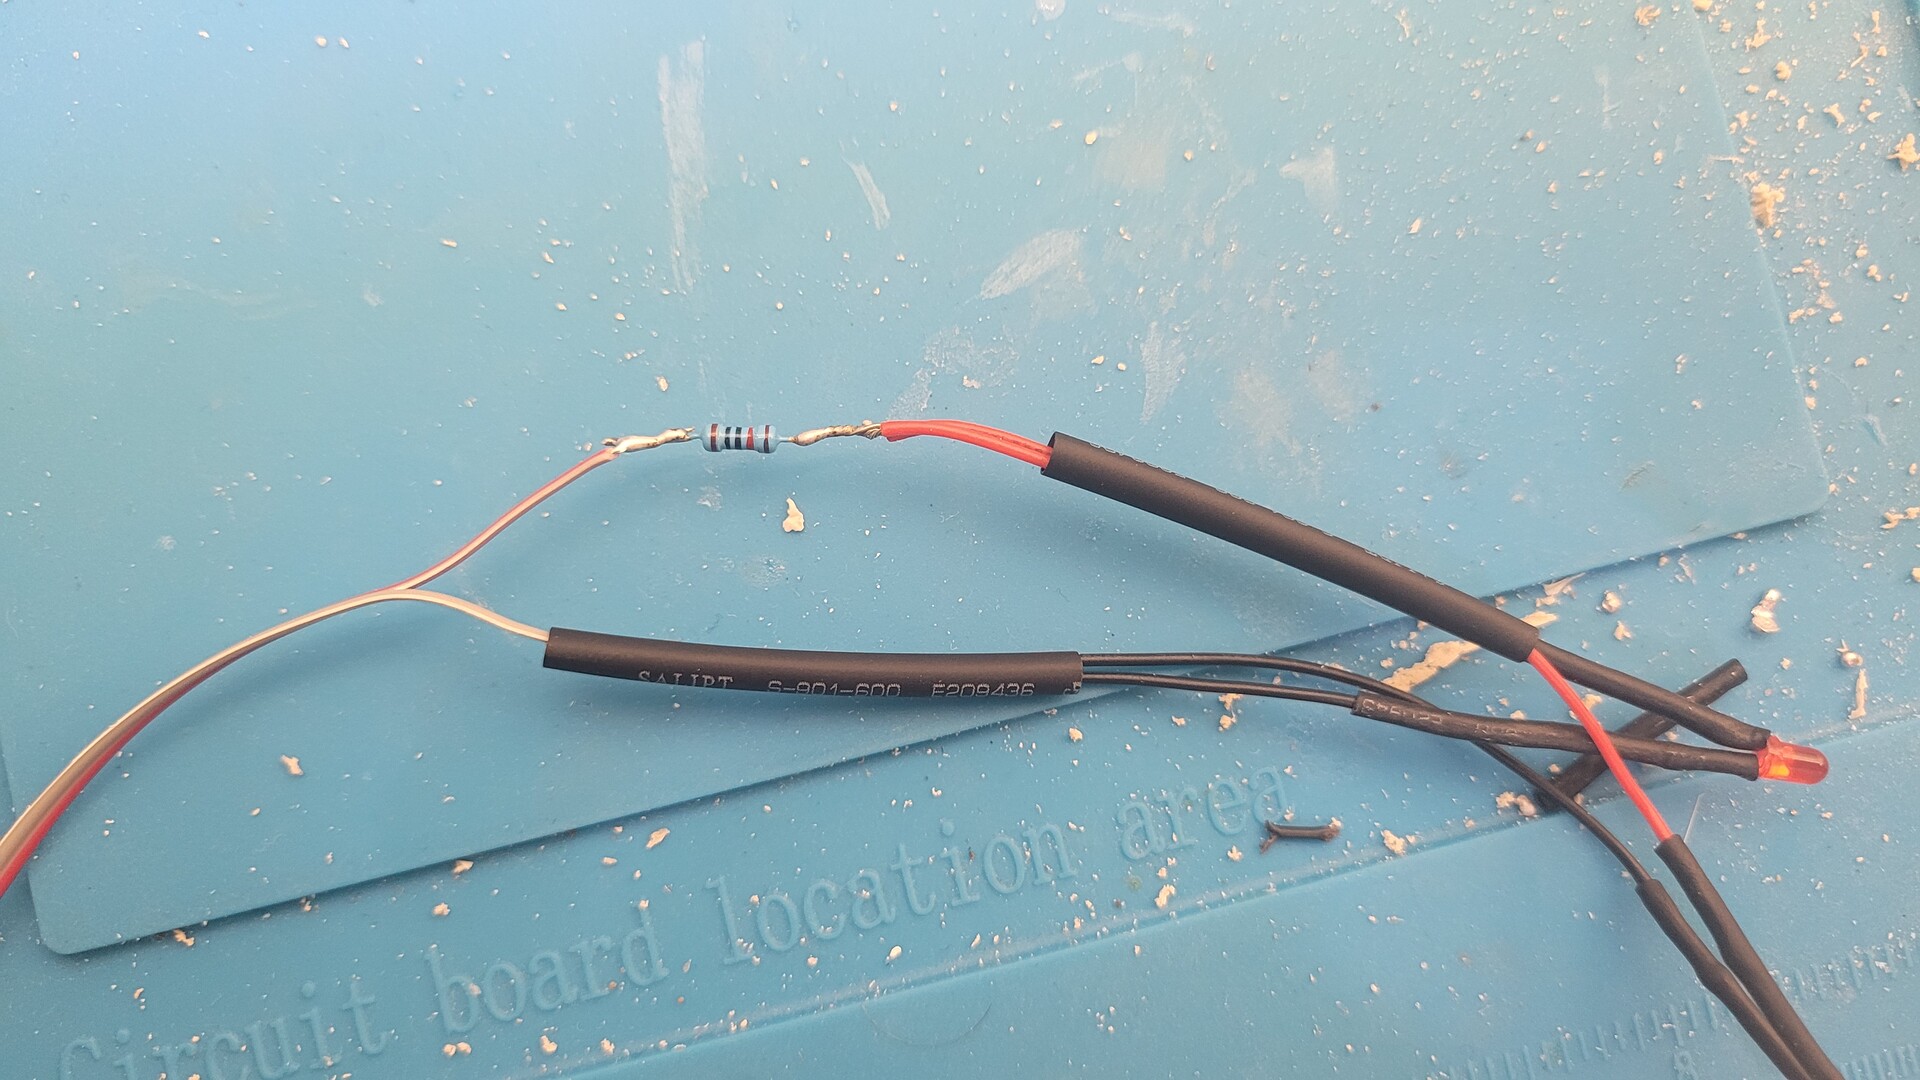
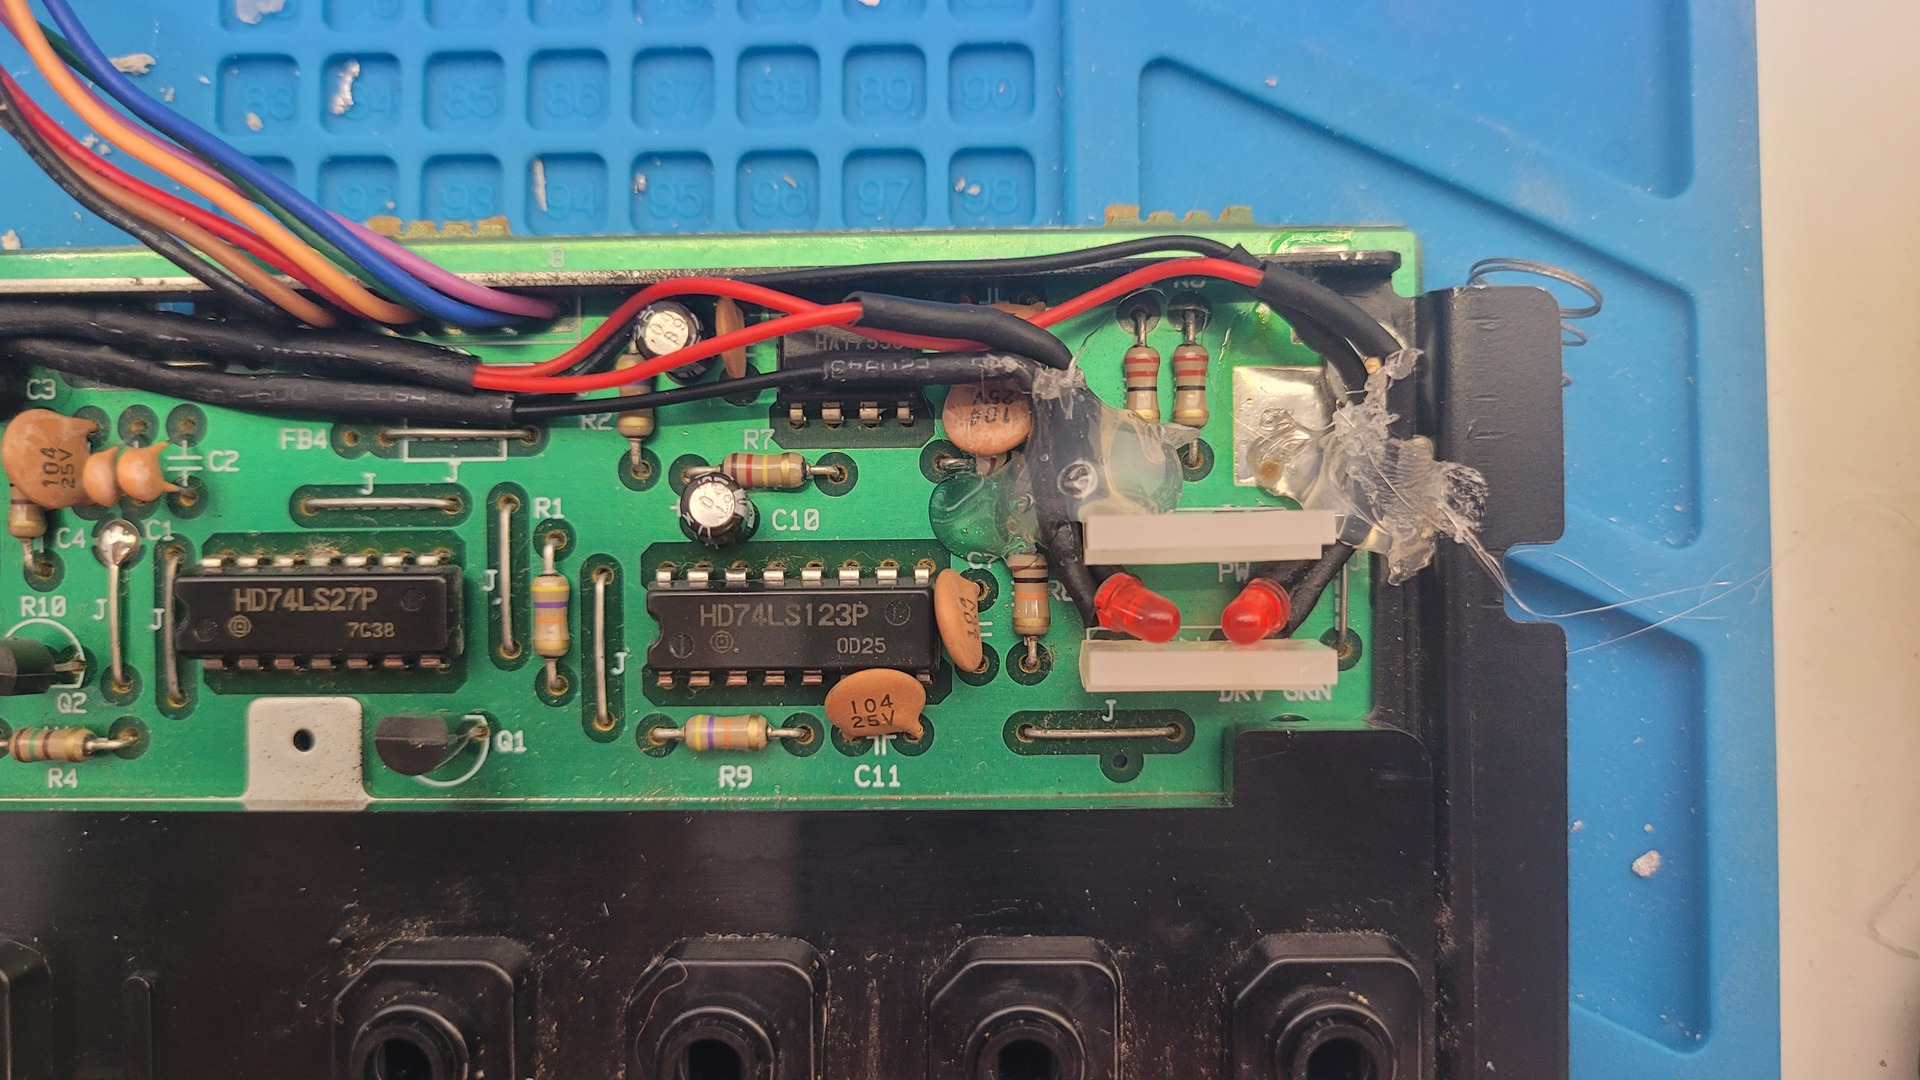
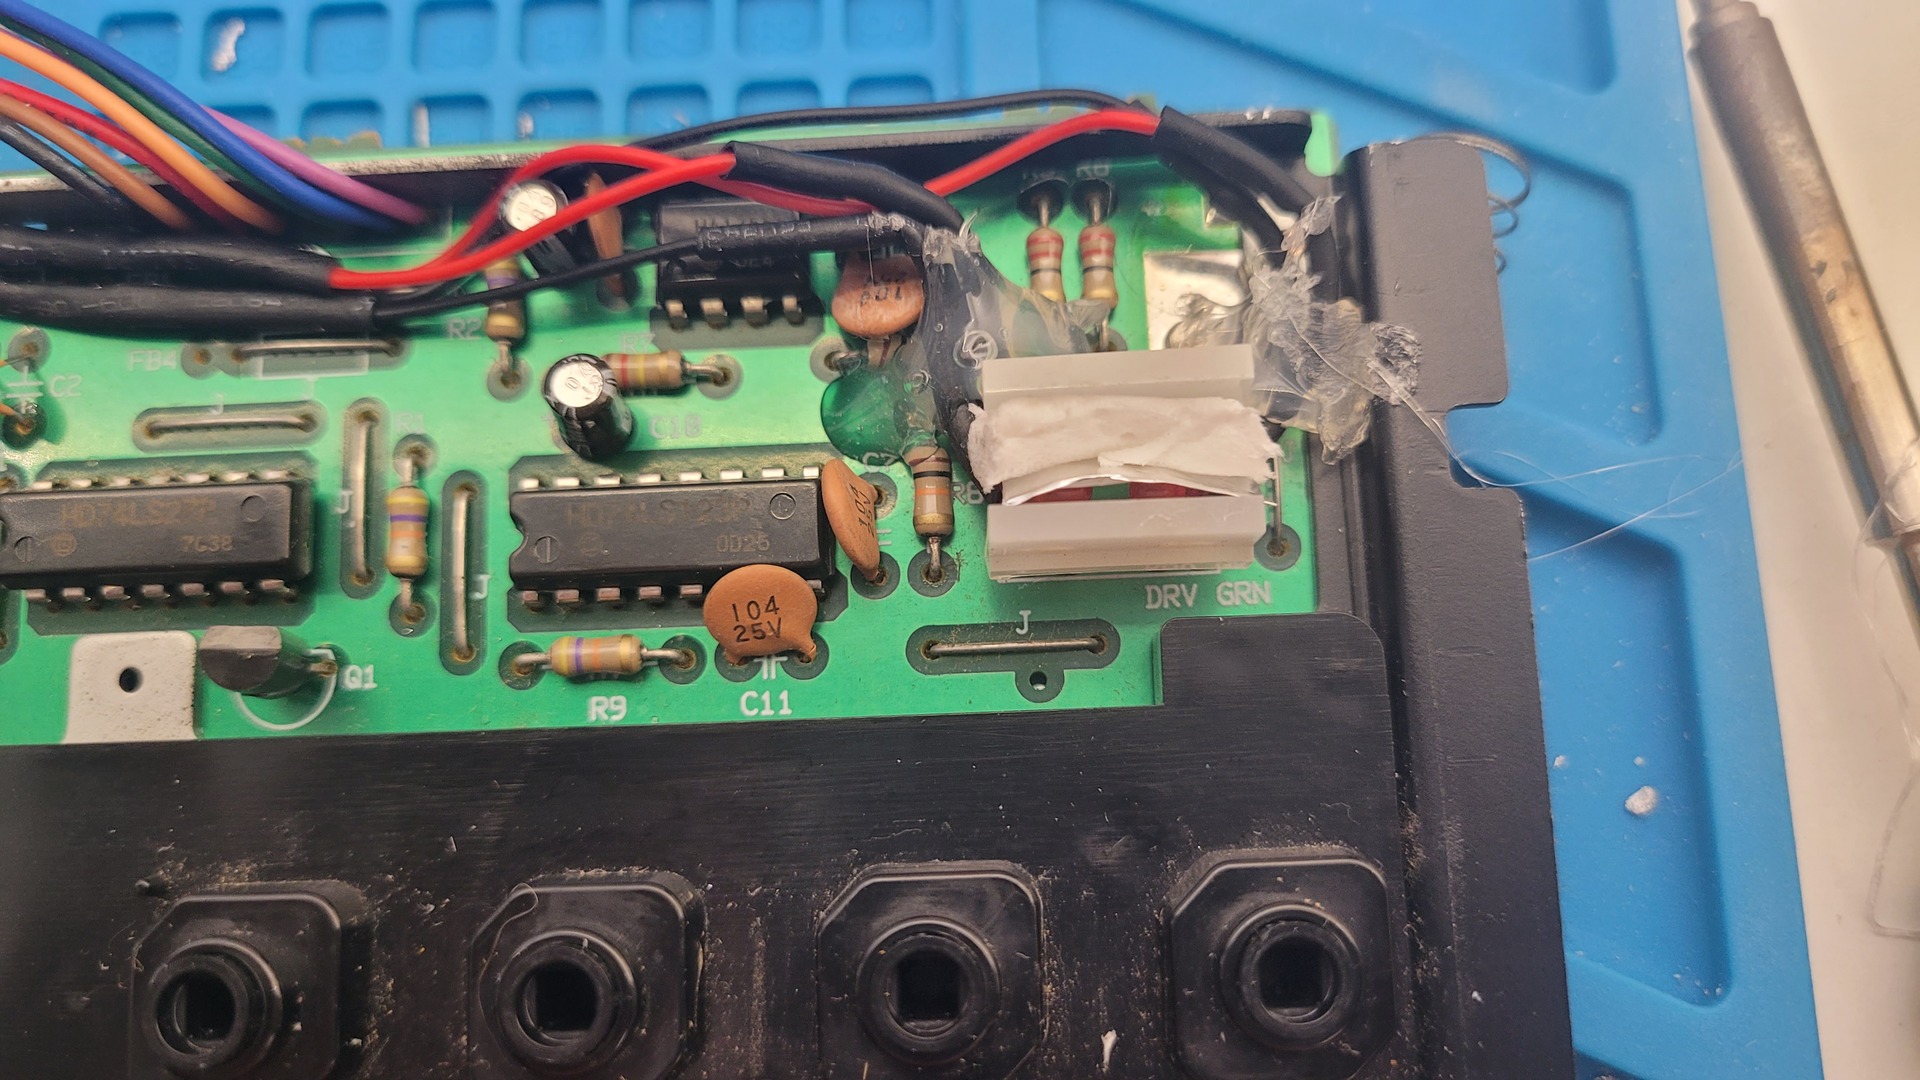
Finally, I added a red LED to monitor IDE activity, complementing the original floppy LED.
The result looks great and gives clear feedback: IDE activity, floppy activity, or both at once.
On the left: no IDE or floppy activity — on the right: IDE activity.
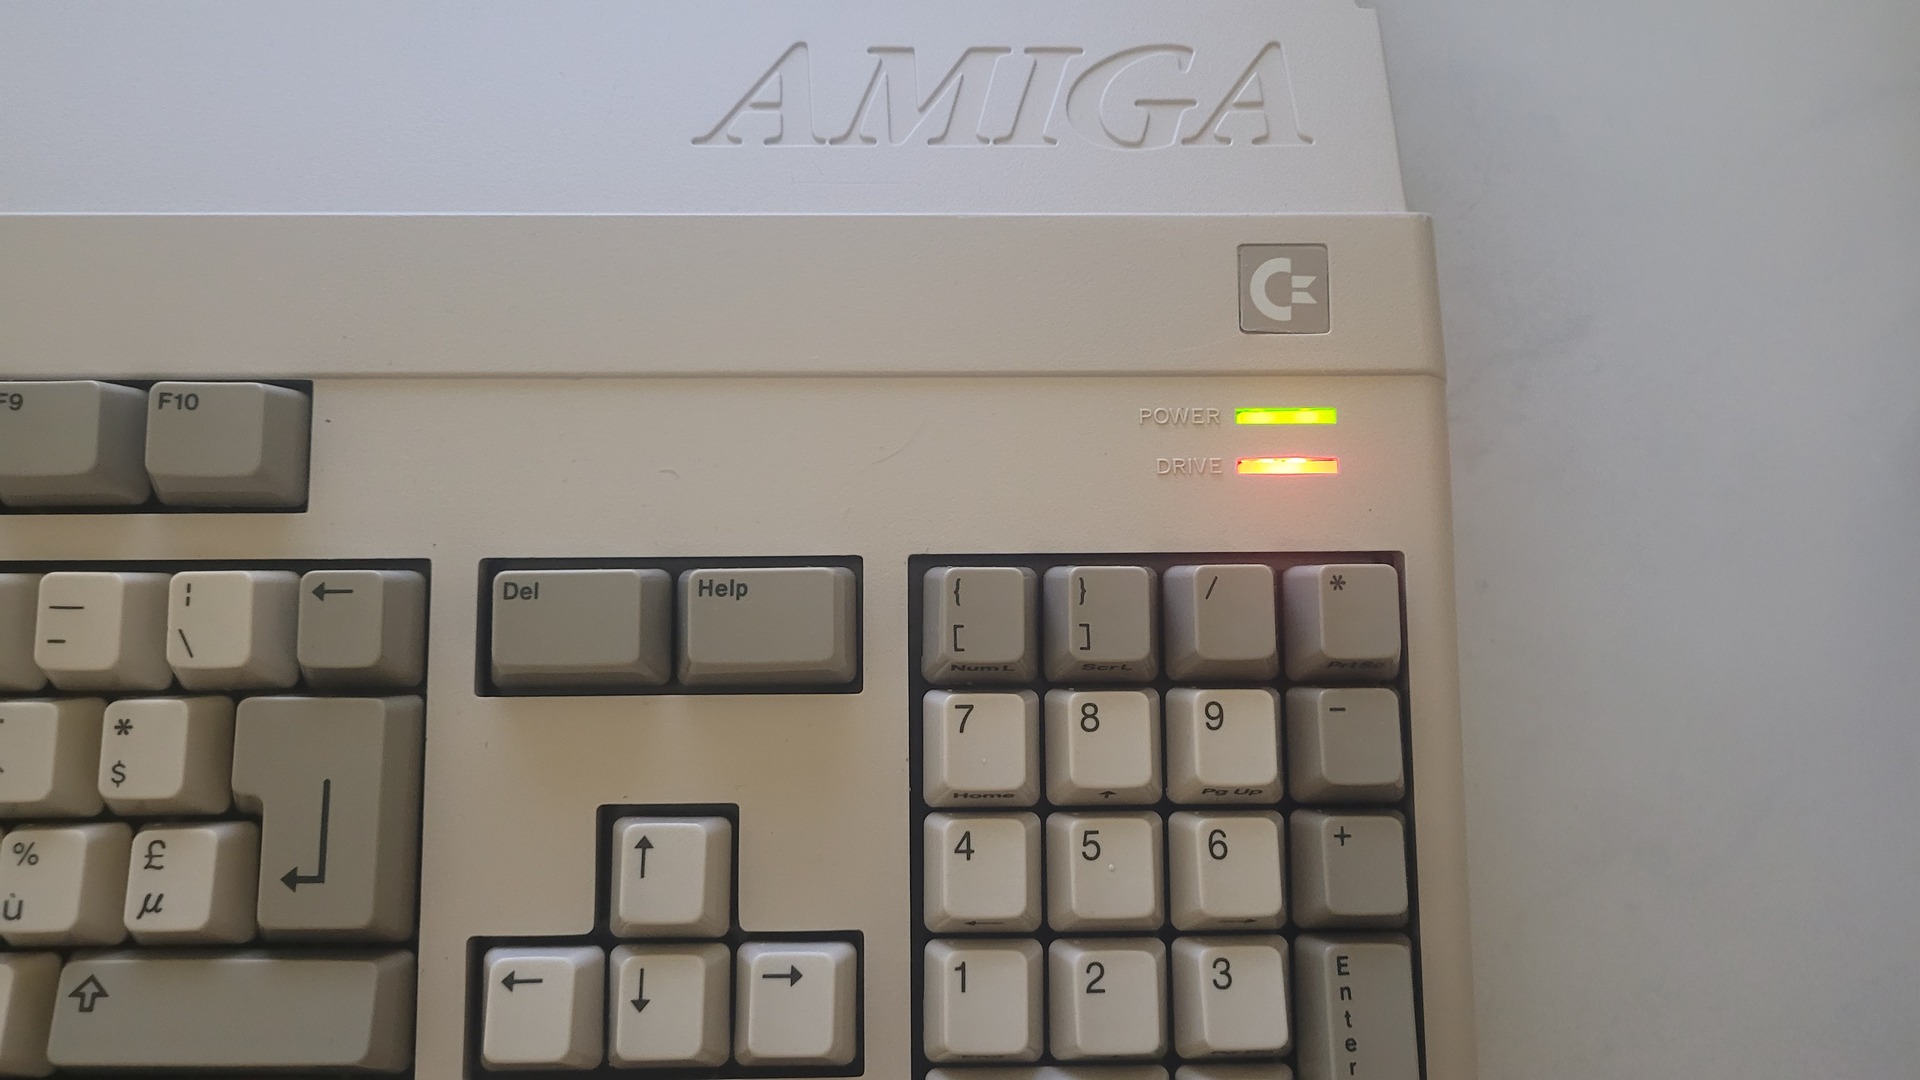
Now: left = floppy only — right = both IDE and floppy working simultaneously:
With the hardware restored and the extensions fully installed, it was finally time to move on to the next step: preparing the operating system.
Preparing OS Install
Amiberry configuration
To make the installation process easier, I prepared the system using Amiberry first. I used a Kickstart 1.3 ROM patched with IDE controller support, similar to the physical ROM I purchased from Amigastore.eu. The version I used can be found here: https://www.uprough.net/releases/Amiga_Roots_Music_Tools_Beta_2/
Below are the Amiberry settings I used to replicate my Amiga 500 hardware as closely as possible:
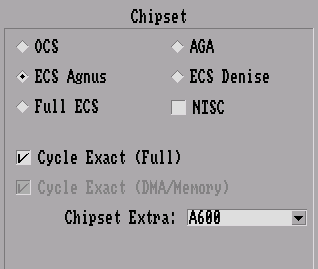
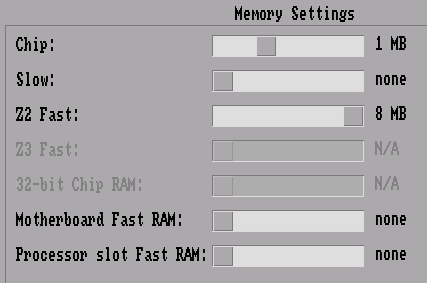
- CPU: 68000, 24-bit addressing, A500 cycle-exact (×2)
- Chipset: ECS Agnus with A600 selected under “Chipset Extra” — this is important, otherwise the IDE controller will be disabled
- RAM: Same as my real A500 — 1 MB Chip, 8 MB Z2 Fast
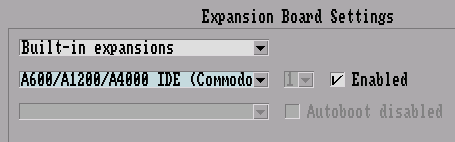
- Expansion: Enabled the A600 IDE controller
- Hard Drive: Mapped the Linux device corresponding to my USB CF card reader, selected the Commodore A600 controller, and set the mode to ATA-1 — this is essential, or the CF card won’t be detected correctly
These settings allow Amiberry to behave almost exactly like the upgraded A500 hardware, making the OS installation straightforward and 100% compatible with the real machine.

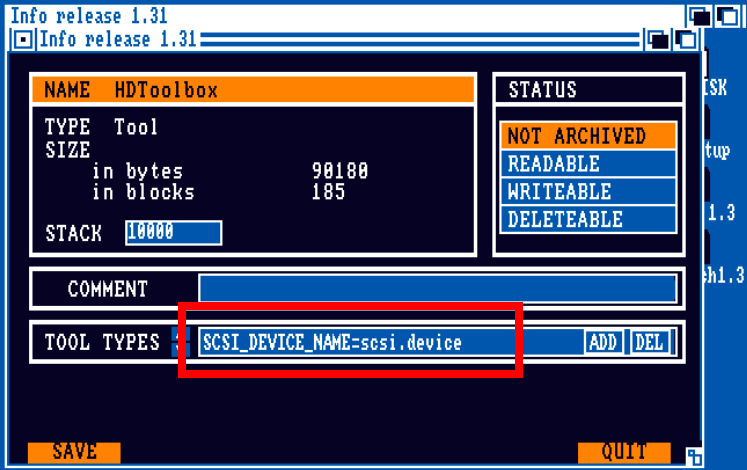
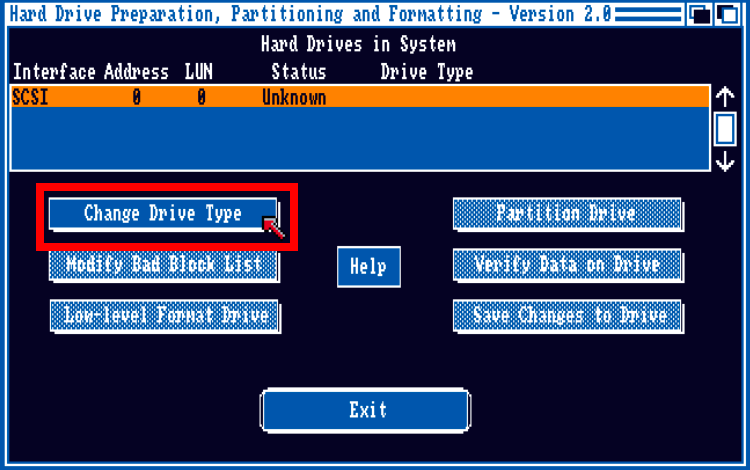
HDToolsBox
Nothing particularly unusual here, except that I first had to free some space on the “IDE Setup” floppy (I honestly don’t remember where I originally got it). Without doing so, HDToolBox refused to save the new drive-type definition.
Once that was sorted out, here’s what I essentially did:
- Edited the ToolTypes of HDToolBox to point to scsi.device
- Launched HDToolBox.
- Selected the CF drive and clicked “Change Drive Type”.
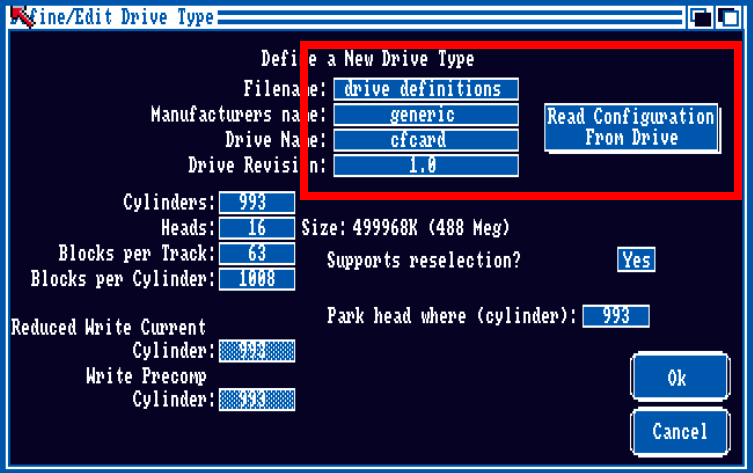
- Created a new drive type definition.
- Set the Manufacturer, Drive Name, and Revision fields.
- Saved and selected this newly created drive type.
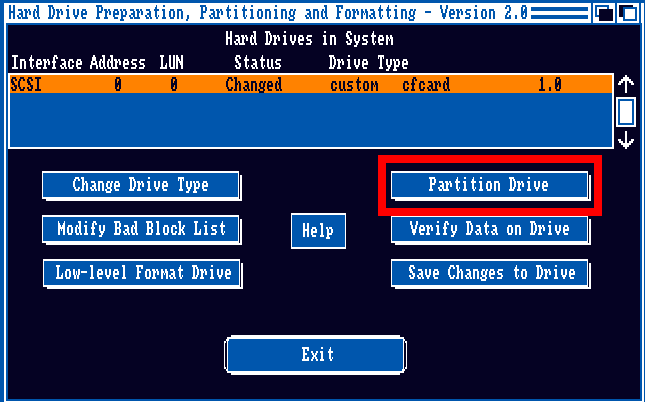
These steps allow HDToolBox to correctly recognize and handle the CF card as a proper fixed drive under Workbench.
Partitions
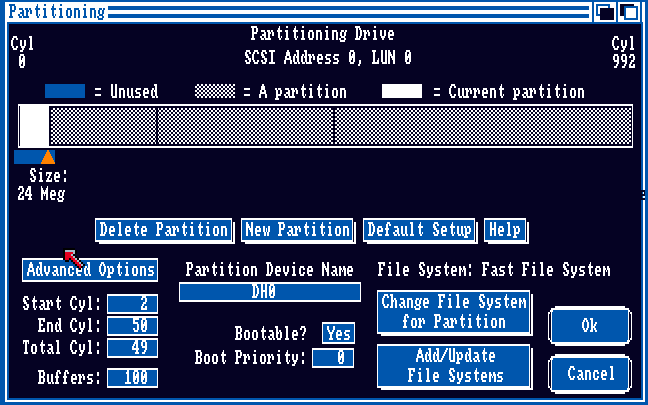
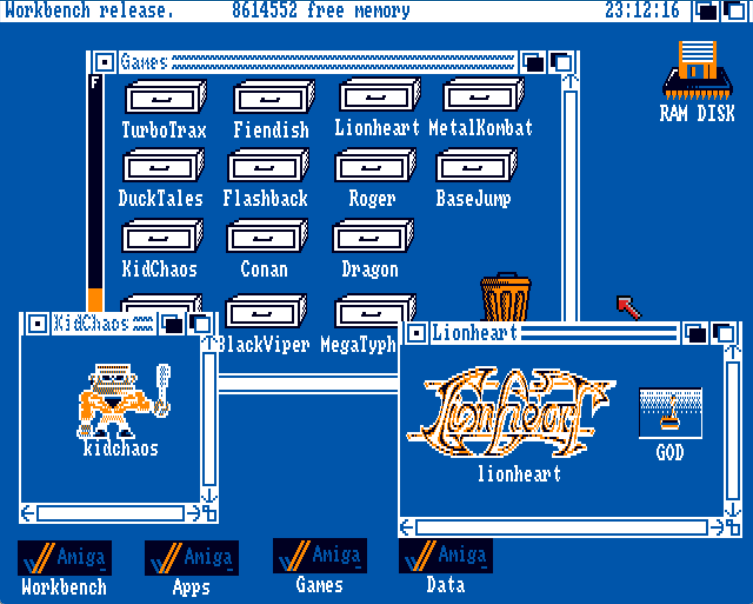
Below is the partitioning scheme I chose. I generally prefer to separate the operating system, its accompanying utilities, applications, games, and user data — essentially the Amiga equivalent of a “/home” directory.
- DH0 – Workbench: 24 MB, 100 buffers
- DH1 – Apps: 85 MB, 100 buffers
- DH2 – Games: 140 MB, 100 buffers
- DH3 – Data: 212 MB, 150 buffers
For all partitions, I used FFS with a maxtransfer value of 0x1FE00 .
format DRIVE DH0 name Workbench FFS QUICK
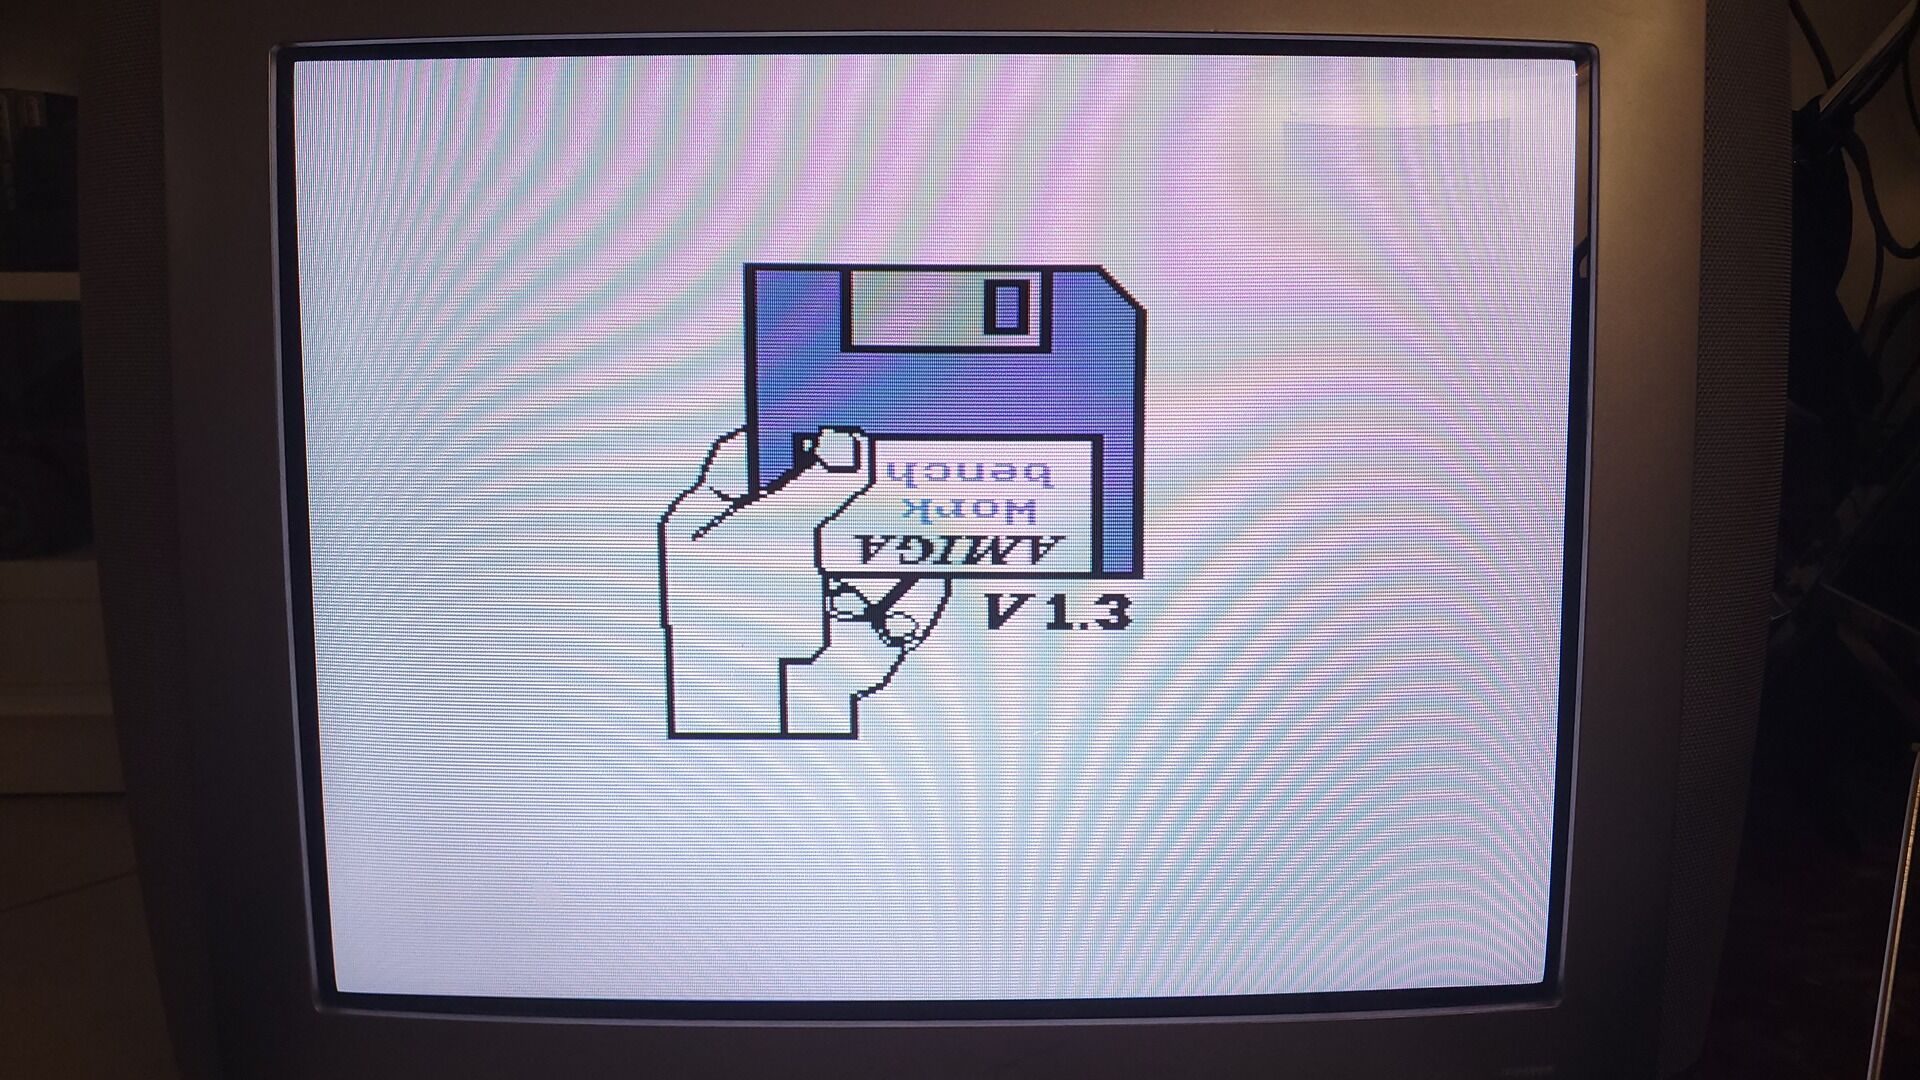
Workbench 1.3 install
Installing Workbench 1.3 is fairly straightforward: it simply involves copying the contents of the Workbench and Extra disks onto the bootable partition, then editing the startup-sequence.
AmigaDOS
|
1 2 3 4 5 |
copy workbench1.3: to dh0: all clone copy "extra 1.3:" to dh0: all done rename DH0:s/startup-sequence DH0:s/startup-sequence.FD rename DH0:s/startup-sequence.HD DH0:s/startup-sequence edit DH0:s/startup-sequence ; replace the call "Execute s:Startup-sequence" by "Execute s:Startup-sequence.FD" |
I also copied HDToolBox from the “IDE Setup” disk into DH0:/Tools for convenience.
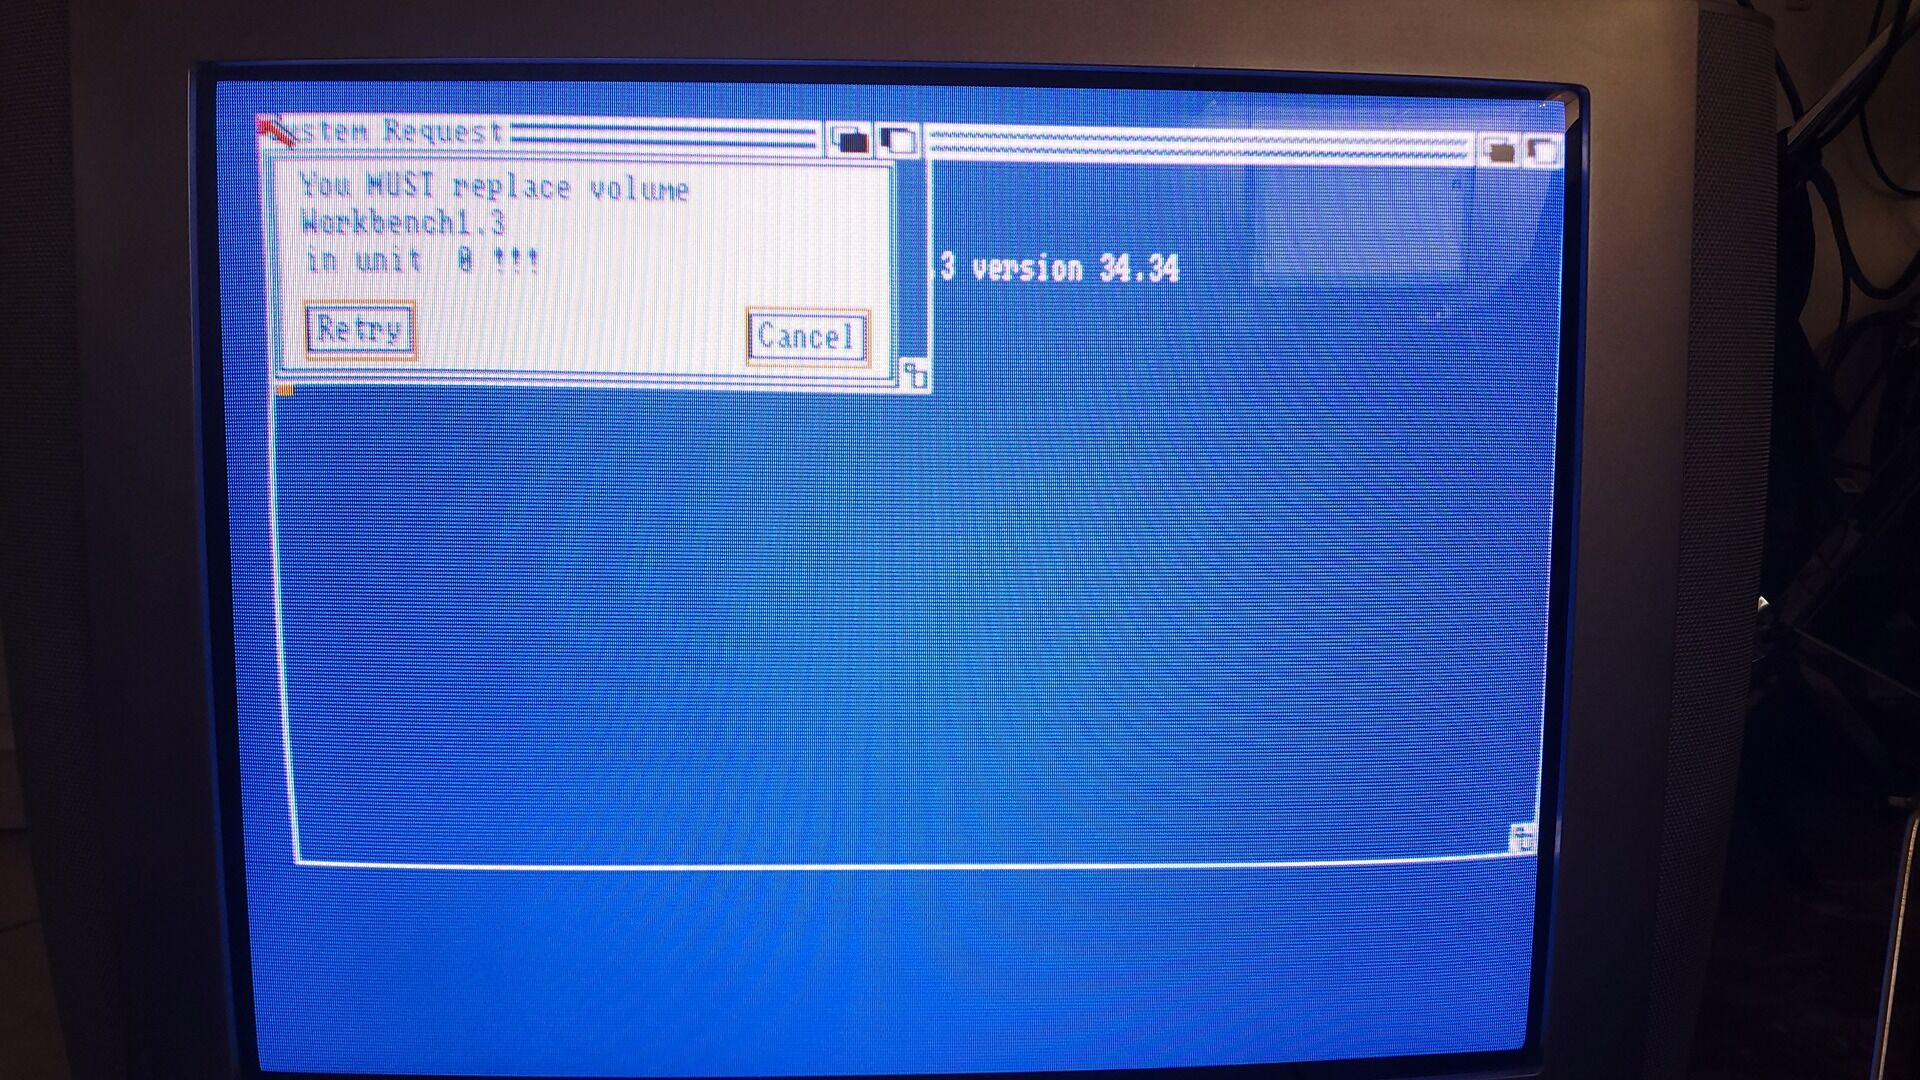
After removing all floppy disks and resetting the virtual machine, the Amiga immediately booted from the hard drive.
Here’s the Workbench 1.3 booting directly from the CF card:

Installed Software
In this chapter, I’m going to give an overview of all the software I installed on the A500, along with their sources — and no, it’s not always from Aminet.net!
Sources
Where I got it
Before diving into the software itself, here’s a quick overview of the main sources I used to gather everything described in this chapter
- List of software compatible with OS 1.3 https://eab.abime.net/showthread.php?t=52283
- https://demozoo.org/
- https://ftp.funet.fi/pub/amiga/
- Workbench 13. Extras
- https://amr.abime.net/
- https://archive.org/download/CommodoreAmigaApplicationsADF
- https://archive.org/download/commodore-amiga-compilations-applications
- https://aminet.net/
- Ramdisk icon from https://github.com/LessNick/Amiga-WorkBench-Re-Design/tree/master
- Hard disk partition icon from A2091 install disk https://amigamuseum.emu-france.info/Fichiers/ADF/Utilitaires-Applications/
Installed Tools
| Software | Purpose | Source |
|---|---|---|
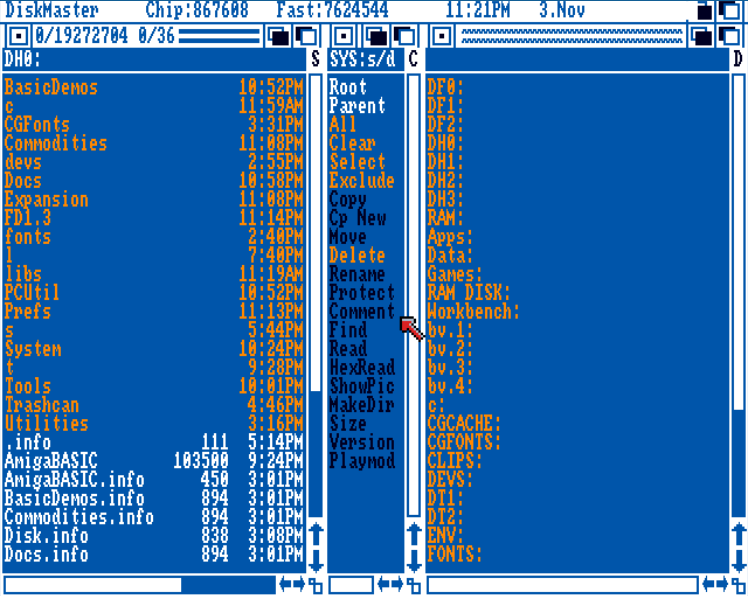
| DiskMaster 2 | File manager | Archive.org – compilation |
| CygnusED 2.12 | Full features tet editor | Archive.org – Neck utilities |
| PowerPacker | Compression and tool to read compressed content | Aminet |
| DMS 1.11 | Disk imager | Aminet |
| TSGui | Graphical interface for ADF and DMS | Aminet |
| LHA 1.38 | Amiga’s default archiving tool | Aminet |
| Mostra 1.06 | Image viewer | ftp.funet.fi |
| Sysinfo | Hardware and system informations | Aminet |
| X-Copy Pro 3.31 | Disk copier | Archive.org – Neck utilities |
| SuperDuper | Disk copier | Aminet / fish-0488 |
| Bootx 4.5 | Antivirus | Aminet / fish-0641 |
Workbench enhancements
| Software | Purpose | Source |
|---|---|---|
| ARP 1.3 | Better AmigaDos commands | Aminet |
| WShell 2.0 | Better shell | Archive.org – original software disk |
| MyMenus | Allow to make custom menu entries | Aminet / fish-0225 |
| Fkeys | Key shortcuts for windows and screen switcher | Aminet / fish-0532 |
| Dmouse 1.20 | Screen and mouse blanker + windows management | Archive.org – Neck utilities |
| MSClock | Clock on title bar | Aminet |
| Setclock v34.3 | Y2k patch for setclock | Obligement |
Applications and games
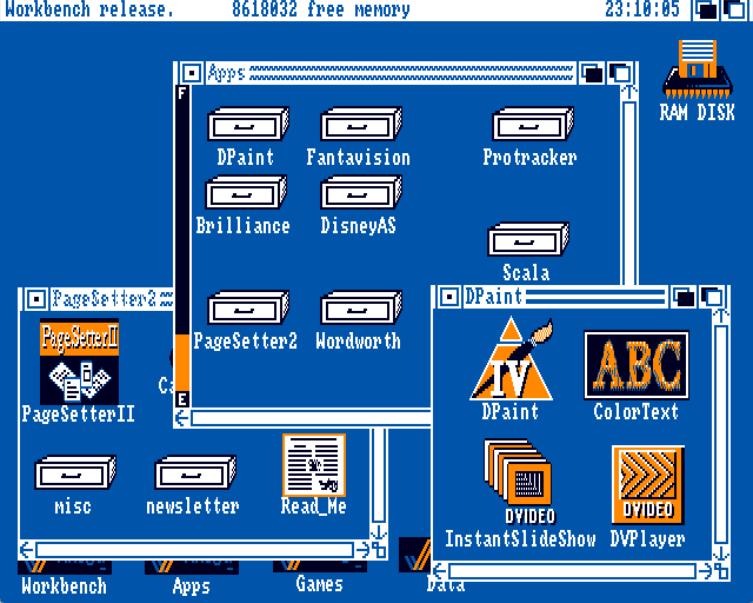
For applications, I simply installed a few classic programs from the era, mostly for fun. By today’s standards, these tools aren’t particularly productive, but they give a great sense of how software worked back then. All of them were sourced from archives.org and ftp.funet.fi (see the “Sources / Where I Got It” section for links):
- Deluxe Paint IV
- Pro-Tracker 3.10 – music editor (https://ftp.funet.fi/pub/amiga/audio/apps/compose/)
- ANIMagic
- Brillance 2 : contains commorodre installer for OS 1.3 => copy to C
- Disney Animation Studio
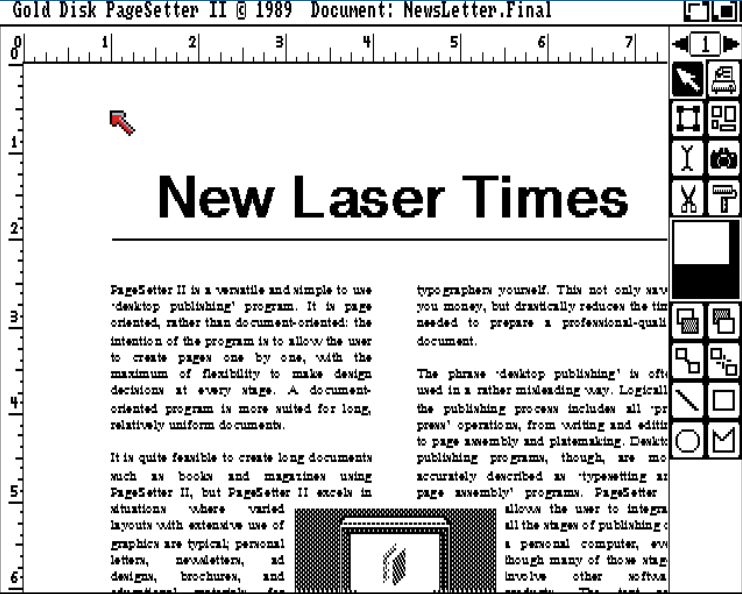
- PageSetter 2
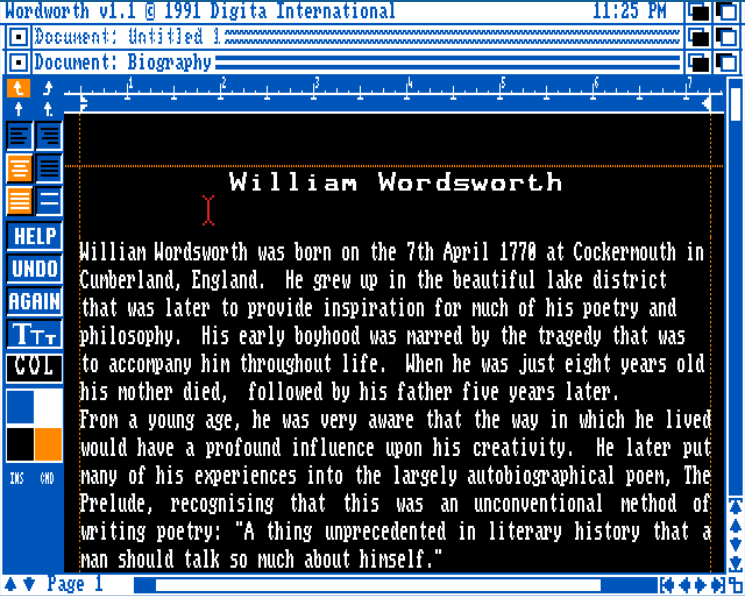
- Wordworth 1.1
- Scala MM 200
As for games, I only included those that are natively installable on the A500. I didn’t see the point of using JST, since I can rely on WHDLoad on my other Amigas. The games I chose come from my personal list of best Amiga titles, curated over time:
- Turbo Trax
- Fiendish freddy
- Lionheart
- MetalKombat
- Ducktales
- Flashback
- Hare Raising Havoc
- Base Jump
- KidChaos
- Conan the Cimmerian
- Dragon Heart
- BosCar
- BlackViper
- MegaTyphoon
Configuration & customizations
This section describes the steps I followed to customize my A500, presented roughly in the order I tackled them. Some steps are explained in more detail than others, depending on the level of customization involved.
Bare minimum for a usable OS
A file manager with OS 1.3 feeling
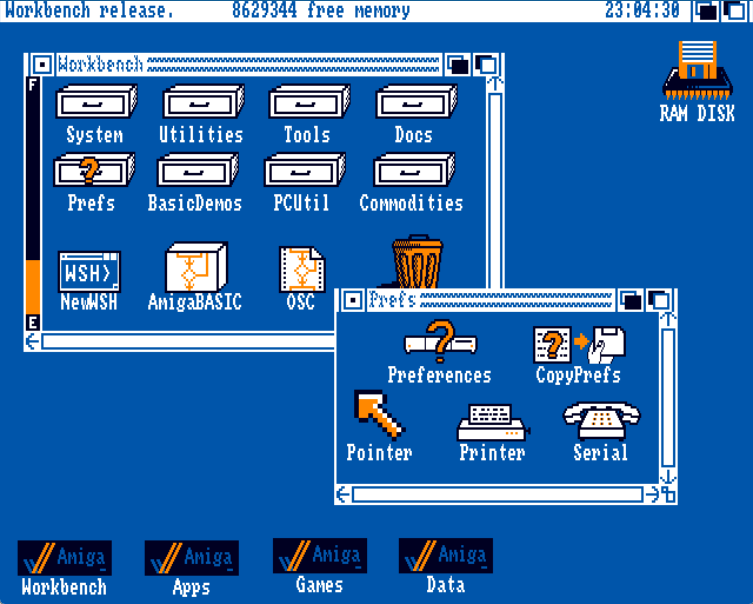
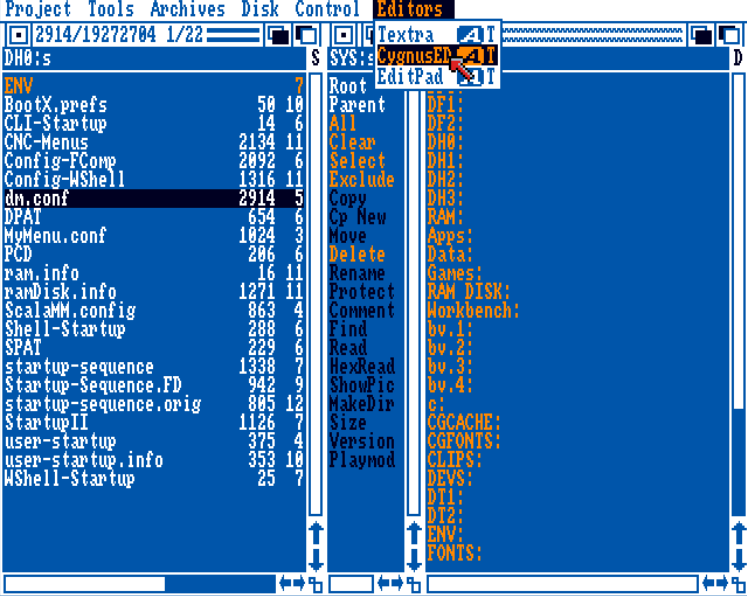
First, I installed DiskMaster 2 — a must-have if you want a proper file manager on base Workbench 1.3, which can’t even display files and directories that have no associated icons.
Here’s what I did to set it up:
- Copied the executable to SYS:c/dm .
- Created a setup file named
dm.conf in
SYS:s with the following customizations:
- SetFormat "NS T DMY A" to remove unnecessary comments from the file list
- Barformat "DiskMaster Chip:%C Fast:%F %T %D.%M"
- Optimized window dimensions
- Added a Version command: AddCmd Version, 20, extern c:version %s; Wait 2
- Added a PlayMod command
- Customized the Editors menu
- Simplified the Archives menu to only LHA + DMS
- Simplified the Tools menu and added Execute script
- Simplified the Project menu
To launch DiskMaster, I run: dm s:dm.conf either from the shell or via a custom menu, as explained later.
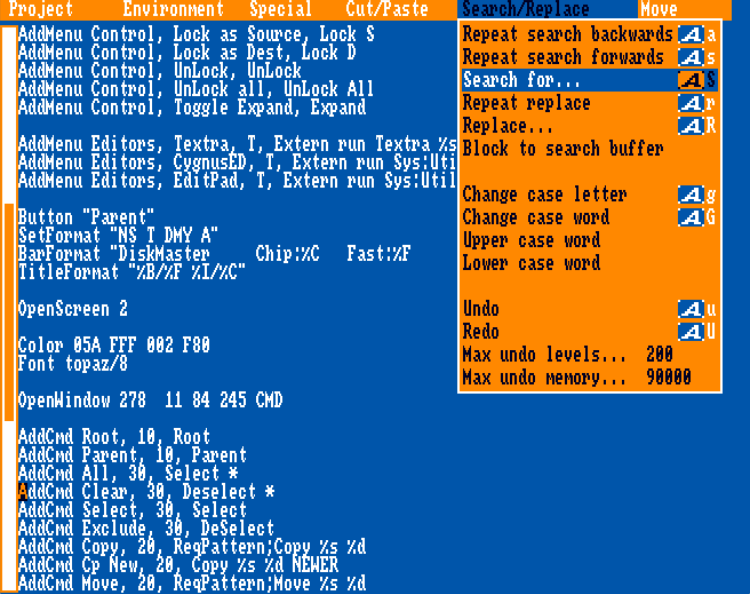
Below is the full configuration file for reference:
AmigaDOS
|
1 2 3 4 5 6 7 8 9 10 11 12 13 14 15 16 17 18 19 20 21 22 23 24 25 26 27 28 29 30 31 32 33 34 35 36 37 38 39 40 41 42 43 44 45 46 47 48 49 50 51 52 53 54 55 56 57 58 59 60 61 62 63 64 65 66 67 68 69 70 71 72 73 74 75 76 77 78 79 |
Reset AddMenu Project, Printer Setup, SetPrinter AddMenu Project, Change Command, ChgCmd AddMenu Project, Save Config, S, SaveConfig AddMenu Project, About, About AddMenu Project, Quit, Q, Confirm "Are you sure you want to quit?" Yes No;Quit AddMenu Tools, Run Selected, Single;External run %s AddMenu Tools, Execute Script, Single;External run Execute %s AddMenu Tools, Swap S<->D, Swap AddMenu Tools, Run DM Script, Single;Batch %s AddMenu Archives, Lha Add, StdIO "CON:0/12/640/100/Add Window";Extern "Lha <* -r a";StdIO CLOSE AddMenu Archives, Lha Extract, StdIO "CON:0/12/640/100/Extract Window";Extern Lha <* x %s;StdIO CLOSE AddMenu Archives, Lha List, StdIO "CON:0/12/640/160/List Window";Extern Lha v %s;Wait;StdIO CLOSE AddMenu Archives, DMS Write, StdIO "CON:0/12/640/160/List Window";Extern DMS write %s TO DF0:;Wait;StdIO CLOSE AddMenu Disk, Format, Format AddMenu Disk, DiskCopy, DiskCopy AddMenu Disk, Format DF0:, Confirm "Are you sure?";Format DF0: AddMenu Disk, Format DF1:, Format DF1: VERIFY "WorkDisk" AddMenu Disk, Clear DF0:, Format DF0: QUICK INSTALL VERIFY AddMenu Disk, Copy DF0: DF0:, DiskCopy DF0: DF0: AddMenu Disk, Copy DF0: DF1:, DiskCopy DF0: DF1: AddMenu Control, Lock as Source, Lock S AddMenu Control, Lock as Dest, Lock D AddMenu Control, UnLock, UnLock AddMenu Control, UnLock all, UnLock All AddMenu Control, Toggle Expand, Expand AddMenu Editors, Textra, T, Extern run Textra %s AddMenu Editors, CygnusED, T, Extern run Sys:Utilities/CygnusED %s AddMenu Editors, EditPad, T, Extern run Sys:Utilities/Notepad %s Button "Parent" SetFormat "NS T DMY A" BarFormat "DiskMaster Chip:%C Fast:%F %T %D.%M" TitleFormat "%B/%F %I/%C" OpenScreen 2 Color 05A FFF 002 F80 Font topaz/8 OpenWindow 278 11 84 245 CMD AddCmd Root, 10, Root AddCmd Parent, 10, Parent AddCmd All, 30, Select * AddCmd Clear, 30, Deselect * AddCmd Select, 30, Select AddCmd Exclude, 30, DeSelect AddCmd Copy, 20, ReqPattern;Copy %s %d AddCmd Cp New, 20, Copy %s %d NEWER AddCmd Move, 20, ReqPattern;Move %s %d AddCmd Delete, 30, ReqPattern;Confirm "All selected files will be lost.";Delete %s AddCmd Rename, 20, Recurse OFF;Rename %s AddCmd Protect, 20, Recurse OFF;Protect %s AddCmd Comment, 20, Recurse OFF;Comment %s AddCmd Find, 20, ReqPattern "Please enter search pattern";Find %s AddCmd Read, 20, Read %s AddCmd HexRead, 20, Read %s HEX AddCmd ShowPic, 20, ShowPic %s AddCmd MakeDir, 20, MakeDir AddCmd Size, 20, UnMark OFF;Check %s AddCmd Version, 20, extern c:version %s; Wait 2 AddCmd Playmod, 20, extern run APPS:Protracker/backplay %s OpenWindow 362 11 278 245 OpenWindow 0 11 278 245 AddAutoCmd FORM????ILBM,ShowPic %s AddAutoCmd FORM????ACBM,ShowPic %s AddAutoCmd FORM????8SVX,ShowPic %s AddAutoCmd FORM????ANIM,Extern View %s AddAutoCmd ??-lh,StdIO "CON:0/12/640/100/Extract Window";Extern Lha <* x %s;StdIO CLOSE AddAutoCmd TEXT,Read %s AddAutoCmd DEFAULT,Read %s HEX |
Text editors
Once you have a proper file manager, the next thing you’ll do most often while configuring and customizing Workbench 1.3 is editing configuration files. For this reason, I installed two excellent text editors — far superior to the default NotePad or ED.
-
Textra: Installed to SYS:c as a lightweight but powerful editor for quick edits and rapid file changes.
-
CygnusED: Installed to SYS:Utilities , with req.library placed in SYS:libs , providing a full-featured, professional editor for more complex tasks (albeit heavier).
Both editors complement each other: Textra for speed, CygnusED for advanced editing.
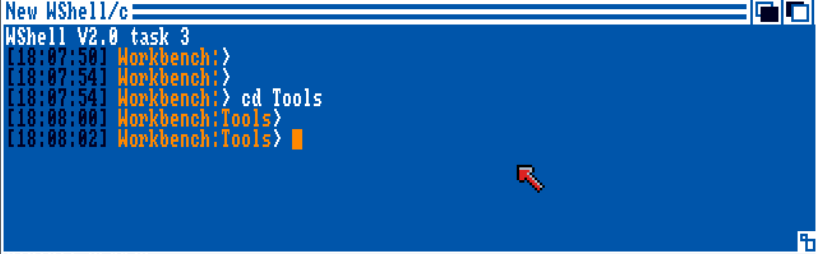
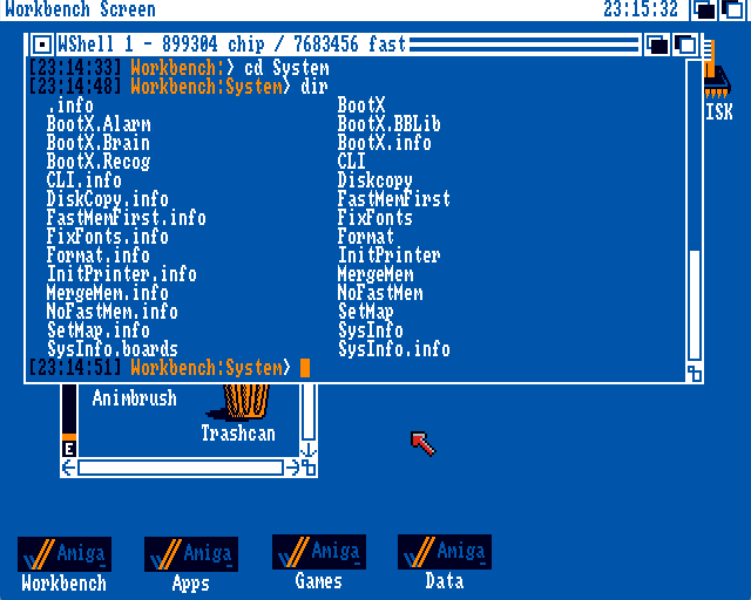
Better shell
If, like me, you’re used to Bash or Zsh, the original Amiga Shell — even in the 3.x releases — feels quite limited, missing some “basic” features we take for granted. Fortunately, two tools make the CLI interface far more user-friendly: ARP 1.3 and WShell.
For ARP, I simply followed the installer and opted not to install the ARP shell, keeping the setup minimal.
WShell, on the other hand, comes with an installer that can be run directly from the CLI: Wshell-install
It doesn’t create an icon, so it’s invisible from Workbench by default. I made several customizations to integrate it better:
- Copied NewWSH to the Workbench partition, allowing WShell to be started via an icon.
- Set the ToolTypes as follows:
AmigaDOS
|
1 2 3 |
CONSOLE=CON:20/15/580/150/WShell/CLOSE FROM=S:WShell-Startup NAME=WShell |
- Configured the default shell window in S:ENV/shellwindow : CON:20/15/580/150/WShell/CLOSE
I also tweaked the FComp configuration (
SYS:s/Config-Fcomp) to get more familiar key usage:
- TAB for autocomplete instead of ESC
- Arrow keys Up/Down for line navigation
- HOME / END for session top/bottom
- PAGE UP / DOWN for session page up/down
Here is the full configuration file for reference:
AmigaDOS
|
1 2 3 4 5 6 7 8 9 10 11 12 13 14 15 16 17 18 19 20 21 22 23 24 25 26 27 28 29 30 31 32 33 34 35 36 |
; Options record: SORT/S,GROUP/S,NOPATH/S,NOTOOLTYPES/S OPTIONS nopath ; notooltypes ; FILETYPE records: `FILETYPE/K,FMT/K,REMOVE/S' FILETYPE TEXT FMT "E %a" FILETYPE ILBM FMT "sys:utilities/display %a*N" FILETYPE DOC FMT "sys:utilities/more %a*N" ; Command records: `COMMAND/K,PATH/K,PAT/K,FMT/K,REMOVE/S' COMMAND EXecute PATH S: ; an argument PATH COMMAND DELete FMT "%f%0 %1 %2 %3%l" ; multiple files COMMAND REName FMT "REName FROM %0 TO %0" ; command-specific rewrite COMMAND tex PAT "#?.tex" COMMAND DVisw PAT "#?.dvi" FMT "%f%r0%l" COMMAND wait FMT "You're waiting ... %0" ; input context example COMMAND VERsion PATH "libs:,devs:" ; Hotkeys: `KEY/K,QUAL/K,PATH/K,PAT/K,FMT/K,AUTO/S,REMOVE/S' KEY 66 QUAL 0 ; TAB key for completion KEY 29 FMT ";Choices: %0 %1 %2 %3 %4 %5 %6 %7 %8 %9" ; Input keys: `KEY/K,QUAL/K,NAME/K,PATH/K,PAT/K,FMT/K,AUTO/S,REMOVE/S' KEY 76 QUAL 8 NAME CTRL-UARROW FMT "*E[101]" ; search up KEY 77 QUAL 8 NAME CTRL-RARROW FMT "*E[100]" ; search down KEY 62 QUAL 0 NAME KPUARROW FMT "*E[103]" ; line up KEY 30 QUAL 0 NAME KPDARROW FMT "*E[102]" ; line down KEY 31 QUAL 0 NAME PGUP FMT "*E[113]" ; page up KEY 63 QUAL 0 NAME PGDOWN FMT "*E[112]" ; page down KEY 61 QUAL 0 NAME HOME FMT "*E[99]" ; session top KEY 29 QUAL 0 NAME END FMT "*E[98]" ; session bottom KEY 79 QUAL 16 NAME LALT-LARROW FMT "*E[79]" ; skip left name alt-control-O KEY 78 QUAL 16 NAME LALT-RARROW FMT "*E[73]" ; skip right name alt-control-I KEY 79 QUAL 8 NAME CTRL-LARROW FMT "*E[85]" ; del left name alt-control-U KEY 78 QUAL 8 NAME CTRL-RARROW FMT "*E[89]" ; del right name alt-control-Y |
I also customized the WShell prompt in S:WShell-Startup to make it more informative and visually clear: the time is displayed between brackets in black (color 2), followed by the current path in orange (color 3).
Here is the content of SYS/s:WShell-Startup :
AmigaDOS
|
1 |
prompt "%2[%t] %3%c%1>" |
Additionally, I modified SYS:/s:ENV/titlebar to display the shell number, free fast memory, and free chip memory:
AmigaDOS
|
1 |
%w %n - %mc chip / %mf fast |
Finally, I set WShell as the default CLI by adding it somewhere in the startup-sequence.
AmigaDOS
|
1 2 3 4 5 |
; WShell assign remove CON: ; is replaced by the next line C:DHOpts CON: PIP: ; set the new display handler C:FComp ; enable completion and history navigation C:SetExecute ; use wshell for Execute command |
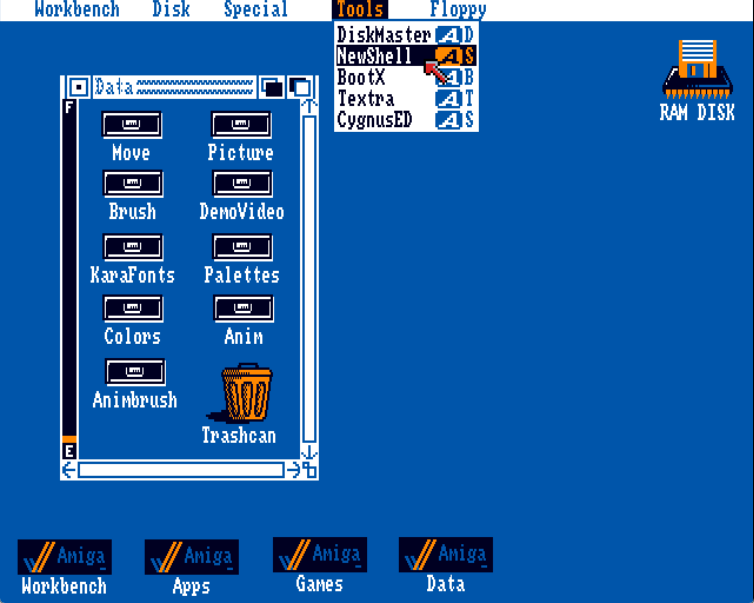
Custom menu for quick access to most usefull tools
The final touch for a more usable Workbench 1.3 is customizing the system menu to include shortcuts to the most frequently used tools, such as DiskMaster, Textra, and NewShell.
To achieve this, I installed MyMenu following the official documentation:
- Copied the main program to SYS:C .
- Copied MyMenu.conf to SYS:S and configured it according to my preferences.
- Copied MyMenu-Handler to SYS:L
- Called MyMenu in the startup-sequence, right after LoadWB.
The full configuration file is as follows:
AmigaDOS
|
1 2 3 4 5 6 7 8 9 10 |
color 2 menu <D> Tools DiskMaster | CLI SYS:c/dm SYS:s/dm.conf menu <S> Tools NewShell | WB SYS:NewWSH menu <B> Tools BootX | WB SYS:System/bootx menu <T> Tools Textra | CLI SYS:c/Textra menu <S> Tools CygnusED | WB SYS:Utilities/CygnusED menu <A> Floppy Dms-Adf | WB SYS:tools/tsgui menu <D> Floppy SuperDuper | WB SYS:tools/SD menu <X> Floppy X-Copy | CLI SYS:c/xCopy |
Workbench enhancements & tools
The following software is not strictly necessary, but each clearly enhances the Workbench 1.3 experience. They are easy to install, require little to no configuration, and bring useful improvements to everyday use. I’ll go quickly through them:
| Software | Purpose | Comment |
|---|---|---|
| FKeys | keyboard shortcuts to switch between Windows and screen | Copied to a new Commodities drawer on SYS: and run from the startup-sequence. |
| Dmouse | Fine-tuned mouse accelerator and screen blanker | Executable to SYS:C, handler to SYS:L launched via startup-sequence: dmouse -a1 -t0 -A0 |
| Msclock | Displays the time on the menu bar | Same installation logic as DMouse: executable to SYS:C , handler to SYS:L, then run from startup-sequence: msclock -d -m -o . |
| PPnew | Powerpacker tools & libraries (required for some packed programs and mods) | Copied PPMore/powerpacker.library to SYS:libs , pp and PPMore to SYS:C , PPMore.doc to SYS:docs , same for ppShow and ppAnim |
| LHA | Default file archiver on AmigaOS | Ran LHA_e138.run to extract files, then copied lha, splitlzh , and joinlzh to SYS:C |
| BootX | Up-to-date antivirus for OS 1.3 | On my setup it crashes often, but it can detect viruses in memory, bootblocks, floppies, and files. Installation: libs/reqtools.library.13 to SYS:libs, all BootX files to SYS:system , BootX.doc to SYS:docs, latest recognition file to SYS:system. Adjusted colors for a Workbench 1.3 look: color1=blue 05A, color2=white FFF, color3=black 002, color4=orange F80. |
| Setclock v34.3 | Y2K-compatible clock for OS 1.3 | Prevents year misinterpretation (e.g., 2000=1979). |
| Mostra 1.08 | Image viewer | Copied to SYS:Utilities |
These tools improve daily usability, add visual polish, and ensure compatibility with classic file formats and archives.
Floppy disk Tools
Even though I can manipulate Amiga floppies on my other machines, sometimes it’s quicker to work directly on the A500 when it’s connected. The following software makes floppy management much easier:
| Software | Purpose | Comment |
|---|---|---|
| X-Copy | Well-known floppy disk copier | Copied to SYS:C |
| DMS amd TSGui | Floppy disk (un)archiver and associated GUI | Ran dms1111.run to extract DMS, and unlha for the TSGui archive. Then copied: dms to SYS:C, DMS.doc to SYS:docs, tsgui to SYS:Tools |
| SuperDuper | Another floppy disk copier | Copied sd to SYS:Tools and documentation to SYS:Docs. |
Tested but removed
I also tried installing and using some other interesting tools and hacks, but ultimately removed them because they caused crashes or unexpected behavior on my setup:
- ZoomDaemon: Adds a “new window” widget to minimize windows. However, it also displayed this for invisible Workbench windows, which looked awkward — and it caused frequent crashes. At least my system is stable again without it.
- NoClick2: Ran fine in Amiberry/UAE, but crashed on the real Amiga 500.
- SimGen + RunBack: Fun for adding backdrop pictures, but it led to unexpected and frequent Guru Meditation errors.
Sometimes, stability wins over flashy features, especially when working with a vintage machine like the A500.
Startup-sequence
It’s now time to share my startup-sequence. Of course, everyone has their own rules and preferences, so I’m simply presenting mine as an example.
My approach was guided by three main goals:
- Simplify the default OS 1.3 naming conventions: instead of juggling startup-sequence, startup-sequence.FD, and startupII.
- Consolidate everything related to my base but customized Workbench into a single file for easier maintenance.
- Create a user-startup, similar to OS 2.0+, mainly to handle application-specific assigns and personal tweaks.
The full startup-sequence file is provided below for reference:
AmigaDOS
|
1 2 3 4 5 6 7 8 9 10 11 12 13 14 15 16 17 18 19 20 21 22 23 24 25 26 27 28 29 30 31 32 33 34 35 36 37 38 39 40 41 42 43 44 45 46 47 48 49 50 51 52 53 54 55 56 57 58 59 60 61 62 63 64 65 66 67 68 |
SetPatch >NIL: SetPatchMrgCop >NIL: SYS:System/FastMemFirst SetClock load Addbuffers df0: 30 ; faster text rendition FF >NIL: -0 ; preload most used commands resident c:Resident pure resident c:List pure resident c:CD pure resident c:Mount pure resident c:Assign pure resident c:Makedir pure resident c:dir pure resident CLI L:Shell-Seg SYSTEM pure add; activate Shell ; assign assign sys: dh0: assign c: SYS:c assign L: SYS:l assign FONTS: SYS:fonts assign CGFONTS: SYS:CGFonts assign CGCACHE: SYS:CGFonts/CGCache assign S: SYS:s assign DEVS: SYS:devs assign LIBS: SYS:libs ; Ramdisk config makedir ram:t makedir ram:env makedir ram:clipboards assign t: ram:t assign ENV: ram:env assign CLIPS: ram:clipboards copy S:env/ ENV: QUIET copy S:Ramdisk.info ram:Disk.info copy S:ram.info ram:.info ; Mounts mount speak: mount aux: mount pipe: ; WShell assign remove CON: ; is replaced by the next line C:DHOpts CON: PIP: ; set the new displaz handler C:FComp ; enable completion and history navigation C:SetExecute ; use wshell for Execute command ; set keymap SYS:System/SetMap F ;set path for Workbench path ram: c: sys:utilities sys:system s: sys:prefs add C:dmouse >NIL: -a1 -t0 -A0 C:msclock >NIL: -d -m -o SYS:commodities/Fkeys >NIL: execute s:user-startup ; load workbench LoadWB delay C:MyMenu endcli |
ScreenShots
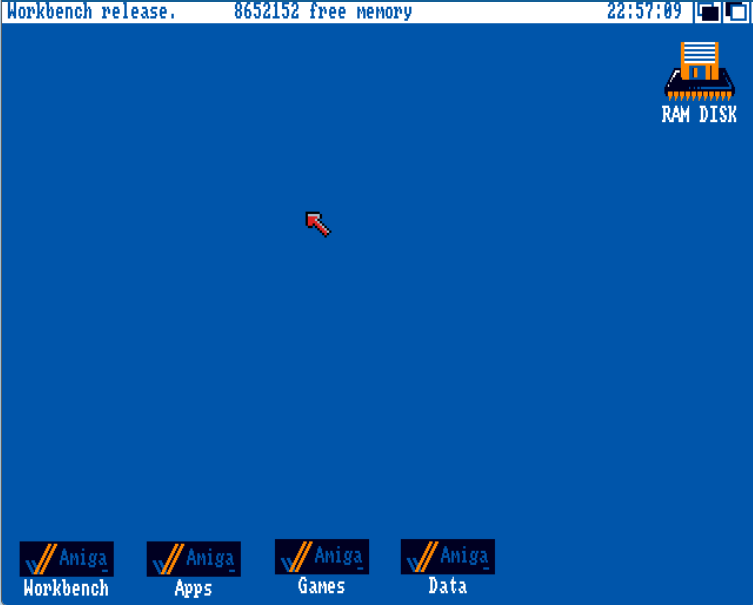
To produce cleaner and more polished screenshots, I captured them using Amiberry / UAE rather than the real hardware.
This allows for crisp images that clearly show the Workbench, tools, and customizations without the glare or color inconsistencies that sometimes appear on a CRT display.
Below are several examples illustrating my setup and configurations:

See it live on real hardware
If you want to see the fully restored and customized Amiga 500 in action, here’s a video showing it running on the real hardware. It demonstrates the Workbench, tools, and all the tweaks described in this article.